1. Introduction
1.绪论
In this tutorial, we’ll learn what non-blocking data structures are and why they are an important alternative to lock-based concurrent data structures.
在本教程中,我们将学习什么是非阻塞数据结构,以及为什么它们是基于锁的并发数据结构的重要替代品。
First, we’ll go over some terms like obstruction-free, lock-free, and wait-free.
首先,我们将讨论一些术语,如无障碍、无锁和无等待。
Second, we’ll look at the basic building blocks of non-blocking algorithms like CAS (compare-and-swap).
其次,我们将看看非阻塞算法的基本构件,如CAS(比较和交换)。
Third, we’ll look at the implementation of a lock-free queue in Java, and finally, we’ll outline an approach on how to achieve wait-freedom.
第三,我们将看看Java中无锁队列的实现,最后,我们将概述如何实现等待-自由的方法。
2. Lock Versus Starvation
2.锁与饿的关系
First, let’s look at the difference between a blocked and a starving thread.
首先,让我们来看看阻塞线程和饥饿线程的区别。
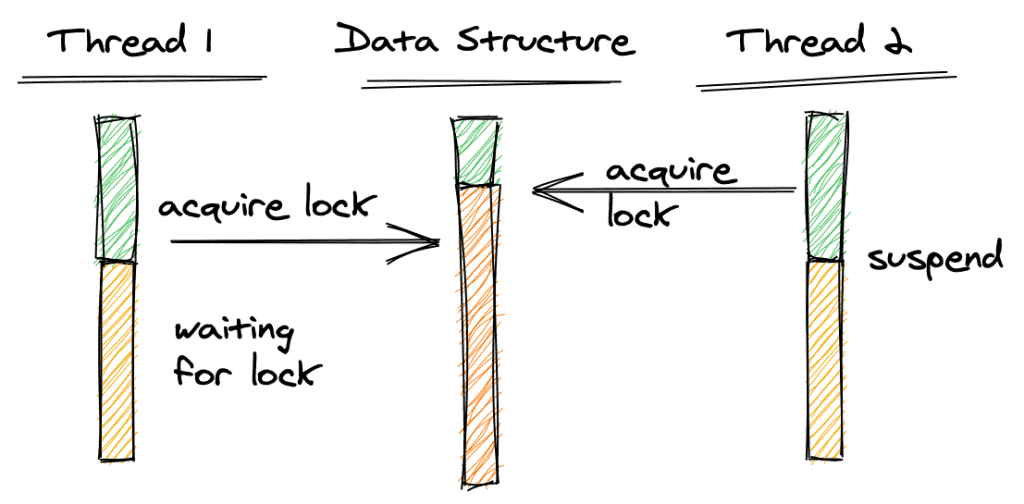
In the above picture, Thread 2 acquires a lock on the data structure. When Thread 1 attempts to acquire a lock as well, it needs to wait until Thread 2 releases the lock; it won’t proceed before it can get the lock. If we suspend Thread 2 while it holds the lock, Thread 1 will have to wait forever.
在上图中,线程2获得了一个数据结构的锁。当线程1也试图获得一个锁时,它需要等待,直到线程2释放锁;在它获得锁之前,它不会继续进行。如果我们在线程2持有锁时暂停它,线程1将不得不永远等待。
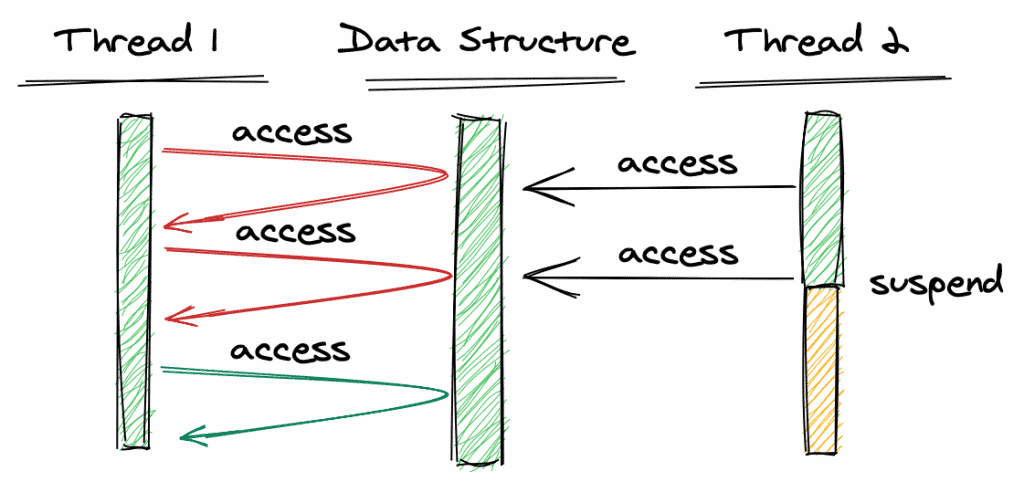
The next picture illustrates thread starvation:
下一张图片说明了线程饥饿的情况。
Here, Thread 2 accesses the data structure but does not acquire a lock. Thread 1 attempts to access the data structure at the same time, detects the concurrent access, and returns immediately, informing the thread that it could not complete (red) the operation. Thread 1 will then try again until it succeeds to complete the operation (green).
这里,线程2访问了数据结构,但没有获得锁。线程1试图同时访问该数据结构,检测到并发访问,并立即返回,通知线程它无法完成(红色)操作。然后线程1将再次尝试,直到成功完成操作(绿色)。
The advantage of this approach is that we don’t need a lock. However, what can happen is that if Thread 2 (or other threads) access the data structure with high frequency, then Thread 1 needs a large number of attempts until it finally succeeds. We call this starvation.
这种方法的好处是,我们不需要锁。然而,可能发生的情况是,如果线程2(或其他线程)以高频率访问数据结构,那么线程1需要大量的尝试,直到最终成功。我们称之为饥饿。
Later on we’ll see how the compare-and-swap operation achieves non-blocking access.
稍后我们将看到比较和交换操作如何实现非阻塞访问。
3. Types of Non-Blocking Data Structures
3.非阻塞性数据结构的类型
We can distinguish between three levels of non-blocking data structures.
我们可以将非阻塞数据结构区分为三个层次。
3.1. Obstruction-Free
3.1 无障碍物
Obstruction-freedom is the weakest form of a non-blocking data structure. Here, we only require that a thread is guaranteed to proceed if all other threads are suspended.
阻碍-自由是非阻塞数据结构的最弱形式。在这里,我们只要求在所有其他线程都暂停的情况下,保证一个线程能够继续进行。
More precisely, a thread won’t continue to starve if all other threads are suspended. This is different from using locks in that sense, that if the thread was waiting for a lock and a thread that holds the lock is suspended, the waiting thread would wait forever.
更确切地说,如果所有其他线程都被暂停,一个线程就不会继续饿死。这与使用锁在这个意义上是不同的,如果线程在等待一个锁,而持有该锁的线程被暂停,等待的线程将永远等待。
3.2. Lock-Free
3.2 无锁定
A data structure provides lock-freedom if, at any time, at least one thread can proceed. All other threads may be starving. The difference to obstruction-freedom is that there is at least one non-starving thread even if no threads are suspended.
如果在任何时候,至少有一个线程可以继续进行,那么一个数据结构就可以提供锁自由度。所有其他线程可能都是饥饿的。与阻塞自由的区别在于,即使没有线程被暂停,也至少有一个非饥饿线程。
3.3. Wait-Free
3.3 无等待
A data structure is wait-free if it’s lock-free and every thread is guaranteed to proceed after a finite number of steps, that is, threads will not starve for an “unreasonably large” number of steps.
如果一个数据结构是无锁的,并且每个线程都能保证在有限的步骤后继续进行,也就是说,线程不会在 “不合理的大 “步骤中饿死。
3.4. Summary
3.4.总结
Let’s summarize these definitions in graphical representation:
让我们用图解的方式来总结这些定义。
The first part of the image shows obstruction-freedom as Thread 1 (top thread) can proceed (green arrow) as soon we suspend the other threads (at the bottom in yellow).
图片的第一部分显示了障碍自由,因为线程1(顶部线程)可以继续进行(绿色箭头),只要我们暂停其他线程(底部为黄色)。
The middle part shows lock-freedom. At least Thread 1 can progress while others may be starving (red arrow).
中间部分显示了锁的自由度。至少线程1可以取得进展,而其他线程可能处于饥饿状态(红色箭头)。
The last part shows wait-freedom. Here, we guarantee that Thread 1 can continue (green arrow) after a certain period of starvation (red arrows).
最后一部分显示了等待自由度。在这里,我们保证线程1在一定的饥饿期(红色箭头)后可以继续进行。
4. Non-Blocking Primitives
4.非阻塞性基元
In this section, we’ll look at three basic operations that help us to build lock-free operations on data structures.
在这一节中,我们将看一下三个基本操作,它们可以帮助我们在数据结构上建立无锁操作。
4.1. Compare and Swap
4.1.比较和互换
One of the basic operations used to avoid locking is the compare-and-swap (CAS) operation.
用于避免锁定的基本操作之一是比较和交换(CAS)操作。
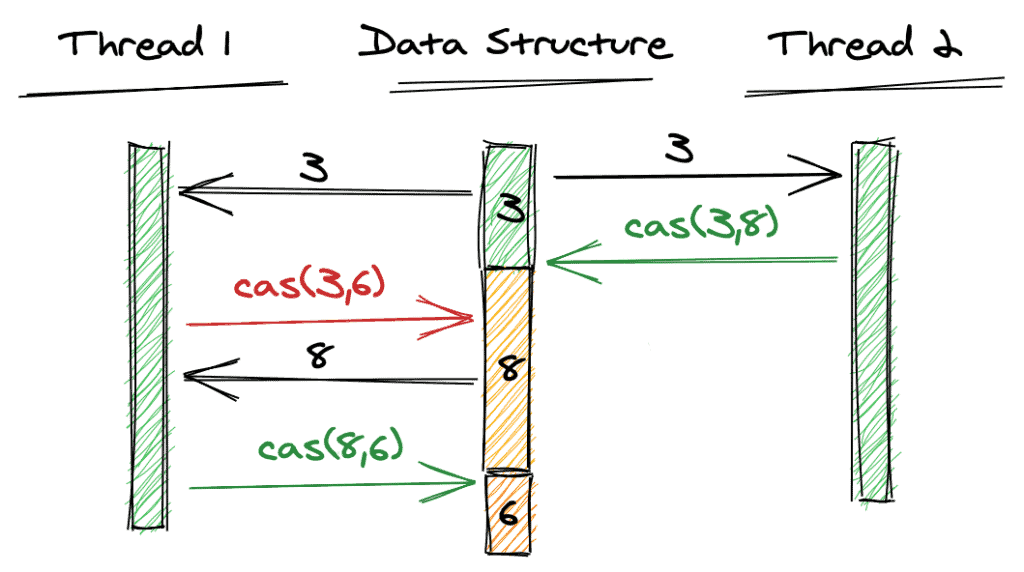
The idea of compare-and-swap is, that a variable is only updated if it still has the same value as at the time we had fetched the value of the variable from the main memory. CAS is an atomic operation, which means that fetch and update together are one single operation:
比较和交换的概念是,只有当一个变量的值与我们从主内存中获取该变量的值时相同时,才会被更新。CAS是一个原子操作,这意味着取值和更新是一个单一的操作。
Here, both threads fetch the value 3 from the main memory. Thread 2 succeeds (green) and updates the variable to 8. As the first CAS by thread 1 expects the value to be still 3, the CAS fails (red). Therefore, Thread 1 fetches the value again, and the second CAS succeeds.
这里,两个线程都从主内存中获取了3的值。线程2成功(绿色)并将变量更新为8。由于线程1的第一个CAS期望值仍然是3,CAS失败(红色)。因此,线程1再次获取该值,第二个CAS成功了。
The important thing here is that CAS does not acquire a lock on the data structure but returns true if the update was successful, otherwise it returns false.
这里重要的是,CAS没有获取数据结构上的锁,但如果更新成功,则返回true,否则返回false。
The following code snippet outlines how CAS works:
下面的代码片断概述了CAS的工作原理。
volatile int value;

boolean cas(int expectedValue, int newValue) {
    if(value == expectedValue) {
        value = newValue;
        return true;
    }
    return false;
}
We only update the value with the new value if it still has the expected value, otherwise, it returns false. The following code snippet shows how CAS can be called:
我们只在新值仍然具有预期值的情况下用新值进行更新,否则,它将返回false。下面的代码片断显示了如何调用CAS。
void testCas() {
    int v = value;
    int x = v + 1;

    while(!cas(v, x)) {
        v = value;
        x = v + 1;
    }
}
We attempt to update our value until the CAS operation succeeds, that is, returns true.
我们试图更新我们的值,直到CAS操作成功,即返回true。
However, it’s possible that a thread gets stuck in starvation. That can happen if other threads perform a CAS on the same variable at the same time, so the operation will never succeed for a particular thread (or will take an unreasonable amount of time to succeed). Still, if the compare-and-swap fails, we know that another thread has succeeded, thus we also ensure global progress, as required for lock-freedom.
然而,一个线程有可能被卡在饥饿状态。如果其他线程同时对同一变量进行CAS操作,这种情况就会发生,所以对某一线程来说,该操作永远不会成功(或者需要不合理的时间才能成功)。尽管如此,如果比较和交换失败了,我们知道另一个线程已经成功了,因此我们也确保了全局的进展,这是对锁自由的要求。
It’s important to note that the hardware should support compare-and-swap, to make it a truly atomic operation without the use of locking.
需要注意的是,硬件应该支持比较和交换,以使其成为真正的原子操作,而无需使用锁定。。
Java provides an implementation of compare-and-swap in the class sun.misc.Unsafe. However, in most cases, we should not use this class directly, but Atomic variables instead.
Java在类sun.misc.Unsafe中提供了一个比较和交换的实现。然而,在大多数情况下,我们不应该直接使用这个类,而应该使用Atomic variables代替。
Furthermore, compare-and-swap does not prevent the A-B-A problem. We’ll look at that in the following section.
此外,比较和交换并不能防止A-B-A问题。我们将在下一节看这个问题。
4.2. Load-Link/Store-Conditional
4.2.负载-链接/存储-条件
An alternative to compare-and-swap is load-link/store-conditional. Let’s first revisit compare-and-swap. As we’ve seen before, CAS only updates the value if the value in the main memory is still the value we expect it to be.
比较与交换的一个替代方案是加载链接/存储条件。让我们首先重新审视一下比较与交换。正如我们之前所看到的,CAS只在主内存中的值仍然是我们期望的值时才会更新。
However, CAS also succeeds if the value had changed, and, in the meantime, has changed back to its previous value.
然而,如果数值发生了变化,同时又变回了之前的数值,CAS也会成功。
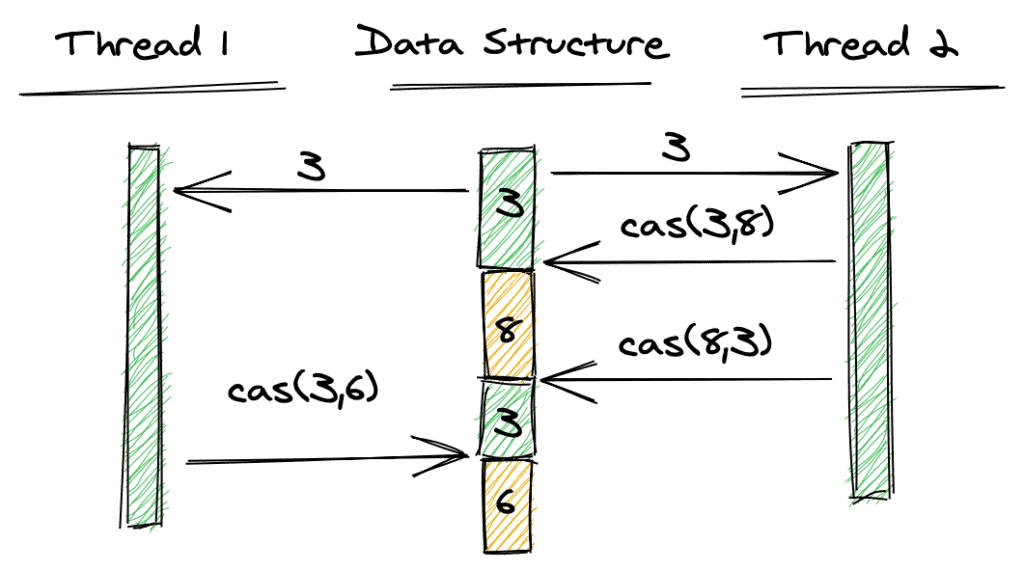
The below image illustrates this situation:
下面的图片说明了这种情况。
Both, thread 1 and Thread 2 read the value of the variable, which is 3. Then Thread 2 performs a CAS, which succeeds in setting the variable to 8. Then again, Thread 2 performs a CAS to set the variable back to 3, which succeeds as well. Finally, Thread 1 performs a CAS, expecting the value 3, and succeeds as well, even though the value of our variable was modified twice in between.
线程1和线程2都读取了变量的值,即3。然后线程2执行一个CAS,成功地将变量设置为8。然后,线程2再次执行一个CAS,将变量设回3,也成功了。最后,线程1执行了一个CAS,期望值为3,也成功了,尽管这中间我们的变量的值被修改了两次。
This is called the A-B-A problem. This behavior might not be a problem depending on the use-case, of course. However, it might not be desired for others. Java provides an implementation of load-link/store-conditional with the AtomicStampedReference class.
这就是所谓的A-B-A问题。当然,这种行为可能不是一个问题,这取决于使用情况。然而,对于其他人来说,它可能并不理想。Java通过AtomicStampedReference类提供了load-link/store-conditional的实现。
4.3. Fetch and Add
4.3.取出和添加
Another alternative is fetch-and-add. This operation increments the variable in the main memory by a given value. Again, the important point is that the operation happens atomically, which means no other thread can interfere.
另一个选择是fetch-and-add。这个操作将主内存中的变量增加一个给定值。同样,重要的一点是,该操作是原子发生的,这意味着没有其他线程可以干扰。
Java provides an implementation of fetch-and-add in its atomic classes. Examples are AtomicInteger.incrementAndGet(), which increments the value and returns the new value; and AtomicInteger.getAndIncrement(), which returns the old value and then increments the value.
Java在其原子类中提供了fetch-and-add的实现。例如,AtomicInteger.incrementAndGet(),它增加值并返回新值;以及AtomicInteger.getAndIncrement(),它返回旧值,然后增加值。
5. Accessing a Linked Queue from Multiple Threads
5.从多个线程访问一个链接队列
To better understand the problem of two (or more) threads accessing a queue simultaneously, let’s look at a linked queue and two threads trying to add an element concurrently.
为了更好地理解两个(或更多)线程同时访问一个队列的问题,让我们看看一个链接队列和两个试图同时添加一个元素的线程。
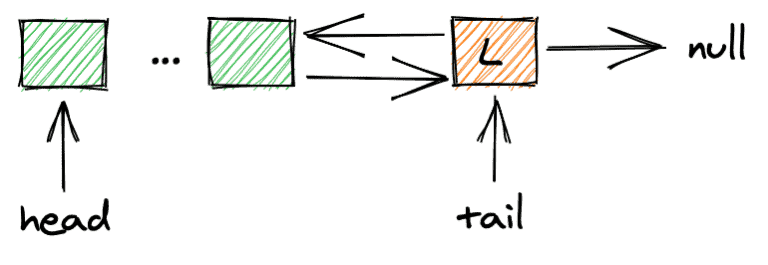
The queue we’ll look at is a doubly-linked FIFO queue where we add new elements after the last element (L) and the variable tail points to that last element:
我们要看的队列是一个双链FIFO队列,我们在最后一个元素(L)之后添加新元素,变量tail指向最后一个元素。
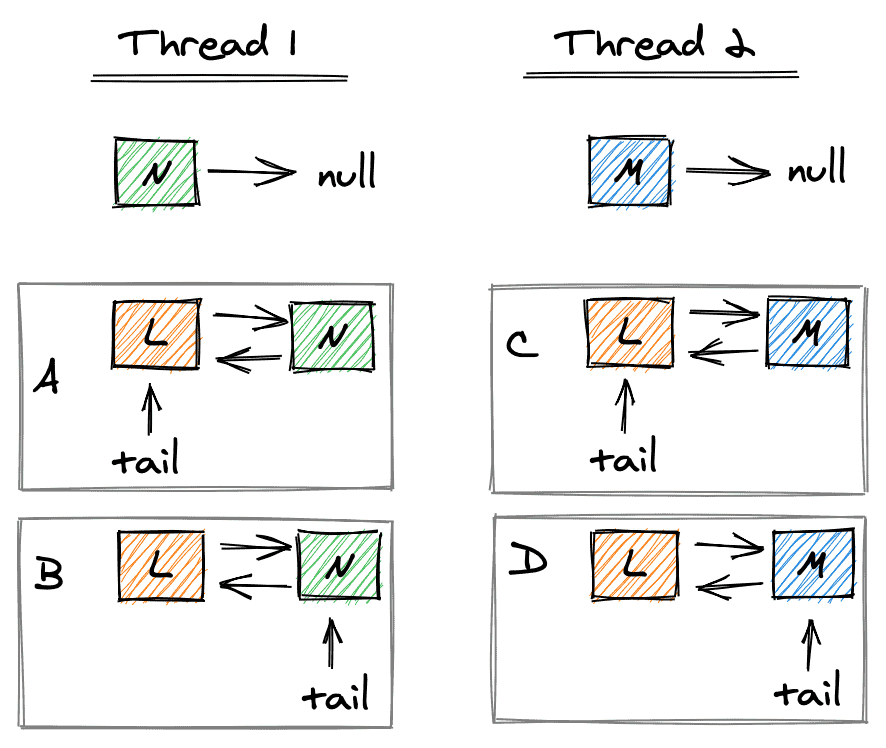
To add a new element, the threads need to perform three steps: 1) create the new elements (N and M), with the pointer to the next element set to null; 2) have the reference to the previous element point to L and the reference to the next element of L point to N (M, respectively). 3) Have tail point to N (M, respectively):
为了增加一个新元素,线程需要执行三个步骤。1)创建新元素(N和M),下一个元素的指针设置为null;2)让前一个元素的引用指向L,L的下一个元素的引用指向N(M,分别)。3)让tail指向N(M,分别)。
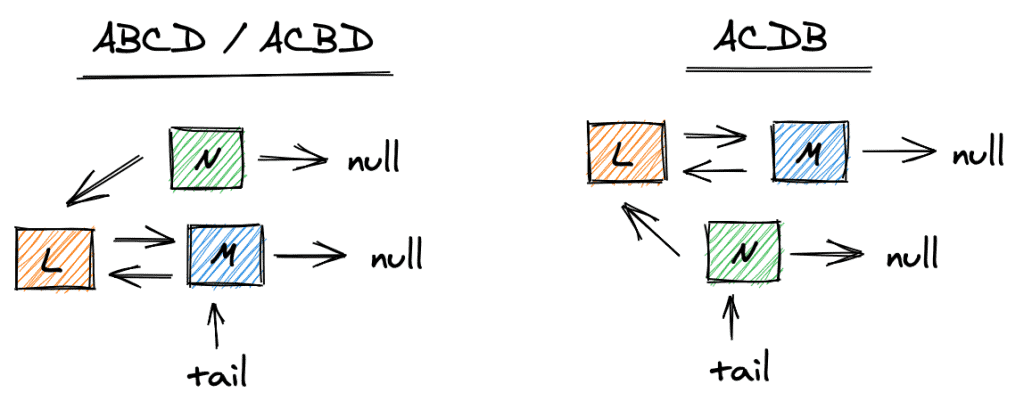
What can go wrong if the two threads perform these steps simultaneously? If the steps in the above picture execute in the order ABCD or ACBD, L, as well as tail, will point to M. N will remain disconnected from the queue.
如果两个线程同时执行这些步骤,会出什么问题?如果上图中的步骤按照ABCD或ACBD的顺序执行,L以及tail将指向M,N将保持与队列的断开连接。
If the steps execute in the order ACDB, tail will point to N, while L will point to M, which will cause an inconsistency in the queue:
如果步骤按ACDB的顺序执行,tail将指向N,而L将指向M,这将导致队列中的不一致。
Of course, one way to solve this problem is to have one thread acquire a lock on the queue. The solution we’ll look at in the following chapter will solve the problem with the help of a lock-free operation by using the CAS operation we’ve seen earlier.
当然,解决这个问题的一个方法是让一个线程获得队列上的锁。我们将在下一章中看到的解决方案将通过使用我们之前看到的CAS操作,在无锁操作的帮助下解决这个问题。。
6. A Non-Blocking Queue in Java
6.Java中的无阻塞队列
Let’s look at a basic lock-free queue in Java. First, let’s look at the class members and the constructor:
让我们看看Java中的一个基本的无锁队列。首先,让我们看一下类的成员和构造函数。
public class NonBlockingQueue<T> {

    private final AtomicReference<Node<T>> head, tail;
    private final AtomicInteger size;

    public NonBlockingQueue() {
        head = new AtomicReference<>(null);
        tail = new AtomicReference<>(null);
        size = new AtomicInteger();
        size.set(0);
    }
}
The important part is the declaration of the head and tail references as AtomicReferences, which ensures that any update on these references is an atomic operation. This data type in Java implements the necessary compare-and-swap operation.
重要的部分是将头部和尾部的引用声明为AtomicReferences,这确保了对这些引用的任何更新都是一个原子操作。Java中的这种数据类型实现了必要的比较和交换操作。
Next, let’s look at the implementation of the Node class:
接下来,让我们看一下Node类的实现。
private class Node<T> {
    private volatile T value;
    private volatile Node<T> next;
    private volatile Node<T> previous;

    public Node(T value) {
        this.value = value;
        this.next = null;
    }

    // getters and setters
}
Here, the important part is to declare the references to the previous and next node as volatile. This ensures that we update these references always in the main memory (thus are directly visible to all threads). The same for the actual node value.
在这里,重要的部分是将前一个和后一个节点的引用声明为volatile。这确保了我们总是在主内存中更新这些引用(因此对所有线程都是直接可见的)。对于实际的节点值也是如此。
6.1. Lock-Free add
6.1.无锁的添加
Our lock-free add operation will make sure that we add the new element at the tail and won’t be disconnected from the queue, even if multiple threads want to add a new element concurrently:
我们的无锁add操作将确保我们在尾部添加新元素,并且不会从队列中断开,即使多个线程想要同时添加一个新元素。
public void add(T element) {
    if (element == null) {
        throw new NullPointerException();
    }

    Node<T> node = new Node<>(element);
    Node<T> currentTail;
    do {
        currentTail = tail.get();
        node.setPrevious(currentTail);
    } while(!tail.compareAndSet(currentTail, node));

    if(node.previous != null) {
        node.previous.next = node;
    }

    head.compareAndSet(null, node); // for inserting the first element
    size.incrementAndGet();
}
The essential part to pay attention to is the highlighted line. We attempt to add the new node to the queue until the CAS operation succeeds to update the tail, which must still be the same tail to which we appended the new node.
需要注意的重要部分是突出显示的那一行。我们试图将新的节点添加到队列中,直到CAS操作成功更新尾部,尾部必须仍然是我们附加了新节点的那个尾部。
6.2. Lock-Free get
6.2.无锁的get</em
Similar to the add-operation, the lock-free get-operation will make sure that we return the last element and move the tail to the current position:
与add-操作类似,无锁的get-操作将确保我们返回最后一个元素,并将尾部移动到当前位置。
public T get() {
    if(head.get() == null) {
        throw new NoSuchElementException();
    }

    Node<T> currentHead;
    Node<T> nextNode;
    do {
        currentHead = head.get();
        nextNode = currentHead.getNext();
    } while(!head.compareAndSet(currentHead, nextNode));

    size.decrementAndGet();
    return currentHead.getValue();
}
Again, the essential part to pay attention to is the highlighted line. The CAS operation ensures that we move the current head only if no other node has been removed in the meantime.
同样,需要注意的重要部分是突出显示的那一行。CAS操作确保只有在没有其他节点被移除的情况下我们才会移动当前的头。
Java already provides an implementation of a non-blocking queue, the ConcurrentLinkedQueue. It’s an implementation of the lock-free queue from M. Michael and L. Scott described in this paper. An interesting side-note here is that the Java documentation states that it’s a wait-free queue, where it’s actually lock-free. The Java 8 documentation correctly calls the implementation lock-free.
Java已经提供了一个非阻塞队列的实现,即ConcurrentLinkedQueue。这是 M. Michael 和 L. Scott 在 这篇论文中描述的无锁队列的一个实现。一个有趣的侧重点是,Java 文档指出它是一个无等待队列,而实际上它是无锁。Java 8 文档正确地将该实现称为无锁。
7. Wait-Free Queues
7 无等待的队列
As we’ve seen, the above implementation is lock-free, however, not wait-free. The while loops in both the add and get method can potentially loop for a long time (or, though unlikely, forever) if there are many threads accessing our queue.
正如我们所看到的,上述实现是无锁的,但是,不是无等待的。如果有许多线程访问我们的队列,那么add和get方法中的while循环可能会循环很长时间(或者,尽管不太可能,永远)。
How can we achieve wait-freedom? The implementation of wait-free algorithms, in general, is quite tricky. We refer the interested reader to this paper, which describes a wait-free queue in detail. In this article, let’s look at the basic idea of how we can approach a wait-free implementation of a queue.
我们怎样才能实现无等待?一般来说,无等待算法的实现是相当棘手的。我们请感兴趣的读者参考本文,其中详细描述了一个无等待队列。在这篇文章中,让我们来看看如何实现队列的无等待状态的基本思路。
A wait-free queue requires that every thread makes guaranteed progress (after a finite number of steps). In other words, the while loops in our add and get methods must succeed after a certain number of steps.
无等待队列要求每个线程都能保证进度(在有限的步数之后)。换句话说,我们的添加和获取方法中的while循环必须在一定数量的步骤后成功。
In order to achieve that, we assign a helper thread to every thread. If that helper thread succeeds to add an element to the queue, it will help the other thread to insert its element before inserting another element.
为了实现这一目标,我们为每个线程分配了一个辅助线程。如果该辅助线程成功地将一个元素添加到队列中,它将帮助其他线程在插入另一个元素之前插入其元素。
As the helper thread has a helper itself, and, down the whole list of threads, every thread has a helper, we can guarantee that a thread succeeds the insertion latest after every thread has done one insertion. The following figure illustrates the idea:
由于帮助者线程本身也有一个帮助者,而且,在整个线程列表中,每个线程都有一个帮助者,我们可以保证,在每个线程都做了一次插入后,一个线程最晚成功插入。下图说明了这个想法。
Of course, things become more complicated when we can add or remove threads dynamically.
当然,当我们可以动态地添加或删除线程时,事情就会变得更加复杂。
8. Conclusion
8.结语
In this article, we saw the fundamentals of non-blocking data structures. We explained the different levels and basic operations like compare-and-swap.
在这篇文章中,我们看到了非阻塞数据结构的基本原理。我们解释了不同级别和基本操作,如比较和交换。
Then, we looked at a basic implementation of a lock-free queue in Java. Finally, we outlined the idea of how to achieve wait-freedom.
然后,我们看了一个Java中无锁队列的基本实现。最后,我们概述了如何实现等待-自由的想法。
The full source code for all examples in this article is available over on GitHub.
本文中所有例子的完整源代码都可以在GitHub上找到。。
