1. Overview
1.概述
Multi-tenancy refers to an architecture in which a single instance of a software application serves multiple tenants or customers.
多租户指的是一种架构,其中一个软件应用程序的单一实例为多个租户或客户服务。
It enables the required degree of isolation between tenants so that the data and resources used by tenants are separated from the others.
它实现了租户之间所需的隔离程度,使租户使用的数据和资源与其他租户分开。
In this tutorial, we’ll see how to configure multi-tenancy in a Spring Boot application with Spring Data JPA. Also, we add security to tenants using JWT.
在本教程中,我们将看到如何使用Spring Data JPA在Spring Boot应用程序中配置多租户。此外,我们还使用JWT向租户添加安全性。
2. Multi-Tenancy Models
2.多租户模式
There are three main approaches to multi-tenant systems:
多租户系统有三种主要方法。
- Separate Database
- Shared Database and Separate Schema
- Shared Database and Shared Schema
2.1. Separate Database
2.1.独立的数据库
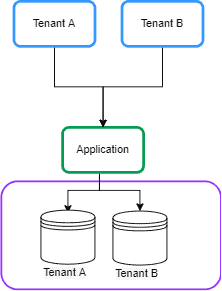
In this approach, each tenant’s data is kept in a separate database instance and is isolated from other tenants. This is also known as Database per Tenant:
在这种方法中,每个租户的数据被保存在一个单独的数据库实例中,并与其他租户隔离。这也被称为每租户数据库。
2.2. Shared Database and Separate Schema
2.2.共享数据库和独立的模式
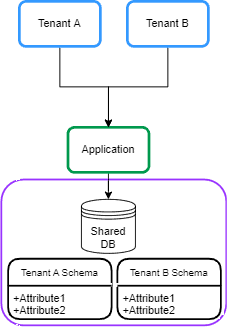
In this approach, each tenant’s data is kept in a distinct schema on a shared database. This is sometimes called Schema per Tenant:
在这种方法中,每个租户的数据被保存在一个共享数据库的不同模式中。这有时被称为每租户模式。
2.3. Shared Database and Shared Schema
2.3.共享的数据库和共享的模式
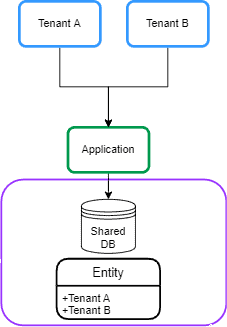
In this approach, all tenants share a database, and every table has a column with the tenant identifier:
在这种方法中,所有租户共享一个数据库,每个表都有一列是租户标识符。
3. Maven Dependencies
3.Maven的依赖性
Let’s start by declaring spring-boot-starter-data-jpa dependency in a Spring Boot application in the pom.xml:
让我们先在pom.xml中声明Spring Boot应用程序中的spring-boot-starter-data-jpa依赖性。
<dependency>
    <groupId>org.springframework.boot</groupId>
    <artifactId>spring-boot-starter-data-jpa</artifactId>
</dependency>
Also, we’ll be using a PostgreSQL database, so let’s also add postgresql dependency to the pom.xml file:
另外,我们将使用PostgreSQL数据库,所以我们也要在pom.xml文件中添加postgresql依赖性。
<dependency>
    <groupId>org.postgresql</groupId>
    <artifactId>postgresql</artifactId>
    <scope>runtime</scope>
</dependency>
The Separate Database and Shared Database and Separate Schema approaches are similar in the configuration in a Spring Boot application. In this tutorial, we focus on the Separate Database approach.
分离数据库和共享数据库以及分离模式的方法在Spring Boot应用程序中的配置是相似的。在本教程中,我们重点讨论分离数据库的方法。
4. Dynamic DataSource Routing
4.动态数据源路由
In this section, we’ll describe the general idea behind the Database per Tenant model.
在本节中,我们将描述每个租户的数据库模型背后的一般想法。
4.1. AbstractRoutingDataSource
4.1.AbstractRoutingDataSource
The general idea to implement multi-tenancy with Spring Data JPA is routing data sources at runtime based on the current tenant identifier.
用Spring Data JPA实现多租户的总体思路是在运行时根据当前租户标识符路由数据源。
In order to do that, we can use AbstractRoutingDatasource as a way of dynamically determining the actual DataSource based on the current tenant.
为了做到这一点,我们可以使用AbstractRoutingDatasource作为一种基于当前租户动态确定实际DataSource的方式。
Let’s create a MultitenantDataSource class that extends the AbstractRoutingDataSource class:
让我们创建一个MultitenantDataSource类,它扩展了AbstractRoutingDataSource类。
public class MultitenantDataSource extends AbstractRoutingDataSource {

    @Override
    protected String determineCurrentLookupKey() {
        return TenantContext.getCurrentTenant();
    }
}
The AbstractRoutingDataSource routes getConnection calls to one of the various target DataSources based on a lookup key.
AbstractRoutingDataSource根据一个查找键将getConnection调用路由到各种目标DataSources之一。
The lookup key is usually determined through some thread-bound transaction context. So, we create a TenantContext class for storing the current tenant in each request:
查询键通常通过一些线程绑定的事务上下文来确定。因此,我们创建了一个TenantContext类,用于在每个请求中存储当前租户。
public class TenantContext {

    private static final ThreadLocal<String> CURRENT_TENANT = new ThreadLocal<>();

    public static String getCurrentTenant() {
        return CURRENT_TENANT.get();
    }

    public static void setCurrentTenant(String tenant) {
        CURRENT_TENANT.set(tenant);
    }
}
We use a ThreadLocal object for keeping the tenant ID for the current request. Also, we use the set method to store the tenant ID and the get() method to retrieve it.
我们使用一个ThreadLocal对象来保存当前请求的租户ID。此外,我们使用set方法来存储租户ID,并使用get()方法来检索它。
4.2. Setting Tenant ID per Request
4.2.按请求设置租户ID
After this configuration setup, when we perform any tenant operation, we need to know the tenant ID before creating any transaction. So, we need to set the tenant ID in a Filter or Interceptor before hitting controller endpoints.
在这个配置设置之后,当我们执行任何租户操作时,我们需要在创建任何事务之前知道租户ID。因此,我们需要在点击控制器端点之前,在Filter 或Interceptor中设置租户ID。
Let’s add a TenantFilter for setting the current tenant in TenantContext:
让我们添加一个TenantFilter来设置TenantContext中的当前租户。
@Component
@Order(1)
class TenantFilter implements Filter {

    @Override
    public void doFilter(ServletRequest request, ServletResponse response,
      FilterChain chain) throws IOException, ServletException {

        HttpServletRequest req = (HttpServletRequest) request;
        String tenantName = req.getHeader("X-TenantID");
        TenantContext.setCurrentTenant(tenantName);

        try {
            chain.doFilter(request, response);
        } finally {
            TenantContext.setCurrentTenant("");
        }

    }
}
In this filter, we get the tenant ID from the request header X-TenantID and set it in TenantContext. We pass control down the chain of filters. Our finally block ensures that the current tenant is reset before the next request. This avoids any risk of cross-tenant request contamination.
在这个过滤器中,我们从请求头X-TenantID中获得租户ID,并将其设置在TenantContext。我们将控制权沿着过滤器的链条向下传递。我们的finally块确保当前租户在下一个请求前被重置。这就避免了任何跨租户请求污染的风险。
In the next section, we’ll implement the tenants and data source declaration in the Database per Tenant model.
在下一节,我们将在Database per Tenant模型中实现租户和数据源声明。
5. Database Approach
5.数据库方法
In this section, we’ll implement multi-tenancy based on a Database per Tenant model.
在本节中,我们将基于每租户数据库模型实现多租户。
5.1. Tenants Declaration
5.1.租户声明
In this approach, we have multiple databases, so we need to declare multiple data sources in the Spring Boot application.
在这种方法中,我们有多个数据库,所以我们需要在Spring Boot应用程序中声明多个数据源。
We can configure the DataSources in separate tenant files. So, we create the tenant_1.properties file in allTenants directory and declare the tenant’s data source:
我们可以在单独的租户文件中配置DataSources。因此,我们在allTenants目录下创建tenant_1.properties文件并声明租户的数据源。
name=tenant_1
datasource.url=jdbc:postgresql://localhost:5432/tenant1
datasource.username=postgres
datasource.password=123456
datasource.driver-class-name=org.postgresql.Driver
Moreover, we create a tenant_2.properties file for another tenant:
此外,我们为另一个租户创建一个tenant_2.properties文件。
name=tenant_2
datasource.url=jdbc:postgresql://localhost:5432/tenant2
datasource.username=postgres
datasource.password=123456
datasource.driver-class-name=org.postgresql.Driver
We will end up with a file for each tenant:
我们最终将为每个租户建立一个档案。
5.2. DataSource Declaration
5.2.数据源声明
Now we need to read the tenant’s data and create DataSource using the DataSourceBuilder class. Also, we set DataSources in the AbstractRoutingDataSource class.
现在我们需要读取租户的数据,并使用DataSourceBuilder 类创建DataSource。同时,我们在AbstractRoutingDataSource类中设置DataSources。
Let’s add a MultitenantConfiguration class for that:
让我们为之添加一个MultitenantConfiguration类。
@Configuration
public class MultitenantConfiguration {

    @Value("${defaultTenant}")
    private String defaultTenant;

    @Bean
    @ConfigurationProperties(prefix = "tenants")
    public DataSource dataSource() {
        File[] files = Paths.get("allTenants").toFile().listFiles();
        Map<Object, Object> resolvedDataSources = new HashMap<>();

        for (File propertyFile : files) {
            Properties tenantProperties = new Properties();
            DataSourceBuilder dataSourceBuilder = DataSourceBuilder.create();

            try {
                tenantProperties.load(new FileInputStream(propertyFile));
                String tenantId = tenantProperties.getProperty("name");

                dataSourceBuilder.driverClassName(tenantProperties.getProperty("datasource.driver-class-name"));
                dataSourceBuilder.username(tenantProperties.getProperty("datasource.username"));
                dataSourceBuilder.password(tenantProperties.getProperty("datasource.password"));
                dataSourceBuilder.url(tenantProperties.getProperty("datasource.url"));
                resolvedDataSources.put(tenantId, dataSourceBuilder.build());
            } catch (IOException exp) {
                throw new RuntimeException("Problem in tenant datasource:" + exp);
            }
        }

        AbstractRoutingDataSource dataSource = new MultitenantDataSource();
        dataSource.setDefaultTargetDataSource(resolvedDataSources.get(defaultTenant));
        dataSource.setTargetDataSources(resolvedDataSources);

        dataSource.afterPropertiesSet();
        return dataSource;
    }

}
First, we read the tenants’ definitions from allTenants directory and create the DataSource bean using DataSourceBuilder class. After that, we need to set a default data source and target source for MultitenantDataSource class to connect to using setDefaultTargetDataSource and setTargetDataSources, respectively. We set one of the tenant’s names as a default data source from the application.properties file using defaultTenant attribute. To finalize the initialization of the data source, we call the afterPropertiesSet() method.
首先,我们从allTenants目录中读取租户的定义,并使用DataSourceBuilderclass创建DataSourcebean。之后,我们需要为MultitenantDataSource类设置一个默认的数据源和目标源,分别使用setDefaultTargetDataSource和setTargetDataSources来连接。我们使用defaultTenant属性从application.properties文件中设置一个租户的名字作为默认数据源。为了最终完成数据源的初始化,我们调用afterPropertiesSet()方法。
Now that our setup is ready.
现在,我们的设置已经准备就绪。
6. Test
6.测试
6.1. Creating Database for Tenants
6.1.为租户创建数据库
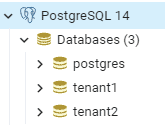
First, we need to define two databases in PostgreSQL:
首先,我们需要在PostgreSQL中定义两个数据库:。
After that, we create an employee table in each database using the below script:
之后,我们使用以下脚本在每个数据库中创建一个employee表。
create table employee (id int8 generated by default as identity, name varchar(255), primary key (id));6.2. Sample Controller
6.2.样品控制器
Let’s create an EmployeeController class for creating and saving the Employee entity in the specified tenant in the request header:
让我们创建一个EmployeeController类,用于创建和保存请求头中指定租户的Employee实体。
@RestController
@Transactional
public class EmployeeController {

    @Autowired
    private EmployeeRepository employeeRepository;

    @PostMapping(path = "/employee")
    public ResponseEntity<?> createEmployee() {
        Employee newEmployee = new Employee();
        newEmployee.setName("Baeldung");
        employeeRepository.save(newEmployee);
        return ResponseEntity.ok(newEmployee);
    }
}
6.3. Sample Request
6.3.样品要求
Let’s create a post request for inserting an employee entity in tenant ID tenant_1 using Postman:
让我们使用Postman创建一个帖子请求,用于在租户IDtenant_1中插入一个employee实体。
Moreover, we send a request to tenant_2:
此外,我们向租户_2发送了一个请求。
After that, when we check the database, we see that each request has been saved in the related tenant’s database.
之后,当我们检查数据库时,我们看到每个请求都被保存在相关租户的数据库中。
7. Security
7.安全问题
Multi-tenancy should protect customers’ data within a shared environment. This means each tenant can only access their data. Therefore, we need to add security to our tenants. Let’s build a system where the user has to log into the application and get a JWT, which is then used to prove the right to access the tenancy.
多租户应该在一个共享环境中保护客户的数据。这意味着每个租户只能访问他们的数据。因此,我们需要为我们的租户添加安全性。让我们建立一个系统,用户必须登录应用程序并获得一个JWT,然后用它来证明访问租户的权利。
7.1. Maven Dependencies
7.1.Maven的依赖性
Let’s start by adding the spring-boot-starter-security dependency in the pom.xml:
让我们首先在pom.xml中添加spring-boot-starter-security依赖性。
<dependency>
    <groupId>org.springframework.boot</groupId>
    <artifactId>spring-boot-starter-security</artifactId>
</dependency>
Also, we need to generate and verify the JWT. To do that, we add the jjwt to our pom.xml:
此外,我们还需要生成和验证JWT。要做到这一点,我们将jjwt添加到我们的pom.xml。
<dependency>
    <groupId>io.jsonwebtoken</groupId>
    <artifactId>jjwt</artifactId>
    <version>0.9.1</version>
</dependency>
7.2. Security Configuration
7.2.安全配置
First, we need to provide the authentication capability for the tenant’s user. For simplicity, let’s use the in-memory user declaration in SecurityConfiguration class:
首先,我们需要为租户的用户提供认证能力。为了简单起见,让我们在SecurityConfiguration类中使用内存中的用户声明。
@Override
protected void configure(AuthenticationManagerBuilder auth) throws Exception {
    auth.inMemoryAuthentication()
      .passwordEncoder(passwordEncoder())
      .withUser("user")
      .password(passwordEncoder().encode("baeldung"))
      .roles("tenant_1");

    auth.inMemoryAuthentication()
      .passwordEncoder(passwordEncoder())
      .withUser("admin")
      .password(passwordEncoder().encode("baeldung"))
      .roles("tenant_2");
}
We add two users for two tenants. Moreover, we consider the tenant as a role. According to the above code, username user and admin have access to tenant_1 and tenant_2, respectively.
我们为两个租户添加两个用户。此外,我们将租户视为一个角色。根据上述代码,用户名user和admin分别对tenant_1和tenant_2有访问权限。
Now, we create a filter for the authentication of users. Let’s add the LoginFilter class:
现在,我们为用户的认证创建一个过滤器。让我们添加LoginFilter类。
public class LoginFilter extends AbstractAuthenticationProcessingFilter {

    public LoginFilter(String url, AuthenticationManager authManager) {
        super(new AntPathRequestMatcher(url));
        setAuthenticationManager(authManager);
    }

    @Override
    public Authentication attemptAuthentication(HttpServletRequest req, HttpServletResponse res)
      throws AuthenticationException, IOException, ServletException {

        AccountCredentials creds = new ObjectMapper().
          readValue(req.getInputStream(), AccountCredentials.class);

        return getAuthenticationManager().authenticate(
          new UsernamePasswordAuthenticationToken(creds.getUsername(),
            creds.getPassword(), Collections.emptyList())
        );
    }
The LoginFilter class extends AbstractAuthenticationProcessingFilter. The AbstractAuthenticationProcessingFilter intercepts a request and attempts to perform authentication using attemptAuthentication() method. In this method, we map the user credentials to the AccountCredentials DTO class and authenticate the user against the in-memory authentication manager:
LoginFilter类扩展了AbstractAuthenticationProcessingFilter。AbstractAuthenticationProcessingFilter拦截一个请求,并尝试使用attemptAuthentication()方法来执行认证。在这个方法中,我们将用户证书映射到AccountCredentials DTO类,并针对内存中的认证管理器对用户进行认证。
public class AccountCredentials {

    private String username;
    private String password;

   // getter and setter methods
}
7.3. JWT
7.3 JWT
Now we need to generate the JWT and add the tenant ID. In order to do that, we override successfulAuthentication() method. This method executes after successful authentication:
现在我们需要生成JWT并添加租户ID。为了做到这一点,我们重写successfulAuthentication()方法。这个方法在认证成功后执行。
@Override
protected void successfulAuthentication(HttpServletRequest req, HttpServletResponse res,
  FilterChain chain, Authentication auth) throws IOException, ServletException {

    Collection<? extends GrantedAuthority> authorities = auth.getAuthorities();
    String tenant = "";
    for (GrantedAuthority gauth : authorities) {
        tenant = gauth.getAuthority();
    }

    AuthenticationService.addToken(res, auth.getName(), tenant.substring(5));
}
According to the above code, we get the user’s role and add it JWT. To do that, we create AuthenticationService class and addToken() method:
根据上面的代码,我们获得用户的角色并将其添加到JWT中。为了做到这一点,我们创建了AuthenticationService类和addToken()方法。
public class AuthenticationService {

    private static final long EXPIRATIONTIME = 864_000_00; // 1 day in milliseconds
    private static final String SIGNINGKEY = "SecretKey";
    private static final String PREFIX = "Bearer";

    public static void addToken(HttpServletResponse res, String username, String tenant) {
        String JwtToken = Jwts.builder().setSubject(username)
          .setAudience(tenant)
          .setExpiration(new Date(System.currentTimeMillis() + EXPIRATIONTIME))
          .signWith(SignatureAlgorithm.HS512, SIGNINGKEY)
          .compact();
        res.addHeader("Authorization", PREFIX + " " + JwtToken);
    }
The addToken method generated the JWT that contains tenant ID as an audience claim and added it to the Authorization header in the response.
addToken方法生成了包含租户ID的JWT,作为audience索赔,并将其添加到响应中的Authorization头。
Finally, we add the LoginFilter in SecurityConfiguration class:
最后,我们在SecurityConfiguration类中添加LoginFilter。
@Override
protected void configure(HttpSecurity http) throws Exception {
    http
      .authorizeRequests()
      .antMatchers("/login").permitAll()
      .anyRequest().authenticated()
      .and()
      .sessionManagement()
      .sessionCreationPolicy(SessionCreationPolicy.STATELESS)
      .and()
      .addFilterBefore(new LoginFilter("/login", authenticationManager()),
        UsernamePasswordAuthenticationFilter.class)
      .addFilterBefore(new AuthenticationFilter(),
        UsernamePasswordAuthenticationFilter.class)
      .csrf().disable()
      .headers().frameOptions().disable()
      .and()
      .httpBasic();
}
Moreover, we add the AuthenticationFilter class for setting the Authentication in SecurityContextHolder class:
此外,我们添加了AuthenticationFilter类,用于在SecurityContextHolder类中设置Authentication。
public class AuthenticationFilter extends GenericFilterBean {

    @Override
    public void doFilter(ServletRequest req, ServletResponse res, FilterChain chain)
      throws IOException, ServletException {

        Authentication authentication = AuthenticationService.getAuthentication((HttpServletRequest) req);
        SecurityContextHolder.getContext().setAuthentication(authentication);

        chain.doFilter(req, res);
    }
}
7.4. Getting Tenant ID from JWT
7.4.从JWT中获取租户ID
Let’s modify the TenantFilter for setting the current tenant in TenantContext:
让我们修改TenantFilter,用于设置TenantContext中的当前租户。
String tenant = AuthenticationService.getTenant((HttpServletRequest) req);
TenantContext.setCurrentTenant(tenant);
In this situation, we get the tenant ID from the JWT using the getTenant() method from AuthenticationService class:
在这种情况下,我们使用AuthenticationService 类中的getTenant() 方法从JWT中获得租户ID。
public static String getTenant(HttpServletRequest req) {
    String token = req.getHeader("Authorization");
    if (token == null) {
        return null;
    }
    String tenant = Jwts.parser()
      .setSigningKey(SIGNINGKEY)
      .parseClaimsJws(token.replace(PREFIX, ""))
      .getBody()
      .getAudience();
    return tenant;
}
8. Security Test
8.安全测试
8.1. JWT Generation
8.1.JWT的生成
Let’s generate the JWT for the username user. To do that, we post the credential to /login endpoints:
让我们为用户名user生成JWT。要做到这一点,我们将凭证发布到/login端点。
Let’s check the token:
让我们检查一下令牌。
eyJhbGciOiJIUzUxMiJ9.eyJzdWIiOiJ1c2VyIiwiYXVkIjoidGVuYW50XzEiLCJleHAiOjE2NTk2MDk1Njd9.When we decode the token, we find out the tenant ID sets as the audience claim:
当我们解码令牌时,我们发现租户ID设置为audienceclaim。
{
    alg: "HS512"
}.
{
    sub: "user",
    aud: "tenant_1",
    exp: 1659609567
}.
8.2. Sample Request
8.2.样品要求
Let’s create a post request for inserting an employee entity using the generated token:
让我们创建一个帖子请求,使用生成的token插入一个employee实体。
We set the generated token in the Authorization header. The tenant ID has been extracted from the token and set in the TenantContext.
我们在Authorization头中设置生成的令牌。租户ID已经从令牌中提取,并设置在TenantContext中。
9. Conclusion
9.结语
In this article, we looked at different multi-tenancy models.
在这篇文章中,我们研究了不同的多租户模式。
We described the required class for adding multi-tenancy in the Spring Boot application using Spring Data JPA for Separate Database and Shared Database and Separate Schema models.
我们描述了在Spring Boot应用程序中使用Spring Data JPA为分离数据库和共享数据库以及分离模式添加多租户的所需类。
Then, we set up the required environment for testing the multi-tenancy in the PostgreSQL database.
然后,我们在PostgreSQL数据库中设置了测试多租户的所需环境。
Finally, we added security to the tenants using JWT.
最后,我们使用JWT为租户增加了安全性。
As always, the full source code of this tutorial is available over on GitHub.
一如既往,本教程的完整源代码可在GitHub上获取。


