1. Introduction
1.绪论
In modern software development, the term pipeline gets used a lot. But what is it?
在现代软件开发中,管道这个术语被经常使用。但它是什么呢?
Generally speaking, a build pipeline is a set of automated steps that move code from development to production.
一般来说,构建管道是一组将代码从开发到生产的自动化步骤。
Build pipelines are great for implementing continuous integration workflows for software. They allow us to build smaller changes with greater frequency, with the goal of finding bugs sooner and reducing their impact.
构建管道对于实施软件的持续集成工作流程非常重要。它们允许我们以更高的频率构建更小的变化,目的是更快地发现错误并减少其影响。
In this tutorial, we’ll look at building a simple build pipeline using Travis CI.
在本教程中,我们将研究如何使用Travis CI构建一个简单的构建管道。
2. Steps in a Build Pipeline
2.构建管道的步骤
A build pipeline can consist of many different steps, but at a minimum, it should include:
构建管道可以由许多不同的步骤组成,但至少应该包括。
- Compiling code: in our case, that means compiling Java source code into class files
- Executing tests: like running unit tests and possibly integration tests
- Deploying artifacts: packaging complied code into artifacts, say into jar files, and deploying them
If an application uses different technologies, then additional steps can be included in the build pipeline. For example, we might have an additional step that minifies JavaScript files or publishes updated API documentation.
如果一个应用程序使用了不同的技术,那么可以在构建管道中包含额外的步骤。例如,我们可能会有一个额外的步骤来简化JavaScript文件或发布更新的API文档。
3. What Is Travis CI?
3.什么是Travis CI?
For our sample build pipeline, we’ll use Travis CI, a cloud-based continuous integration tool.
对于我们的示例构建管道,我们将使用Travis CI,一个基于云的持续集成工具。
This has a number of features that make it a great choice for getting started with build pipelines:
这有许多功能,使它成为开始使用构建管道的一个伟大选择。
- Quickly integrates with any public GitHub repository
- Supports every major programming language
- Deploys to multiple different cloud platforms
- Offers a variety of messaging and alerting tools
At a high level, it works by monitoring a GitHub repository for new commits.
在高层次上,它通过监控GitHub仓库的新提交来工作。
When a new commit is made, it executes the steps of the build pipeline as defined in a configuration file (more on this below). If any step fails, the pipeline terminates and it will notify us.
当有新的提交时,它会执行配置文件中定义的构建管道的步骤(下面会有更多介绍)。如果任何步骤失败,管道就会终止,并通知我们。
Out of the box, Travis CI requires very little configuration. The only required configuration is specifying the programming language.
开箱后,Travis CI只需要很少的配置。唯一需要的配置是指定编程语言。
We can always provide more configuration to tailor our pipeline if needed. For example, we can limit what branches trigger builds, add additional steps to the pipeline, and much more.
如果需要,我们总是可以提供更多的配置来定制我们的管道。例如,我们可以限制哪些分支触发构建,为管道添加额外的步骤,以及更多。
3.1. Free and Paid Versions
3.1.免费和付费版本
It’s important to know that Travis CI currently has 2 offerings: a free and a paid version.
重要的是要知道,Travis CI目前有2个产品:免费和付费版本。
The free version, denoted by the .org domain name, offers full capabilities for any public GitHub repository. There are no limits to the number of builds or repositories, although there are resource limits imposed when your pipeline is running.
由.org域名表示的免费版本为任何公共的GitHub仓库提供了完整的功能。构建或储存库的数量没有限制,尽管在管道运行时有资源限制。
The paid version, which uses the .com domain name, is required for private GitHub repositories. It also offers more concurrent builds and unlimited build minutes compared to the free plan. There is a free trial for the first 100 builds to test out the paid version.
付费版本使用.com域名,是私人GitHub仓库所需的。与免费计划相比,它还提供更多的并发构建和无限的构建时间。有一个前100次构建的免费试用版来测试付费版本。
4. Creating a Build Pipeline with Travis CI
4.用Travis CI创建一个构建管线
For this tutorial, we’ll be using the free version mentioned above. Any public repository can be used to create a free pipeline.
在本教程中,我们将使用上述的免费版本。任何公共资源库都可以用来创建一个免费管道。
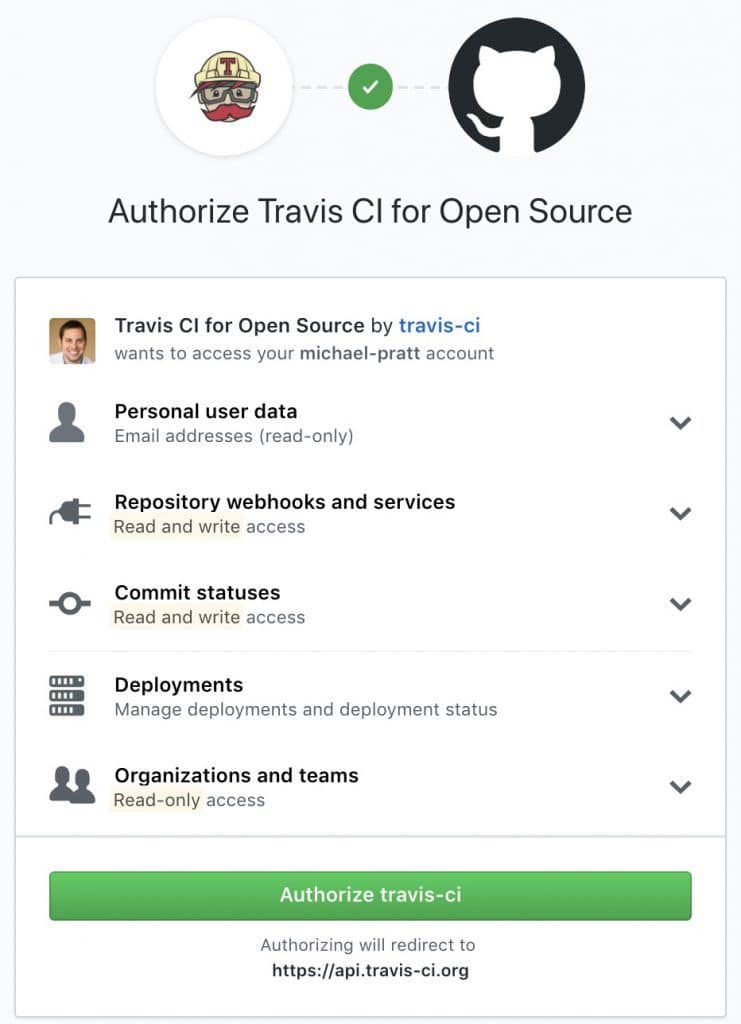
All we have to do is log in to Travis CI with our GitHub account and authorize it:
我们要做的就是用我们的GitHub账户登录Travis CI,并进行授权。
After we grant permissions to our GitHub account, we’re ready to begin configuring our build pipeline.
在授予GitHub账户权限后,我们就可以开始配置我们的构建管道了。
4.1. Configuring the Repository
4.1.配置存储库
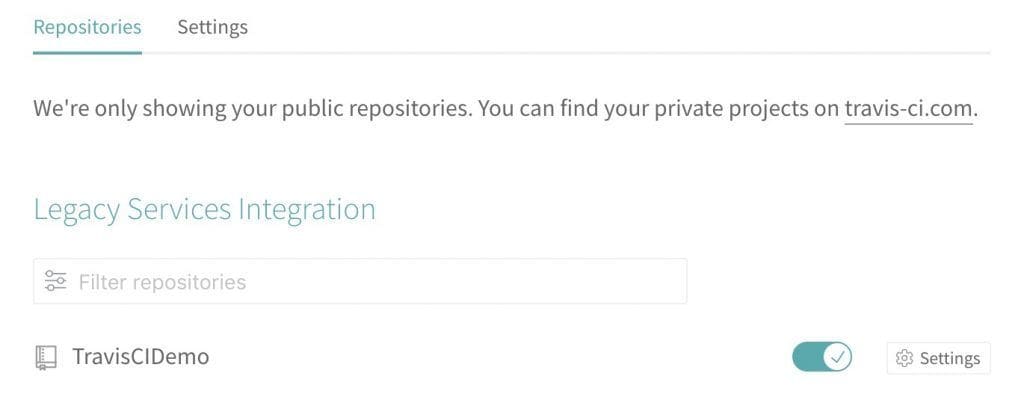
Initially, all of our public repositories are considered inactive. To resolve this, we need to enable our repository from the account settings page.
最初,我们所有的公共存储库都被认为是不活跃的。为了解决这个问题,我们需要从账户设置页面启用我们的存储库。
This lists all of our public repositories, along with a toggle button. Clicking the toggle button will configure Travis CI to start monitoring that repository for new commits, using the default branch of master:
这里列出了我们所有的公共存储库,以及一个切换按钮。点击切换按钮将配置Travis CI开始监控该仓库的新提交,使用默认分支master:。
Note that each repository also has a Settings button. This is where we can configure different pipeline behavior:
注意,每个资源库也有一个Settings按钮。在这里我们可以配置不同的管道行为。
- Define which events trigger the pipeline (pushes, pull requests, and so on)
- Set environment variables that are passed into the pipeline
- Auto-cancel builds when new events are triggered
For this tutorial, the default settings will work fine. Later we’ll see how to override some of the default behavior.
在本教程中,默认设置可以正常工作。以后我们会看到如何覆盖一些默认行为。
4.2. Creating the Travis Configuration
4.2.创建Travis配置
The next step is to create a new file named .travis.yml in the root directory of our repository. This file contains all the information required to configure a pipeline. Without this file, the pipeline will not execute.
下一步是在我们版本库的根目录下创建一个名为.travis.yml的新文件。这个文件包含配置管道所需的所有信息。如果没有这个文件,管道将无法执行。
For this tutorial we just need to include the bare minimum configuration, which specifies the programming language:
在本教程中,我们只需要包括最基本的配置,即指定编程语言。
language: javaThat’s it! Without providing any more information, Travis CI will execute a simple pipeline that:
这就是了!无需提供更多信息,Travis CI将执行一个简单的管道,即。
- Compiles our source code
- Executes our tests
Once we commit the .travis.yml file Travis will kick off our first build. Any further commits to master branch will trigger additional builds. The dashboard also allows us to manually trigger the pipeline at any time without requiring a commit or pull request.
一旦我们提交.travis.yml文件,Travis将启动我们的第一次构建。任何对master分支的进一步提交将触发额外的构建。仪表板还允许我们在任何时候手动触发管道,而不需要提交或拉动请求。
5. Additional Configuration
5.额外配置
In the previous section, we saw that a single line of configuration is all that we need to run our build pipeline. But most projects will require additional configuration to implement a meaningful pipeline.
在上一节中,我们看到一行配置就是我们运行构建管道所需的全部内容。但大多数项目都需要额外的配置来实现一个有意义的流水线。
This section outlines some of the more useful configurations we might want to add to our pipeline.
本节概述了我们可能想要添加到管道中的一些更有用的配置。
5.1. Changing the Default Build Command
5.1.改变默认的构建命令
The default command used to build Maven projects is:
用于构建Maven项目的默认命令是。
mvn test -BWe can change this to any command by setting the script directive in .travis.yml:
我们可以通过在.travis.yml中设置script指令将其改为任何命令。
script: mvn package -DskipTestsIt’s possible to chain together multiple commands in a single script line using the && operator.
使用&&操作符,可以在一个脚本行中串联多个命令。
Some build commands are complex and may span multiple lines or have complex logic. For example, they may perform different actions based on environment variables.
有些构建命令很复杂,可能跨越多行或有复杂的逻辑。例如,它们可能根据环境变量执行不同的动作。
In these cases, it’s recommended to place the build command in a stand-alone script, and call that script from inside the configuration file:
在这些情况下,建议将构建命令放在一个独立的脚本中,并从配置文件中调用该脚本。
script: ./build.sh5.2. Deploying Code
5.2.部署代码
The default build settings for Java projects simply compile the code and execute tests. The resulting artifacts (.jar files, etc.) are discarded at the end of the pipeline unless we deploy them somewhere.
Java项目的默认构建设置只是编译代码和执行测试。由此产生的工件(.jar文件等)在管道结束时被丢弃,除非我们把它们部署到某个地方。
Travis CI supports a variety of well known 3rd party services. Artifacts can be copied to many popular cloud storage systems such as Amazon S3, Google Cloud Storage, Bintray, and more.
Travis CI支持各种知名的第三方服务。工件可以被复制到许多流行的云存储系统,如Amazon S3、Google云存储、Bintray等。
It can also deploy code directly to most popular cloud computing platforms such as AWS, Google App Engine, Heroku, and many more.
它还可以将代码直接部署到大多数流行的云计算平台,如AWS、Google App Engine、Heroku等。
Below is an example configuration showing how we can deploy to Heroku. To generate encrypted properties, we have to use the Travis CLI tool.
下面是一个配置示例,展示了我们如何部署到Heroku。为了生成加密的属性,我们必须使用Travis CLI工具。
deploy:
  provider: heroku
  api_key:
    secure: "ENCRYPTED_API_KEY"
Additionally, it provides a generic deployment option that allows us to write our own deployment script. This is helpful if we need to deploy artifacts to a 3rd party system that is not natively supported.
此外,它提供了一个通用的部署选项,允许我们编写自己的部署脚本。如果我们需要将工件部署到一个不被原生支持的第三方系统,这很有帮助。
For example, we could write a shell script that securely copies the artifacts to a private FTP server:
例如,我们可以写一个shell脚本,将工件安全地复制到一个私有的FTP服务器上。
deploy:
  provider: script
  script: bash ./custom-deploy.sh
5.3. Managing Which Branches Trigger the Pipeline
5.3.管理哪些分支会触发流水线
By default, the pipeline will execute for any commit on master. However, most large projects use some form of git branching to manage development cycles.
默认情况下,流水线会对master上的任何提交进行执行。然而,大多数大型项目使用某种形式的git分支来管理开发周期。
Travis CI supports both white and blacklisting of git branches to determine which commits should trigger the pipeline.
Travis CI支持git分支的白名单和黑名单,以确定哪些提交应该触发管道。
As an example, consider the following configuration:
作为一个例子,考虑以下配置。
branches:
  only:
  - release
  - stable
  except:
  - master
  - nightly
This would ignore commits on the master and nightly branches. Commits to the release and stable branches would trigger the pipeline. Note that the only directive always takes precedence over the except directive.
这将忽略master和nightly分支上的提交。对release和stable分支的提交将触发流水线。注意,only指令总是优先于except指令。
We can also use regular expressions to control which branches trigger the pipeline:
我们还可以使用正则表达式来控制哪些分支触发流水线。
branches:
  only:
  - /^development.*$/
This would start the pipeline only for commits on branches that start with development.
这将只对以development开头的分支上的提交启动管道。
5.4. Skipping Specific Commits
5.4.跳过特定的提交
We can use the git commit message to skip individual commits. Travis CI will examine the message for the following patterns:
我们可以使用git提交消息来跳过单个提交。Travis CI将检查消息中的以下模式。
- skip <KEYWORD>
- <KEYWORD> skip
Where <KEYWORD> is any of the following values:
其中
- ci
- travis
- travis ci
- travis-ci
- travisci
If the commit message matches any of these patterns then the pipeline will not run.
如果提交信息符合这些模式中的任何一种,那么管道将不会运行。
5.5. Using Different Build Environments
5.5.使用不同的构建环境
The default build environment for Java projects is Ubuntu Linux. Pipelines can also execute on Mac OSX or Windows Server by adding the following configuration into .travis.yml:
Java项目的默认构建环境是Ubuntu Linux。通过在.travis.yml中添加以下配置,管道也可以在Mac OSX或Windows Server上执行。
os: osx # can also be 'windows'Even with Linux, there are 3 different distributions that we can choose from:
即使是Linux,也有3个不同的发行版,我们可以从中选择。
os: linux
  dist: xenial # other choices are 'trusty' or 'precise'
The build platform documentation covers all available environments and their differences.
构建平台文档涵盖了所有可用的环境和它们的差异。
Just remember that if we change the platform, we might also need to change any custom build or deploy scripts to ensure compatibility. There are several ways to handle multiple operating systems in configuration.
只要记住,如果我们改变了平台,我们可能还需要改变任何自定义的build或deploy脚本,以确保兼容性。有几种方法可以在配置中处理多个操作系统。
5.6. Using Different JDK Versions
5.6.使用不同的JDK版本
We can also test against a specific version of the JDK by setting the following configuration in the .travis.yml file:
我们还可以通过在.travis.yml文件中设置以下配置,对特定版本的JDK进行测试。
jdk: oraclejdk8Keep in mind that different build environments, even the different Linux distributions, can have different JDK versions available. Consult the documentation for each environment to see the full list of JDK versions.
请记住,不同的构建环境,甚至不同的 Linux 发行版,都可能有不同的 JDK 版本可用。请查阅每个环境的文档,查看JDK版本的完整列表。
6. Build Matrices
6.建立矩阵
By default, each time our pipeline runs, it runs as a single job. This means all phases of the pipeline execute sequentially on a single virtual machine with the same settings.
默认情况下,我们的管道每次运行时,都是作为一个单一的作业运行。这意味着管道的所有阶段都是在一个具有相同设置的单一虚拟机上顺序执行的。
But one of the great features of Travis CI is the ability to create a build matrix. This lets us run multiple jobs for each commit, using different values for some of the settings we saw earlier.
但Travis CI的一个伟大功能是能够创建一个构建矩阵。这让我们可以为每次提交运行多个作业,对我们之前看到的一些设置使用不同的值。
For example, we can use a build matrix to run our pipeline on both Linux and Mac OSX, or with both JDK 8 and 9.
例如,我们可以使用一个构建矩阵在Linux和Mac OSX上运行我们的管道,或者同时使用JDK 8和9。
There are two ways to create build matrices. First, we can provide an array of values for one or more of the language and environment configurations we saw earlier. For example:
有两种方法来创建构建矩阵。首先,我们可以为一个或多个我们之前看到的语言和环境配置提供一个数组的值。比如说。
language: java
jdk:
  - openjdk8
  - openjdk9
os:
  - linux
  - osx
Using this approach, Travis CI will automatically expand every combination of configuration to form multiple jobs. In the above example, the result would be four total jobs.
使用这种方法,Travis CI将自动扩展每一种配置组合以形成多个作业。在上面的例子中,结果将是总共四个作业。
The second way to create a build matrix is to use the matrix.include directive. This lets us explicitly declare which combinations we want to run:
创建构建矩阵的第二个方法是使用matrix.include指令。这让我们明确声明我们要运行哪些组合。
language: java
matrix:
  include:
  - jdk: openjdk8
    os: linux
  - jdk: openjdk9
    os: osx
The example above would result in two jobs.
上面的例子将导致两个工作。
Once again, if we build on multiple Operating Systems, we have to be careful to ensure our build and deployment scripts work for all cases. Shell scripts will not work on Windows, for example. We must use proper conditional statements to handle different Operating Systems.
再次,如果我们在多个操作系统上构建,我们必须小心翼翼地确保我们的build和deployment脚本适用于所有情况。例如,Shell脚本不会在Windows上工作。我们必须使用适当的条件语句来处理不同的操作系统。
There are more options that provide more granular control over which jobs to create, and how to handle failures.
有更多的选项,可以对创建哪些作业以及如何处理失败提供更精细的控制。
7. Conclusion
7.结语
In this article, we created a simple build pipeline using Travis CI. Using mostly out of the box configuration, we created a pipeline that builds code and runs tests.
在这篇文章中,我们使用Travis CI创建了一个简单的构建管道。使用大部分开箱即用的配置,我们创建了一个构建代码和运行测试的管道。
We also saw a small sample of just how configurable Travis CI is. It works with a variety of programming languages and 3rd party cloud platforms. The one downside is that it currently only works with GitHub repositories.
我们还看到了一个小例子,说明Travis CI的可配置性如何。它可以与各种编程语言和第三方云平台一起工作。有一个缺点是,它目前只适用于GitHub存储库。

