1. Overview
1.概述
Every time we test an endpoint with CSRF protection enabled, we have to manually take the CSRF token from the cookies and set it in the X-XSRF-TOKEN request header. If we don’t send the CSRF token, we get a 403 Forbidden error.
每当我们测试一个启用了CSRF保护的端点时,我们必须从cookie中手动获取CSRF令牌并将其设置在X-XSRF-TOKEN请求头中。如果我们不发送CSRF令牌,我们会得到一个403 Forbidden错误。
In this tutorial, we’ll see how to automate the sending of the CSRF token to the server when using Postman.
在本教程中,我们将看到如何在使用Postman时自动发送CSRF令牌到服务器。
2. Application Setup
2.应用设置
We’ll not discuss how to enable CSRF protection in a Spring application, which we’ve already covered in a previous article.
我们将不讨论如何在 Spring 应用程序中启用 CSRF 保护,我们已经在之前的文章中介绍了这一点。
As we know, we can find the CSRF token in the client’s cookies, and by default, CSRF protection is enforced for the POST, PUT and DELETE HTTP verbs.
正如我们所知,我们可以在客户端的cookie中找到CSRF令牌,而且默认情况下,CSRF保护是针对POST、PUT和DELETE HTTP动词执行的。
Also, for testing, we’ll use one of the endpoints from the previous article, a POST request, which enables a user to transfer an amount to one account:
另外,为了测试,我们将使用上一篇文章中的一个端点,一个POST请求,该请求使用户能够向一个账户转移一笔款项。
POST http://localhost:8080/transfer?accountNo=1234&amount=100
POST http://localhost:8080/transfer?accountNo=1234&amount=100
3. Postman
3.邮递员
Firstly, we’ll run a test with the Postman client without considering the CSRF token. Afterward, we’ll run another test where we send the CSRF token and set up Postman to send it automatically.
首先,我们将用Postman客户端运行一个测试,不考虑CSRF令牌。之后,我们将运行另一个测试,其中我们发送CSRF令牌并设置Postman自动发送它 。
3.1. Testing Without CSRF Token
3.1.不使用CSRF令牌的测试
Let’s open Postman and add a new request:
让我们打开Postman并添加一个新的请求。
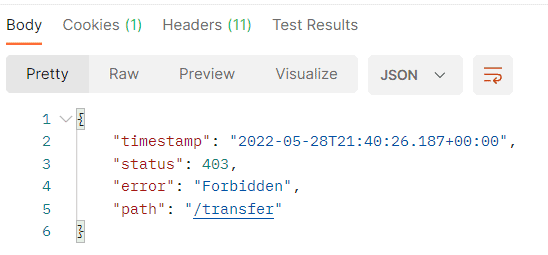
Now, we execute the request without sending the CSRF token, and we get the 403 Forbidden error:
现在,我们在没有发送CSRF标记的情况下执行请求,我们得到了403 Forbidden错误。
Next, we’ll see how to fix that.
接下来,我们将看看如何解决这个问题。
3.2. X-XSRF-TOKEN Header Property
3.2.X-XSRF-TOKEN 标头属性
In the Headers tab, let’s add a new parameter called X-XSRF-TOKEN and the value set to xsrf-token. X-XSRF-TOKEN is the header for the CSRF, and xsrf-token is an environment variable that we’ll define after:
在Headers标签中,让我们添加一个新的参数,名为X-XSRF-TOKEN,值设置为xsrf-token。X-XSRF-TOKEN是CSRF的头,而xsrf-token是一个环境变量,我们将在之后定义。
3.3. Environment Variable xsrf-token
3.3.环境变量xsrf-token
Now let’s go to the Environments on the left side and create a new environment called DEV:
现在让我们去左边的环境,创建一个名为DEV的新环境。
On the right side, let’s define the environment variable we mentioned above, called xsrf-token. We’ll leave the rest of the fields empty:
在右边,让我们定义我们上面提到的环境变量,叫做xsrf-token。我们将使其余的字段为空。
Let’s go back to the request and select the DEV Environment from the top right corner so that we can use the environment property we defined:
让我们回到请求中,从右上角选择DEV环境,这样我们就可以使用我们定义的环境属性。
3.4. Script
3.4.脚本
Let’s click now on the Tests tab. We’ll add the following script here:
现在让我们点击Tests标签。我们将在这里添加以下脚本。
The script retrieves the value of the XSRF-TOKEN cookie and assigns it to the environment variable xsrf-token. Now, whatever value for XSRF-TOKEN comes from the server will be transferred to the X-XSRF-TOKEN header property.
脚本检索XSRF-TOKEN cookie的值,并将其分配给环境变量xsrf-token.现在,无论XSRF-TOKEN的值来自服务器,都将被转移到X-XSRF-TOKEN头属性。
2.5. Testing
2.5.测试
When we execute the request, we now get the 200 OK response:
当我们执行该请求时,我们现在得到了200 OK 的响应。
3. Conclusion
3.总结
In this article, we saw how to test an endpoint of an application that has CSRF protection enabled.
在这篇文章中,我们看到如何测试一个启用了CSRF保护的应用程序的端点。
We used the Postman client to automate the sending of CSRF tokens every time we execute a new request on the same endpoint. That is more efficient since we don’t have to take the CSRF token manually and set it in the request header.
我们使用Postman客户端来自动发送CSRF令牌,每次我们在同一个端点上执行新的请求时,都会发送CSRF令牌。这样做更有效率,因为我们不需要手动取CSRF令牌并在请求头中设置它。


