1. Overview
1.概述
Keycloak is an open-source identity and access management server that secures our modern applications (like SPAs, mobile apps, APIs, etc.). Keycloak supports industry-standard protocols like Security Assertion Markup Language (SAML) 2.0, Single Sign-On (SSO), and OpenID Connect (OIDC).
Keycloak是一个开源的身份和访问管理服务器,可确保我们的现代应用程序(如SPA、移动应用程序、API等)的安全。Keycloak支持行业标准协议,如安全断言标记语言(SAML)2.0、单点登录(SSO)和OpenID Connect(OIDC)。
Further, in this tutorial, we’ll learn how to leverage Keycloak to authenticate and authorize SOAP web services using OIDC (OpenID Connect).
此外,在本教程中,我们将学习如何利用Keycloak来验证和授权使用OIDC(OpenID Connect)的SOAP Web服务。
2. Develop a SOAP Web Service
2.开发一个SOAP网络服务
Briefly, Let’s learn how to build a SOAP web service using Spring Boot.
简而言之,让我们来学习如何使用Spring Boot构建SOAP web服务。
2.1. The Web Service Operations
2.1.网络服务操作
Straightaway, let’s define the operations:
直截了当,让我们来定义一下操作。
- getProductDetails: Returns product details for a given product ID. Also, let’s assume that a user with a user role can request this operation.
- deleteProduct: Deletes a product for a given product ID. Also, only a user with admin can request this operation.
We have defined two operations and an RBAC (Role-based access control).
我们已经定义了两个操作和一个RBAC(基于角色的访问控制)。
2.2. Define XSD
2.2 定义XSD
Above all, let’s define a product.xsd:
首先,让我们定义一个product.xsd。
<xs:element name="getProductDetailsRequest">
    ...
</xs:element>
<xs:element name="deleteProductRequest">
    ...
</xs:element>
    ...
</xs:schema>
Also, let’s add wsdl4j and Spring Boot Webservices dependencies:
另外,让我们添加wsdl4j和Spring Boot Webservices的依赖。
<dependency>
    <groupId>wsdl4j</groupId>
    <artifactId>wsdl4j</artifactId>
    <version>1.6.3</version>
</dependency>
<dependency>
    <groupId>org.springframework.boot</groupId>
    <artifactId>spring-boot-starter-web-services</artifactId>
    <version>2.5.4</version>
</dependency>
2.3. Web Service
2.3 网络服务
Further, let’s develop a SOAP web service.
此外,让我们开发一个SOAP网络服务。
@PayloadRoot(namespace = "http://www.baeldung.com/springbootsoap/keycloak", localPart = "getProductDetailsRequest")
@ResponsePayload
public GetProductDetailsResponse getProductDetails(@RequestPayload GetProductDetailsRequest request) {
    ...
}
@PayloadRoot(namespace = "http://www.baeldung.com/springbootsoap/keycloak", localPart = "deleteProductRequest")
@ResponsePayload
public DeleteProductResponse deleteProduct(@RequestPayload DeleteProductRequest request) {
    ...
}
We can test this web service using several tools like cURL, Postman, SOAPUI, etc. Henceforth, let’s see how to secure our SOAP web service.
我们可以使用一些工具来测试这个Web服务,比如cURL、Postman、SOAPUI等。从现在开始,让我们看看如何确保我们的SOAP网络服务的安全。
3. Configuring Keycloak
3.配置Keycloak
To begin with, let’s configure Keycloak to secure our web service using OpenId Connect.
首先,让我们配置Keycloak以确保我们的网络服务使用OpenId Connect。
3.1. Create a Client
3.1.创建一个客户
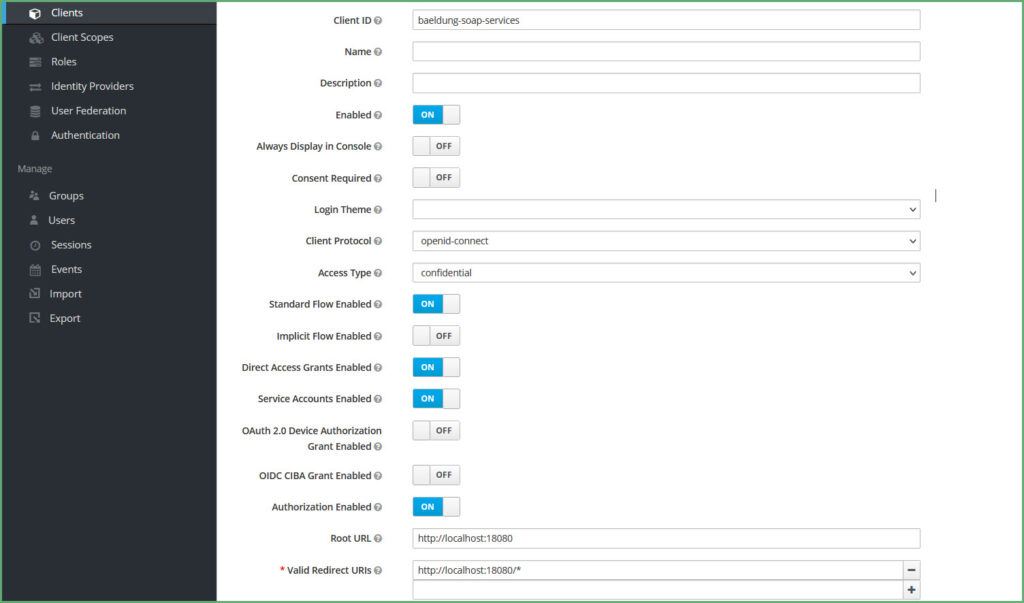
Typically, a Client is an application that requires Keycloaks’s authentication service. Also, while creating the client, choose:
一般来说,客户端是一个需要Keycloaks认证服务的应用程序。另外,在创建客户端时,选择。
- Application URL as the Root URL
- openid-connect as the Client Protocol
- Confidential as Access Type
- Turn on Authorization Enabled and Service Account Enabled
Furthermore, enabling Service Accounts allows our application (the client) to authenticate with Keycloak. Subsequently, it provides the Client Credentials Grant type flow to our authentication flow:
此外,启用服务账户允许我们的应用程序(客户端)与Keycloak进行认证。随后,它为我们的认证流程提供客户端凭证授予类型的流程。
Finally, click Save and then click on the Credentials tab and make a note of the secret. Consequently, we’ll need it as part of the Spring Boot configuration.
最后,点击Save,然后点击Credentials标签,记下secret.,因为我们需要它作为Spring Boot配置的一部分。
3.2. Users and Roles
3.2.用户和角色
Next, Let’s create two users and assign them the roles and passwords:
接下来,让我们创建两个用户并为他们分配角色和密码。
Firstly, let’s create the roles, admin and user. Keycloak allows us to create two kinds of roles – Realm Roles and Client Roles. First, however, let’s create Client Roles.
首先,让我们创建角色,admin和user。 Keycloak允许我们创建两种角色 – Realm Roles 和 Client Roles。然而,首先,让我们创建客户端角色。
Click on Clients, choose the client and click on the Roles tab. Then, create two roles, admin and user:
点击客户,选择客户并点击角色标签。然后,创建两个角色,admin和user:。
Though Keycloak can fetch the users from LDAP or AD (Active Directory), to keep things simple, let’s manually configure the users and assign them the roles.
尽管Keycloak可以从LDAP或AD(活动目录)中获取用户,为了保持简单,让我们手动配置用户并给他们分配角色。
Let’s create two users. First, we click on Users, then Add User :
让我们创建两个用户。首先,我们点击用户,然后添加用户。
Now, let’s allocate roles to the users.
现在,让我们把角色分配给用户。
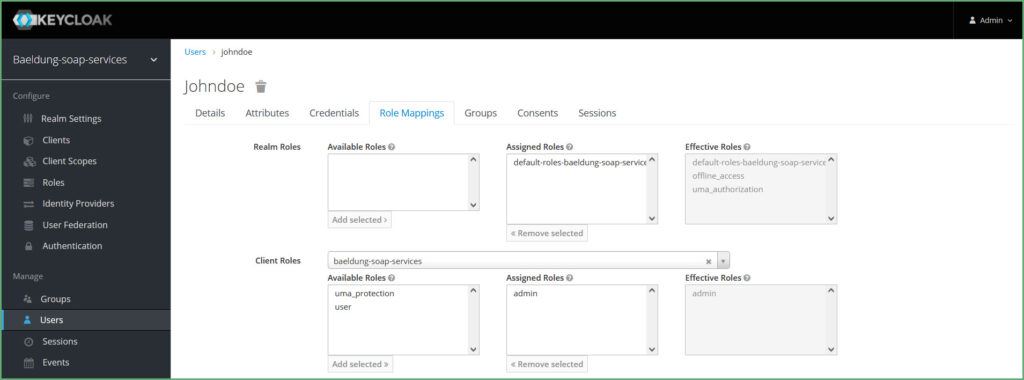
Again, click on Users choose the user and click on Edit, then click Role Mappings tab, select the client from the Client Roles, and select a role on Available Roles. Let’s assign the admin role to one user and the user role to another use:
再次,点击Users选择用户并点击Edit,然后点击Role Mappings标签,从Client Roles中选择客户端,并在Available Roles中选择一个角色。让我们把the admin角色分配给一个用户,the user角色分配给另一个使用。
4. Spring Boot Configuration
4.Spring Boot配置
Similarly, let’s secure our SOAP web services.
同样地,让我们保护我们的SOAP网络服务。
4.1. Keycloak – Spring Boot Integration
4.1.Keycloak – Spring Boot集成
Firstly, let’s add Keycloak dependencies.
首先,让我们添加Keycloak的依赖性。
Keycloak provides an adapter that utilizes Spring Boot’s auto-configuration and makes the integration easy. Now, let’s update our dependencies to include this Keycloak adapter:
Keycloak提供了一个适配器,利用Spring Boot的自动配置,使集成变得简单。现在,让我们更新我们的依赖项,以包括这个Keycloak适配器。
<dependency>
    <groupId>org.keycloak</groupId>
    <artifactId>keycloak-spring-boot-starter</artifactId>
    <version>15.0.2</version>
</dependency>
Next, let’s add the Keycloak configuration to our application.properties:
接下来,让我们把Keycloak的配置添加到我们的application.properties。
keycloak.enabled=true
keycloak.realm=baeldung-soap-services
keycloak.auth-server-url=http://localhost:8080/auth
keycloak.bearer-only=true
keycloak.credentials.secret=14da6f9e-261f-489a-9bf0-1441e4a9ddc4
keycloak.ssl-required=external
keycloak.resource=baeldung-soap-services
keycloak.use-resource-role-mappings=true
From the Keycloak documentation:
来自Keycloak文档。
- keycloak.enabled: Allow enabling of Keycloak Spring Boot adapter by configuration. The default value is true.
- keycloak.realm: Keycloak realm name and is mandatory
- keycloak.auth-server-url: The base URL is mandatory, and it’s of the Keycloak server. Typically, this is of the form http(s)://host:port/auth
- keycloak.bearer-only: While the default value is false, set it to true for the adapter to validate the tokens.
- keycloak.credentials. secret: The mandatory client-secret as configured in Keycloak
- keycloak.ssl-required: The default value is external. In other words, all the external requests (other than localhost) should be on the https protocol.
- keycloak.resource: The mandatory client-id of the application
- keycloak.use-resource-role-mappings: While the default is false, set it to true for the adapter to look inside the token for application-level role mappings for the user.
4.2. Enable Global Method Security
4.2.启用全局方法安全
Besides the previous configurations, we need to specify security constraints to secure our web services. These constraints allow us to restrict unauthorized access. For instance, we should limit a user from admin actions.
除了前面的配置,我们还需要指定安全约束,以确保我们的网络服务。这些约束允许我们限制未经授权的访问。例如,我们应该限制一个用户进行管理员操作。
There are two ways to set up the constraints:
有两种方法来设置约束。
- Declare security-constraints and security-collections in the application configuration file.
- Method-level security using @EnableGlobalMethodSecurity.
For SOAP web services, security-constraints fall short in providing fine-grained control. Moreover, declaring these constraints is verbose.
对于 SOAP Web 服务,安全约束在提供细粒度控制方面存在不足。此外,声明这些约束是很冗长的。
Henceforth, let’s leverage the power of @EnableGlobalMethodSecurity to secure our SOAP web service operations.
从现在开始,让我们利用@EnableGlobalMethodSecurity的力量来保护我们的SOAP Web服务操作。
4.3. Defining a KeycloakWebSecurityConfigurerAdapter
4.3.定义一个KeycloakWebSecurityConfigurerAdapter
KeycloakWebSecurityConfigurerAdapter is an optional convenient class that extends WebSecurityConfigurerAdapter and simplifies security context configuration. Further, let’s define a class KeycloakSecurityConfig that extends this adapter and makes use of @EnableGlobalMethodSecurity.
KeycloakWebSecurityConfigurerAdapter是一个可选的方便类,它扩展了WebSecurityConfigurerAdapter 并简化了安全上下文配置。此外,让我们定义一个类KeycloakSecurityConfig,它扩展了这个适配器并利用了@EnableGlobalMethodSecurity。
The class diagram that depicts this hierarchy:
描绘这个层次结构的类图。
Now, let’s configure KeycloakSecurityConfig class:
现在,让我们来配置KeycloakSecurityConfig类。
@KeycloakConfiguration
@EnableGlobalMethodSecurity(jsr250Enabled = true)
public class KeycloakSecurityConfig extends KeycloakWebSecurityConfigurerAdapter {
    @Override
    protected void configure(HttpSecurity http) throws Exception {
        super.configure(http);
        http
          .csrf()
          .disable()
          .authorizeRequests()
          .anyRequest()
          .permitAll();
    }
}
@KeycloakConfiguration defines all the required annotations for Keycloak’s integration with Spring Boot:
@KeycloakConfiguration定义了Keycloak与Spring Boot集成的所有必要注释。
4.4. Adding Authorization
4.4.添加授权
Finally, let’s use @RolesAllowed annotation (part of JSR-250) to authorize our SOAP web service operations.
最后,让我们使用@RolesAllowed注解(JSR-250的一部分)来授权我们的 SOAP Web 服务操作。
Given that, let’s configure our methods with access roles. To do this, let’s use the @RolesAllowed annotation. Recall, we defined two different roles, user and admin, in Keycloak. Let’s define each of our web services with a role:
鉴于此,让我们用访问角色来配置我们的方法。要做到这一点,让我们使用@RolesAllowed 注解。回顾一下,我们在Keycloak中定义了两个不同的角色,user和admin,。让我们用一个角色来定义我们的每个网络服务。
@RolesAllowed("user")
@PayloadRoot(namespace = "http://www.baeldung.com/springbootsoap/keycloak", localPart = "getProductDetailsRequest")
@ResponsePayload
public GetProductDetailsResponse getProductDetails(@RequestPayload GetProductDetailsRequest request) {
    ...
}
@RolesAllowed("admin")
@PayloadRoot(namespace = "http://www.baeldung.com/springbootsoap/keycloak", localPart = "deleteProductRequest")
@ResponsePayload
public DeleteProductResponse deleteProduct(@RequestPayload DeleteProductRequest request) {
    ...
}
With this, we completed the configuration.
就这样,我们完成了配置。
5. Test the Application
5.测试应用程序
5.1. Check the Setup
5.1.检查设置
Now that the application is ready, let’s start testing our SOAP web services using curl:
现在应用程序已经准备好了,让我们开始使用curl测试我们的SOAP网络服务。
curl -d @request.xml -i -o -X POST --header 'Content-Type: text/xml' http://localhost:18080/ws/api/v1Eventually, if all the configurations are correct, we get an access denied response:
最终,如果所有的配置都是正确的,我们会得到一个拒绝访问的响应。
<SOAP-ENV:Fault>
    <faultcode>SOAP-ENV:Server</faultcode>
    <faultstring xml:lang="en">Access is denied</faultstring>
</SOAP-ENV:Fault>
As expected, Keycloak denies the request as the request does not contain an access token.
正如预期的那样,Keycloak拒绝了该请求,因为该请求不包含一个访问令牌。
5.2. Acquiring Access Token
5.2.获取访问令牌
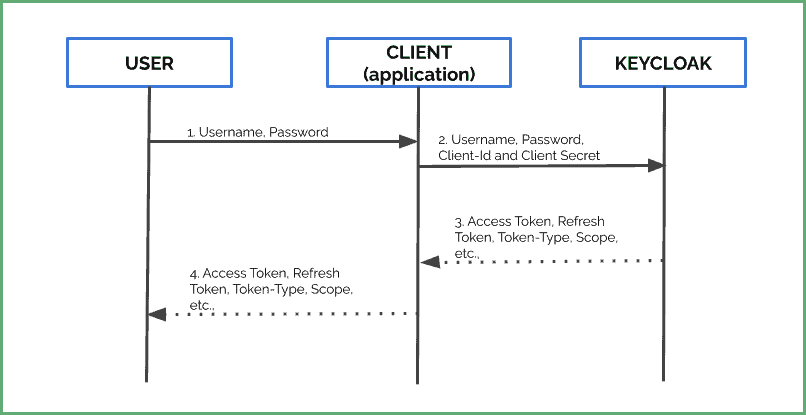
At this point, let’s get an access token from Keycloak to access our SOAP web services. Typically, the flow involves:
在这一点上,让我们从Keycloak获得一个访问令牌来访问我们的SOAP网络服务。通常情况下,这个流程包括
- Firstly, a user sends his credentials to the application
- The application passes client-id and client-secret along with these credentials to the Keycloak server.
- Finally, Keycloak returns an access token, refresh token, and other meta-data based on user credentials and roles.
Keycloak exposes a token endpoint for the clients to request access tokens. Typically, this endpoint is of the form:
Keycloak暴露了一个token端点,用于客户端请求访问令牌。 通常情况下,这个端点的形式是。
<PROTOCOL>://<HOST>:<PORT>/auth/realms/<REALM_NAME>/protocol/openid-connect/token
<PROTOCOL>://<HOST>:<PORT>/auth/realms/<REALM_NAME>/protocol/openid-connect/token
For example:
比如说。
http://localhost:8080/auth/realms/baeldung/protocol/openid-connect/token
http://localhost:8080/auth/realms/baeldung/protocol/openid-connect/token
Now, let’s obtain the access token:
现在,我们来获取访问令牌。
curl -L -X POST 'http://localhost:8080/auth/realms/baeldung-soap-services/protocol/openid-connect/token' \
-H 'Content-Type: application/x-www-form-urlencoded' \
--data-urlencode 'grant_type=password' \
--data-urlencode 'client_id=baeldung-soap-services' \
--data-urlencode 'client_secret=14da6f9e-261f-489a-9bf0-1441e4a9ddc4' \
--data-urlencode 'username=janedoe' \
--data-urlencode 'password=password'
In effect, we get an access token and refresh token along with meta-data:
实际上,我们得到一个访问令牌和刷新令牌以及元数据。
{
    "access_token": "eyJh ...",
    "expires_in": 300,
    "refresh_expires_in": 1800,
    "refresh_token": "eyJh ...",
    "token_type": "Bearer",
    "not-before-policy": 0,
    "session_state": "364b8f3e-34ff-4ca0-8895-bfbdb8b466d4",
    "scope": "profile email"
}
Additionally, the configurable expires_in key defines the lifetime of this token. For instance, the above access token expires in 5 minutes (300 seconds).
此外,可配置的expires_in键定义了该令牌的寿命。例如,上述访问令牌在5分钟(300秒)后到期。
5.3. Webservice Invocation with Access Token
5.3.使用访问令牌的网络服务调用
In this example, let’s use the access token we retrieved in the previous section. Let’s invoke the SOAP web service with the access token as a Bearer Token.
在这个例子中,让我们使用我们在上一节中检索的访问令牌。让我们用访问令牌作为Bearer Token.来调用SOAP网络服务。
curl -d @request.xml -i -o -X POST -H 'Authorization: Bearer BwcYg94bGV9TLKH8i2Q' \
  -H 'Content-Type: text/xml' http://localhost:18080/ws/api/v1
With the correct access token, the response is:
有了正确的访问令牌,响应是。
<ns2:getProductDetailsResponse xmlns:ns2="http://www.baeldung.com/springbootsoap/keycloak">
    <ns2:product>
        <ns2:id>1</ns2:id>
            ...
        </ns2:product>
</ns2:getProductDetailsResponse>
5.4. Authorization
5.4.授权
Recall that we generated the access token for the user janedoe that has a user role. With the user access token, let’s try to perform admin operations. That is, let’s try to invoke deleteProduct:
回顾一下,我们为拥有a user 角色的用户janedoe 生成了访问令牌。使用用户访问令牌,让我们尝试执行管理员操作。也就是说,让我们尝试调用deleteProduct。
curl -d @request.xml -i -o -X POST -H 'Authorization: Bearer sSgGNZ3KbMMTQ' -H 'Content-Type: text/xml' \
  http://localhost:18080/ws/api/v1
where contents of request.xml are:
request.xml的内容是什么。
<soapenv:Envelope xmlns:soapenv="http://schemas.xmlsoap.org/soap/envelope/" xmlns:key="http://www.baeldung.com/springbootsoap/keycloak">
    <soapenv:Header/>
    <soapenv:Body>
        <key:deleteProductRequest>
            <key:id>1</key:id>
        </key:deleteProductRequest>
   </soapenv:Body>
</soapenv:Envelope>
Since a user is not unauthorized to access the admin operations, we get an access denied:
由于用户没有被授权访问管理员操作,我们得到一个访问拒绝。
<SOAP-ENV:Fault>
    <faultcode>SOAP-ENV:Server</faultcode>
        <faultstring xml:lang="en">Access is denied</faultstring>
</SOAP-ENV:Fault>
6. Conclusion
6.结论
This tutorial showed how to develop a SOAP web service, keycloak configurations, and secure our web services using Keycloak. The way we secure REST web services, we have to secure our SOAP web services from suspicious users and unauthorized access.
本教程展示了如何开发一个SOAP网络服务,keycloak配置,以及使用Keycloak保护我们的网络服务。正如我们保护REST网络服务的方式一样,我们必须保护我们的SOAP网络服务免受可疑用户和未经授权的访问。
As always, the complete source code is available over on GitHub.
一如既往,完整的源代码可在GitHub上获得,。


