1. Introduction
1.绪论
In this tutorial, we’re going to look at ways we can change the logging level of a Spring Boot application at runtime. As with many things, Spring Boot has built-in logging functionality that configures it for us. We’re going to explore how to adjust the logging levels of a running application.
在本教程中,我们将探讨如何在运行时改变Spring Boot应用程序的日志级别。与许多事情一样,Spring Boot具有内置的日志功能,可以为我们进行配置。我们将探讨如何调整运行中的应用程序的日志级别。
We’ll look at three ways of doing that: using the Spring Boot Actuator loggers endpoint, the auto-scan functionality in Logback and finally using the Spring Boot Admin tool.
我们将研究三种方法:使用Spring Boot Actuator记录器端点、Logback中的自动扫描功能以及最后使用Spring Boot Admin工具。
2. Spring Boot Actuator
2.Spring Boot执行器
We’re going to start by using the /loggers Actuator endpoint to display and change our logging level. The /loggers endpoint is available at actuator/loggers and we can access a specific logger by appending its name as part of the path.
我们将首先使用/loggers执行器端点来显示和改变我们的日志记录级别。/loggers端点位于actuator/loggers,我们可以通过将其名称作为路径的一部分来访问特定的记录器。
For example, we can access the root logger with the URL http://localhost:8080/actuator/loggers/root.
例如,我们可以通过URL http://localhost:8080/actuator/loggers/root访问根记录仪。
2.1. Setup
2.1.设置
Let’s start by setting up our application to use the Spring Boot Actuator.
让我们先把我们的应用程序设置为使用Spring Boot Actuator。
First, we need to add the Spring Boot Actuator Maven dependency to our pom.xml file:
首先,我们需要将Spring Boot Actuator Maven依赖项添加到我们的pom.xml文件。
<dependency>
    <groupId>org.springframework.boot</groupId>
    <artifactId>spring-boot-starter-actuator</artifactId>
    <version>2.4.0</version>
</dependency>
Starting with Spring Boot 2.x, most endpoints are disabled by default, so we’ll also need to enable the /loggers endpoint in our application.properties file:
从Spring Boot 2.x开始,大多数端点默认是禁用的,所以我们还需要在application.properties文件中启用/loggers端点。
management.endpoints.web.exposure.include=loggers
management.endpoint.loggers.enabled=true
Lastly, let’s create a controller with a series of logging statements so that we can see the effects of our experiments:
最后,让我们创建一个带有一系列日志语句的控制器,这样我们就可以看到我们的实验效果。
@RestController
@RequestMapping("/log")
public class LoggingController {
    private Log log = LogFactory.getLog(LoggingController.class);

    @GetMapping
    public String log() {
        log.trace("This is a TRACE level message");
        log.debug("This is a DEBUG level message");
        log.info("This is an INFO level message");
        log.warn("This is a WARN level message");
        log.error("This is an ERROR level message");
        return "See the log for details";
    }
}
2.2. Using the /loggers Endpoint
2.2.使用/loggers端点
Let’s start our application and access our log API:
让我们启动我们的应用程序并访问我们的日志API。
curl http://localhost:8080/logThen, let’s check the logs where we should find three logging statements:
然后,让我们检查一下日志,我们应该在那里找到三个日志语句。
2019-09-02 09:51:53.498  INFO 12208 --- [nio-8080-exec-1] c.b.s.b.m.logging.LoggingController      : This is an INFO level message
2019-09-02 09:51:53.498  WARN 12208 --- [nio-8080-exec-1] c.b.s.b.m.logging.LoggingController      : This is a WARN level message
2019-09-02 09:51:53.498 ERROR 12208 --- [nio-8080-exec-1] c.b.s.b.m.logging.LoggingController      : This is an ERROR level message
Now, let’s call the /loggers Actuator endpoint to check on the logging level for our com.baeldung.spring.boot.management.logging package:
现在,让我们调用/loggers Actuator端点来检查com.baeldung.spring.boot.management.logging包的日志级别。
curl http://localhost:8080/actuator/loggers/com.baeldung.spring.boot.management.logging
  {"configuredLevel":null,"effectiveLevel":"INFO"}
To change the logging level, we can issue a POST request to the /loggers endpoint:
要改变日志级别,我们可以向/loggers端点发出一个POST请求。
curl -i -X POST -H 'Content-Type: application/json' -d '{"configuredLevel": "TRACE"}'
  http://localhost:8080/actuator/loggers/com.baeldung.spring.boot.management.logging
  HTTP/1.1 204
  Date: Mon, 02 Sep 2019 13:56:52 GMT
If we check the logging level again, we should see it set to TRACE:
如果我们再次检查日志级别,我们应该看到它被设置为TRACE。
curl http://localhost:8080/actuator/loggers/com.baeldung.spring.boot.management.logging
  {"configuredLevel":"TRACE","effectiveLevel":"TRACE"}
Finally, we can re-run our log API and see our changes in action:
最后,我们可以重新运行我们的日志API,看到我们的变化在发挥作用。
curl http://localhost:8080/logNow, let’s check the logs again:
现在,让我们再次检查一下日志。
2019-09-02 09:59:20.283 TRACE 12208 --- [io-8080-exec-10] c.b.s.b.m.logging.LoggingController      : This is a TRACE level message
2019-09-02 09:59:20.283 DEBUG 12208 --- [io-8080-exec-10] c.b.s.b.m.logging.LoggingController      : This is a DEBUG level message
2019-09-02 09:59:20.283  INFO 12208 --- [io-8080-exec-10] c.b.s.b.m.logging.LoggingController      : This is an INFO level message
2019-09-02 09:59:20.283  WARN 12208 --- [io-8080-exec-10] c.b.s.b.m.logging.LoggingController      : This is a WARN level message
2019-09-02 09:59:20.283 ERROR 12208 --- [io-8080-exec-10] c.b.s.b.m.logging.LoggingController      : This is an ERROR level message
3. Logback Auto-scan
3.日志回溯自动扫描
By default, our Spring Boot applications are using the Logback logging library. Let’s now look at how we can take advantage of Logback’s auto-scan feature to change our logging level.
默认情况下,我们的Spring Boot应用程序正在使用Logback日志库。现在让我们来看看如何利用Logback的自动扫描功能来改变我们的日志级别。
First, let’s add some Logback configuration by placing a file named logback.xml under our src/main/resources directory:
首先,让我们在src/main/resources目录下放置一个名为logback.xml的文件,添加一些Logback配置。
<configuration scan="true" scanPeriod="15 seconds">
    <appender name="STDOUT" class="ch.qos.logback.core.ConsoleAppender">
        <encoder>
            <pattern>%d{HH:mm:ss.SSS} [%thread] %-5level %logger{36} - %msg%n</pattern>
        </encoder>
    </appender>

    <logger name="com.baeldung.spring.boot.management.logging" level="INFO" />

    <root level="info">
        <appender-ref ref="STDOUT" />
    </root>
</configuration>
The key detail is in the first line of the logback.xml file. By setting the scan attribute to true, we’re telling Logback to check the configuration file for changes. The auto-scan happens every 60 seconds by default.
关键的细节是在logback.xml文件的第一行。通过将scan属性设置为true,我们告诉Logback检查配置文件的变化。默认情况下,自动扫描每60秒发生一次。。
Setting the scanPeriod to 15 seconds tells it to reload every 15 seconds so we don’t have to wait around as long during our experiments.
将scanPeriod设置为15秒,告诉它每15秒重新加载一次,这样我们在实验中就不必等待那么久。
Let’s try it out by starting the application and calling our log API again:
让我们通过启动应用程序并再次调用我们的日志API来试试。
curl http://localhost:8080/logOur output should reflect the INFO logging level for our package:
我们的输出应该反映我们包的INFO日志级别。
10:21:13.167 [http-nio-8080-exec-1] INFO  c.b.s.b.m.logging.LoggingController - This is an INFO level message
10:21:13.167 [http-nio-8080-exec-1] WARN  c.b.s.b.m.logging.LoggingController - This is a WARN level message
10:21:13.168 [http-nio-8080-exec-1] ERROR c.b.s.b.m.logging.LoggingController - This is an ERROR level message
Now, let’s modify our com.baeldung.spring.boot.management.logging logger in logback.xml to TRACE:
现在,让我们把com.baeldung.spring.boot.management.logging logback.xml中的记录器修改为TRACE。
<logger name="com.baeldung.spring.boot.management.logging" level="TRACE" />After giving it 15 seconds, let’s rerun the log API at http://localhost:8080/log and check our log output:
给它15秒后,让我们在http://localhost:8080/log重新运行日志API,检查我们的日志输出。
10:24:18.429 [http-nio-8080-exec-2] TRACE c.b.s.b.m.logging.LoggingController - This is a TRACE level message
10:24:18.430 [http-nio-8080-exec-2] DEBUG c.b.s.b.m.logging.LoggingController - This is a DEBUG level message
10:24:18.430 [http-nio-8080-exec-2] INFO  c.b.s.b.m.logging.LoggingController - This is an INFO level message
10:24:18.430 [http-nio-8080-exec-2] WARN  c.b.s.b.m.logging.LoggingController - This is a WARN level message
10:24:18.430 [http-nio-8080-exec-2] ERROR c.b.s.b.m.logging.LoggingController - This is an ERROR level message
4. Spring Boot Admin
4.Spring Boot管理
The third way we’re going to change our logging level is through the Spring Boot Admin tool. To use the Spring Boot Admin, we need to create a server application and configure our application as a client.
我们要改变日志级别的第三个方法是通过Spring Boot管理工具。为了使用Spring Boot Admin,我们需要创建一个服务器应用程序,并将我们的应用程序配置为一个客户端。
4.1. The Admin Application
4.1.管理应用程序
To change our logging level with Spring Boot Admin, we’ll need to set up a new application to use as our admin server. We can use the Spring Initialzr for that.
要使用Spring Boot Admin更改我们的日志级别,我们需要设置一个新的应用程序,作为我们的管理服务器使用。我们可以使用Spring Initialzr来实现这一点。
Let’s add the latest spring-boot-admin-starter-server to our pom.xml:
让我们把最新的spring-boot-admin-starter-server加入我们的pom.xml。
<dependency>
    <groupId>de.codecentric</groupId>
    <artifactId>spring-boot-admin-starter-server</artifactId>
    <version>2.4.1</version>
</dependency>
For detailed instructions on setting up an Admin Server, please see Section 2 in our Guide to Spring Boot Admin. Also, Section 4 includes the information necessary to set up security since we’ll be securing our client.
有关设置管理服务器的详细说明,请参见我们的Guide to Spring Boot Admin中的第2节。此外,第4节还包括设置安全的必要信息,因为我们将保护我们的客户端。
4.2. Client Configuration
4.2.客户端配置
Once we have an Admin Server, we need to set our application up as a client.
一旦我们有了一个管理服务器,我们就需要把我们的应用程序设置为一个客户端。
First, let’s add a Maven dependency for spring-boot-admin-starter-client:
首先,让我们为spring-boot-admin-starter-client添加一个Maven依赖项。
<dependency>
    <groupId>de.codecentric</groupId>
    <artifactId>spring-boot-admin-starter-client</artifactId>
    <version>2.4.1</version>
</dependency>
We’ll also want security between our admin server and the client, so let’s bring in the Spring Boot Security starter:
我们还希望在我们的管理服务器和客户端之间实现安全,因此让我们引入Spring Boot安全启动程序。
<dependency>
    <groupId>org.springframework.boot</groupId>
    <artifactId>spring-boot-starter-security</artifactId>
    <version>2.4.0</version>
</dependency>
Next, we need to make some configuration changes in our application.properties files.
接下来,我们需要在我们的application.properties文件中做一些配置的改变。
The admin server is running on port 8080, so let’s start by changing our port and giving the application a name:
管理服务器运行在8080端口上,所以让我们开始改变我们的端口并给应用程序一个名称。
spring.application.name=spring-boot-management
server.port=8081
Now, let’s add the configuration we need to access the server:
现在,让我们添加我们需要的配置来访问服务器。
spring.security.user.name=client
spring.security.user.password=client

spring.boot.admin.client.url=http://localhost:8080
spring.boot.admin.client.username=admin
spring.boot.admin.client.password=admin

spring.boot.admin.client.instance.metadata.user.name=${spring.security.user.name}
spring.boot.admin.client.instance.metadata.user.password=${spring.security.user.password}
This includes the URL that the admin server is running on and login information for both the client and the admin server.
这包括管理服务器运行的URL以及客户端和管理服务器的登录信息。
Lastly, we need to enable the /health, /info and /metrics actuator endpoints for the admin server to be able to determine the client’s status:
最后,我们需要启用/健康、/info和/metrics执行器端点,以便管理服务器能够确定客户端的状态。
management.endpoints.web.exposure.include=httptrace,loggers,health,info,metricsBecause changing logger levels is a POST operation, we also need to add a little security configuration to ignore the CSRF protection for the actuator endpoints:
因为改变记录仪级别是一个POST操作,我们还需要添加一点安全配置,忽略执行器端点的CSRF保护。
@Override
protected void configure(HttpSecurity http) throws Exception {
    http.csrf().ignoringAntMatchers("/actuator/**");
}
4.3. Using Spring Boot Admin
4.3.使用Spring Boot管理
With the configuration out of the way, let’s start both the client and the server application using mvn spring-boot:run.
配置完成后,让我们使用mvn spring-boot:run启动客户端和服务器应用程序。
Let’s start by accessing our log API at http://localhost:8081/log without changing anything. We have security enabled now, so we’ll be asked to log in using the credentials we specified in application.properties.
让我们开始访问我们的日志API,地址是http://localhost:8081/log,不用改变任何东西。我们现在已经启用了安全功能,所以我们将被要求使用我们在application.properties中指定的凭证来登录。
Our log output should show logging messages that reflect our INFO logging level:
我们的日志输出应该显示反映我们INFO日志级别的日志信息。
09:13:23.416 [http-nio-8081-exec-10] INFO  c.b.s.b.m.logging.LoggingController - This is an INFO level message
09:13:23.416 [http-nio-8081-exec-10] WARN  c.b.s.b.m.logging.LoggingController - This is a WARN level message
09:13:23.416 [http-nio-8081-exec-10] ERROR c.b.s.b.m.logging.LoggingController - This is an ERROR level message
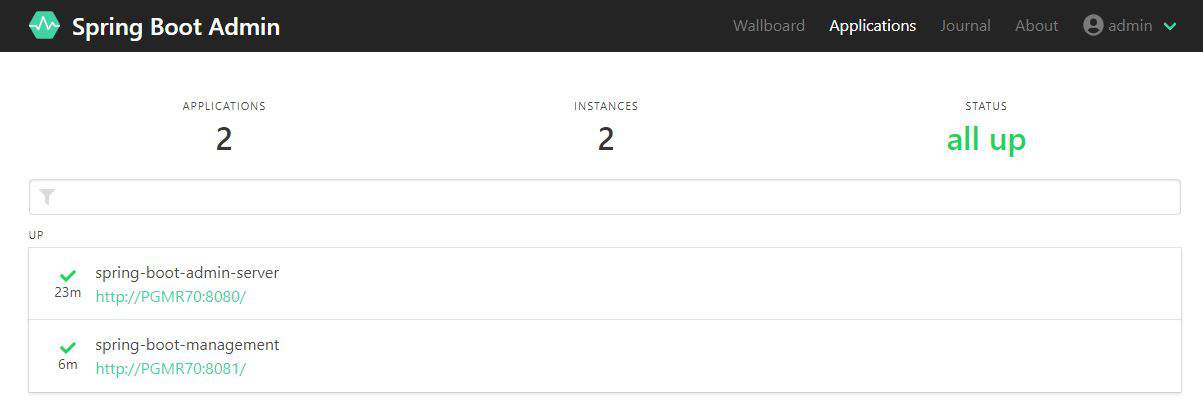
Now, let’s log into the Spring Boot Admin server and change our logging level. Let’s go to http://localhost:8080 and log in with the admin credentials. We’ll be taken to the list of registered applications where we should see our spring-boot-management application:
现在,让我们登录到Spring Boot管理服务器,改变我们的日志级别。让我们去http://localhost:8080,用管理员凭证登录。我们将被带到注册应用程序的列表中,在那里我们应该看到我们的spring-boot-management应用程序。
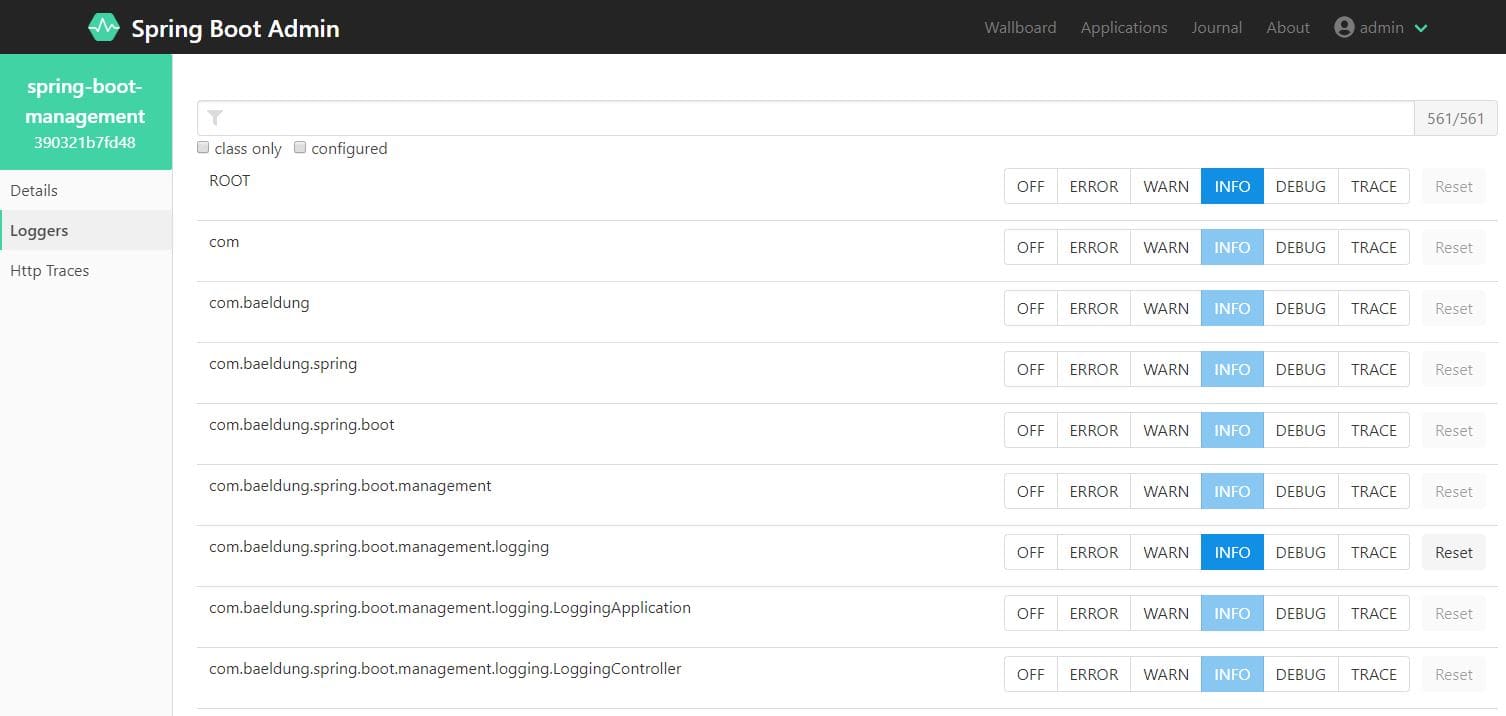
Let’s select spring-boot-management and view the Loggers using the left-hand menu:
让我们选择spring-boot-management,使用左侧菜单查看记录仪。
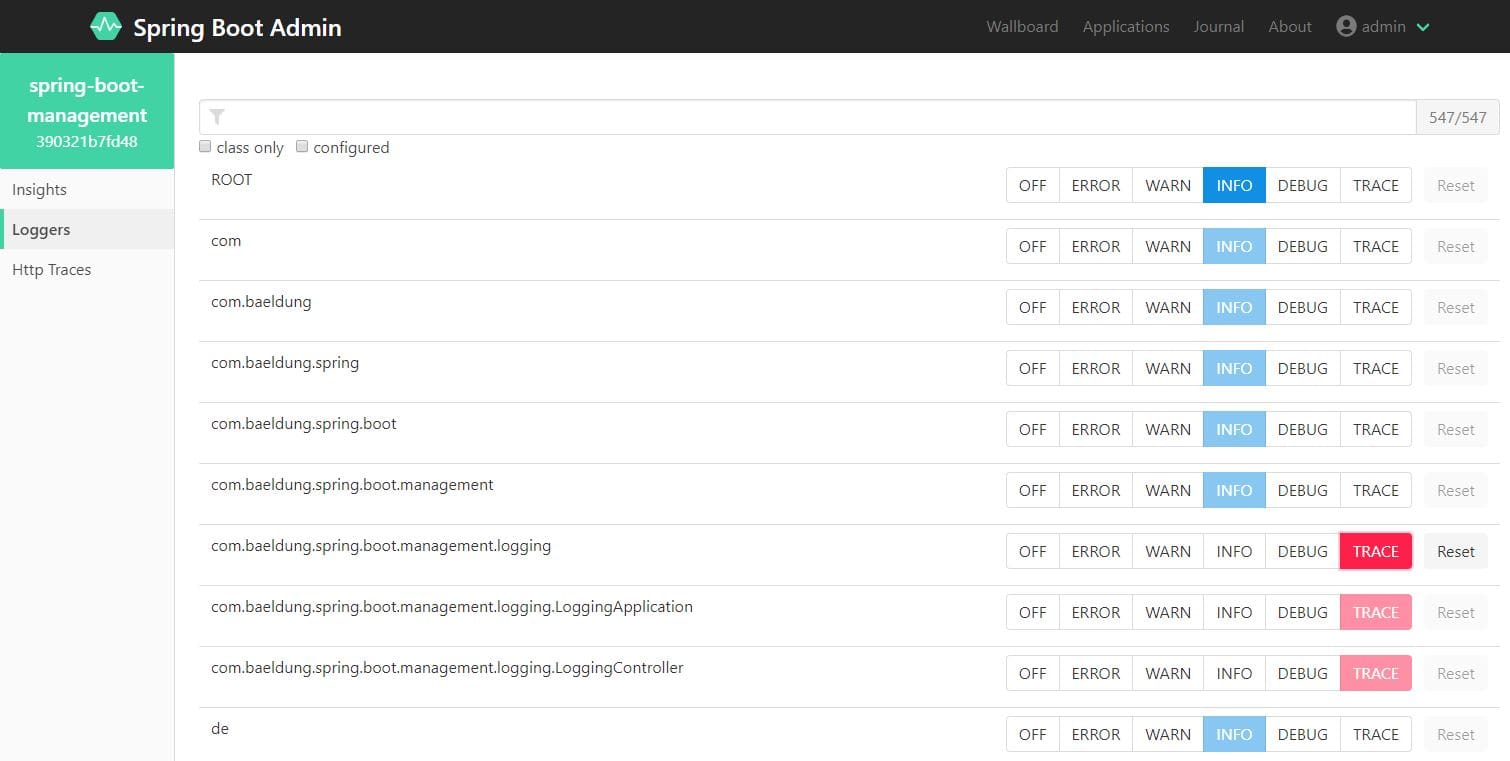
The com.baeldung.spring.boot.management.logging logger is set to INFO. Let’s change it to TRACE and rerun our log API:
com.baeldung.spring.boot.management.logging记录器被设置为INFO。让我们把它改为TRACE并重新运行我们的日志API。
Our log output should now reflect the new logger level:
我们的日志输出现在应该反映出新的记录器级别。
10:13:56.376 [http-nio-8081-exec-4] TRACE c.b.s.b.m.logging.LoggingController - This is a TRACE level message
10:13:56.376 [http-nio-8081-exec-4] DEBUG c.b.s.b.m.logging.LoggingController - This is a DEBUG level message
10:13:56.376 [http-nio-8081-exec-4] INFO  c.b.s.b.m.logging.LoggingController - This is an INFO level message
10:13:56.376 [http-nio-8081-exec-4] WARN  c.b.s.b.m.logging.LoggingController - This is a WARN level message
10:13:56.376 [http-nio-8081-exec-4] ERROR c.b.s.b.m.logging.LoggingController - This is an ERROR level message
5. Conclusion
5.总结
In this article, we explored different ways of controlling the logging level at runtime. We started out using the built-in actuators functionality. After that, we used the auto-scan feature from Logback.
在这篇文章中,我们探索了在运行时控制日志水平的不同方法。我们开始使用内置的执行器功能。之后,我们使用了Logback的自动扫描功能。
Lastly, we learned how to use the Spring Boot Admin to monitor and change logging levels in a registered client application.
最后,我们学习了如何使用Spring Boot Admin来监控和改变注册客户应用程序的日志级别。
The example code for using actuators and Logback and for setting up Spring Boot Admin are both available on GitHub.
使用执行器和Logback以及设置Spring Boot Admin的示例代码都可以在GitHub上找到。


