1. Overview
1.概述
In this tutorial, we’ll learn how to use Spring Boot with Hibernate.
在本教程中,我们将学习如何使用Spring Boot与Hibernate。
We’ll build a simple Spring Boot application and demonstrate how easy it is to integrate it with Hibernate.
我们将建立一个简单的Spring Boot应用程序,并演示如何轻松地将其与Hibernate集成。
2. Bootstrapping the Application
2.启动应用程序
We’ll use Spring Initializr to bootstrap our Spring Boot application. For this example, we’ll use only the needed configurations and dependencies to integrate Hibernate, adding the Web, JPA, and H2 dependencies. We’ll explain these dependencies in the next section.
我们将使用Spring Initializr来启动我们的 Spring Boot 应用程序。在这个例子中,我们将只使用所需的配置和依赖项来集成Hibernate,添加Web、JPA、和H2依赖项。我们将在下一节解释这些依赖关系。
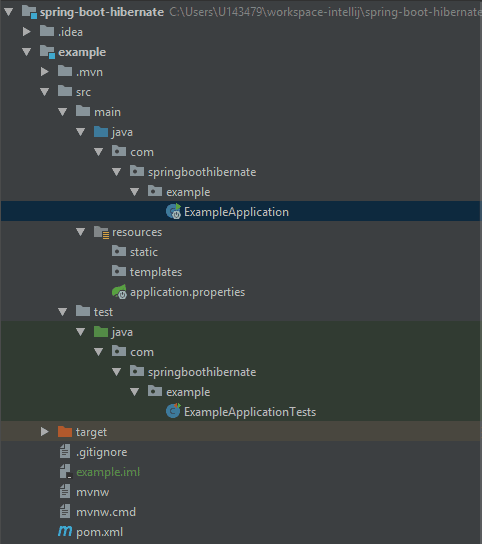
Now let’s generate the project and open it in our IDE. We can check the generated project structure and identify the configuration files we’ll need.
现在让我们生成项目并在我们的IDE中打开它。我们可以检查生成的项目结构,确定我们需要的配置文件。
This is what the project structure will look like:
这就是项目结构的模样。
3. Maven Dependencies
3.Maven的依赖性
If we open up pom.xml, we’ll see that we have spring-boot-starter-web and spring-boot-starter-test as maven dependencies. As their names suggest, these are the starting dependencies in Spring Boot.
如果我们打开pom.xml,我们会看到spring-boot-starter-web和spring-boot-starter-test作为maven依赖。顾名思义,这些是Spring Boot的起始依赖项。
Let’s have a quick look at the dependency that pulls in JPA:
让我们快速浏览一下拉入JPA的依赖关系。
<dependency>
    <groupId>org.springframework.boot</groupId>
    <artifactId>spring-boot-starter-data-jpa</artifactId>
</dependency>
This dependency includes JPA API, JPA Implementation, JDBC, and the other necessary libraries. Since the default JPA implementation is Hibernate, this dependency is actually enough to bring it in as well.
这个依赖性包括JPA API、JPA实现、JDBC和其他必要的库。由于默认的JPA实现是Hibernate,这个依赖关系实际上也足以将其引入。
Finally, we’ll use H2 as a very lightweight database for this example:
最后,我们将使用H2作为这个例子的一个非常轻量级的数据库。
<dependency>
    <groupId>com.h2database</groupId>
    <artifactId>h2</artifactId>
    <scope>runtime</scope>
</dependency>
We can use the H2 console to check that the DB is up and running, and also for a user-friendly GUI for our data entry. We’ll go ahead and enable it in application.properites:
我们可以使用H2控制台来检查数据库是否启动和运行,也可以为我们的数据输入提供一个用户友好的GUI。我们将在application.properites中继续并启用它。
spring.h2.console.enabled=trueThat’s everything we need to configure to include Hibernate and H2 in our example. We can check that the configuration was successful on the logs when we start up the Spring Boot application:
这就是我们需要配置的一切,以便在我们的例子中包括Hibernate和H2。当我们启动Spring Boot应用程序时,我们可以在日志上检查配置是否成功。
HHH000412: Hibernate Core {#Version}
HHH000412: Hibernate Core {#Version}
HHH000206: hibernate.properties not found
HH000206:未找到hibernate.properties。
HCANN000001: Hibernate Commons Annotations {#Version}
HCANN000001: Hibernate Commons Annotations {#Version}
HHH000400: Using dialect: org.hibernate.dialect.H2Dialect
HH000400:使用方言:org.hibernate.dialect.H2Dialect。
We can now access the H2 console on localhost http://localhost:8080/h2-console/.
我们现在可以访问本地主机上的H2控制台http://localhost:8080/h2-console/。
4. Creating the Entity
4.创建实体
To check that our H2 is working properly, we’ll first create a JPA entity in a new models folder:
为了检查我们的H2是否正常工作,我们将首先在一个新的models文件夹中创建一个JPA实体。
@Entity
public class Book {

    @Id
    @GeneratedValue
    private Long id;
    private String name;

    // standard constructors

    // standard getters and setters
}
We now have a basic entity, which H2 can create a table from. Restarting the application and checking the H2 console, a new table called Book will be created.
我们现在有了一个基本实体,H2可以从中创建一个表。重新启动应用程序并检查H2控制台,一个名为Book的新表将被创建。
To add some initial data to our application, we need to create a new SQL file with some insert statements, and put it in our resources folder. We can use import.sql (Hibernate support) or data.sql (Spring JDBC support) files to load data.
为了给我们的应用程序添加一些初始数据,我们需要创建一个带有一些插入语句的新SQL文件,并将其放在我们的resources文件夹中。我们可以使用import.sql(支持Hibernate)或data.sql(支持Spring JDBC)文件来加载数据。
Here are our example data:
下面是我们的例子数据。
insert into book values(1, 'The Tartar Steppe');
insert into book values(2, 'Poem Strip');
insert into book values(3, 'Restless Nights: Selected Stories of Dino Buzzati');
Again, we can restart the Spring Boot application and check the H2 console; the data is now in the Book table.
同样,我们可以重新启动Spring Boot应用程序并检查H2控制台;数据现在在Book表中。
5. Creating the Repository and Service
5.创建存储库和服务
We’ll continue creating the basic components in order to test our application. First, we’ll add the JPA Repository in a new repositories folder:
我们将继续创建基本组件,以便测试我们的应用程序。首先,我们将在一个新的repositories文件夹中添加JPA Repository。
@Repository
public interface BookRepository extends JpaRepository<Book, Long> {
}
We can use the JpaRepository interface from the Spring framework, which provides a default implementation for the basic CRUD operations.
我们可以使用Spring框架中的JpaRepository接口,它为基本的CRUD操作提供了默认实现。
Next, we’ll add the BookService in a new services folder:
接下来,我们将在一个新的services文件夹中添加BookService。
@Service
public class BookService {

    @Autowired
    private BookRepository bookRepository;

    public List<Book> list() {
        return bookRepository.findAll();
    }
}
To test our application, we need to check that the data created can be fetched from the list() method of the service.
为了测试我们的应用程序,我们需要检查创建的数据是否可以从服务的list()方法中获取。
We’ll write the following SpringBootTest:
我们将编写以下SpringBootTest。
@RunWith(SpringRunner.class)
@SpringBootTest
public class BookServiceUnitTest {

    @Autowired
    private BookService bookService;

    @Test
    public void whenApplicationStarts_thenHibernateCreatesInitialRecords() {
        List<Book> books = bookService.list();

        Assert.assertEquals(books.size(), 3);
    }
}
By running this test, we can check that Hibernate creates the Book data, which are then fetched successfully by our service. And that’s it, Hibernate is running with Spring Boot.
通过运行这个测试,我们可以检查Hibernate是否创建了Book数据,然后被我们的服务成功获取。就这样,Hibernate在Spring Boot中运行了。
6. Uppercase Table Name
6.大写的表名
Sometimes, we may need to have the table names in our database written in uppercase letters. As we already know, Hibernate will generate the names of the tables in lowercase letters by default.
有时,我们可能需要将数据库中的表名写成大写字母。我们已经知道,Hibernate默认会以小写字母生成表名。
We can try to explicitly set the table name:
我们可以尝试明确地设置表名。
@Entity(name="BOOK")
public class Book {
    // members, standard getters and setters
}
However, that won’t work. We need to set this property in application.properties:
然而,这并不奏效。我们需要在application.properties中设置这个属性。
spring.jpa.hibernate.naming.physical-strategy=org.hibernate.boot.model.naming.PhysicalNamingStrategyStandardImplThen we can check in our database that the tables are created successfully with uppercase letters.
然后我们可以在我们的数据库中检查这些表是否以大写字母成功创建。
7. Conclusion
7.结论
In this article, we discovered how easy it is to integrate Hibernate with Spring Boot. We used the H2 database as a very lightweight in-memory solution.
在这篇文章中,我们发现将Hibernate与Spring Boot集成是多么容易。我们使用H2数据库作为一个非常轻量级的内存解决方案。
We gave a full example of an application using all of these technologies. Then we gave a small hint how to set the table names in uppercase in our database.
我们给出了一个使用所有这些技术的应用程序的完整例子。然后我们给出了一个小提示,如何在我们的数据库中设置表名的大写字母。
As always, all of the code snippets mentioned in this article can be found on our GitHub repository.
一如既往,本文中提到的所有代码片段都可以在我们的GitHub仓库上找到。
