1. Overview
1.概述
In this tutorial, we’ll look at how to disable Spring Cloud’s Discovery Clients using profiles. This can be useful in situations where we want to enable/disable service discovery without making any changes to the code.
在本教程中,我们将了解如何使用配置文件禁用Spring Cloud的发现客户端。这在我们想要启用/禁用服务发现而不对代码进行任何修改的情况下很有用。
2. Set up Eureka Server and Eureka Client
2.设置Eureka服务器和Eureka客户端
Let’s start by creating a Eureka Server and a Discovery Client.
让我们先创建一个Eureka服务器和一个发现客户端。
First, we can set up our Eureka Server using Section 2 of the Spring Cloud Netflix Eureka tutorial.
首先,我们可以使用Spring Cloud Netflix Eureka教程的第2节设置我们的Eureka服务器。
2.1. Discovery Client Setup
2.1.发现客户端的设置
The next part is to create another application that will register itself on the server. Let’s set up this application as a Discovery Client.
下一部分是创建另一个应用程序,它将在服务器上注册自己。让我们把这个应用程序设置为一个Discovery客户端。
Let’s add the Web and Eureka Client starter dependencies to our pom.xml:
让我们把Web和Eureka Client启动器的依赖项添加到我们的pom.xml中。
<dependencies>
    <dependency>
        <groupId>org.springframework.cloud</groupId>
        <artifactId>spring-cloud-starter-netflix-eureka-client</artifactId>
    </dependency>
    <dependency>
        <groupId>org.springframework.boot</groupId>
        <artifactId>spring-boot-starter-web</artifactId>
    </dependency>
</dependencies>
We also need to make sure that our cloud starter is present in the dependency management section and that the Spring Cloud version is set.
我们还需要确保我们的云启动器存在于依赖性管理部分,并且Spring Cloud的版本已经设定。
When creating the project using Spring Initializr, these will already be set. If not, we can add them to our pom.xml file:
在使用Spring Initializr创建项目时,这些将已经被设置。如果没有,我们可以将它们添加到我们的pom.xml文件中。
<dependencyManagement>
    <dependencies>
        <dependency>
            <groupId>org.springframework.cloud</groupId>
            <artifactId>spring-cloud-starter-parent</artifactId>
            <version>${spring-cloud-dependencies.version}</version>
            <type>pom</type>
            <scope>import</scope>
        </dependency>
    </dependencies>
</dependencyManagement>

<properties>
    <spring-cloud-dependencies.version>2021.0.1</spring-cloud-dependencies.version>
</properties>
2.2. Adding Configuration Properties
2.2.添加配置属性
Once we have the dependencies in place, all we need to do is add our new client application’s configuration properties to the application.properties file:
一旦我们有了依赖关系,我们需要做的就是将我们新的客户端应用程序的配置属性添加到application.properties文件中。
eureka.client.serviceUrl.defaultZone=${EUREKA_URI:http://localhost:8761/eureka}
eureka.instance.preferIpAddress=false
spring.application.name=spring-cloud-eureka-client
This will ensure that when the application is started, it’ll register itself on the Eureka server, which is at the URL specified above. It will be called spring-cloud-eureka-client.
这将确保当应用程序启动时,它将在Eureka服务器上注册自己,该服务器位于上面指定的URL。它将被称为spring-cloud-eureka-client.。
We should note that normally, we also use @EnableDiscoveryClient annotation on a configuration class to enable Discovery Clients. However, we don’t need the annotation if we use the Spring Cloud starters. Discovery Client is enabled by default. Plus, when it finds the Netflix Eureka Client on the classpath, it will auto-configure it.
我们应该注意,通常情况下,我们也会在配置类上使用@EnableDiscoveryClient注解来启用发现客户端。然而,如果我们使用Spring Cloud启动器,我们就不需要这个注解了。发现客户端是默认启用的。另外,当它在classpath上找到Netflix Eureka客户端时,它将自动配置它。
2.3. Hello World Controller
2.3.Hello World控制器
To test our application, we’ll need a sample URL we can hit. Let’s create a simple controller that will return a greeting message:
为了测试我们的应用程序,我们需要一个我们可以点击的样本URL。让我们创建一个简单的控制器,它将返回一个问候信息。
@RestController
public class HelloWorldController {

    @RequestMapping("/hello")
    public String hello() {
        return "Hello World!";
    }
}
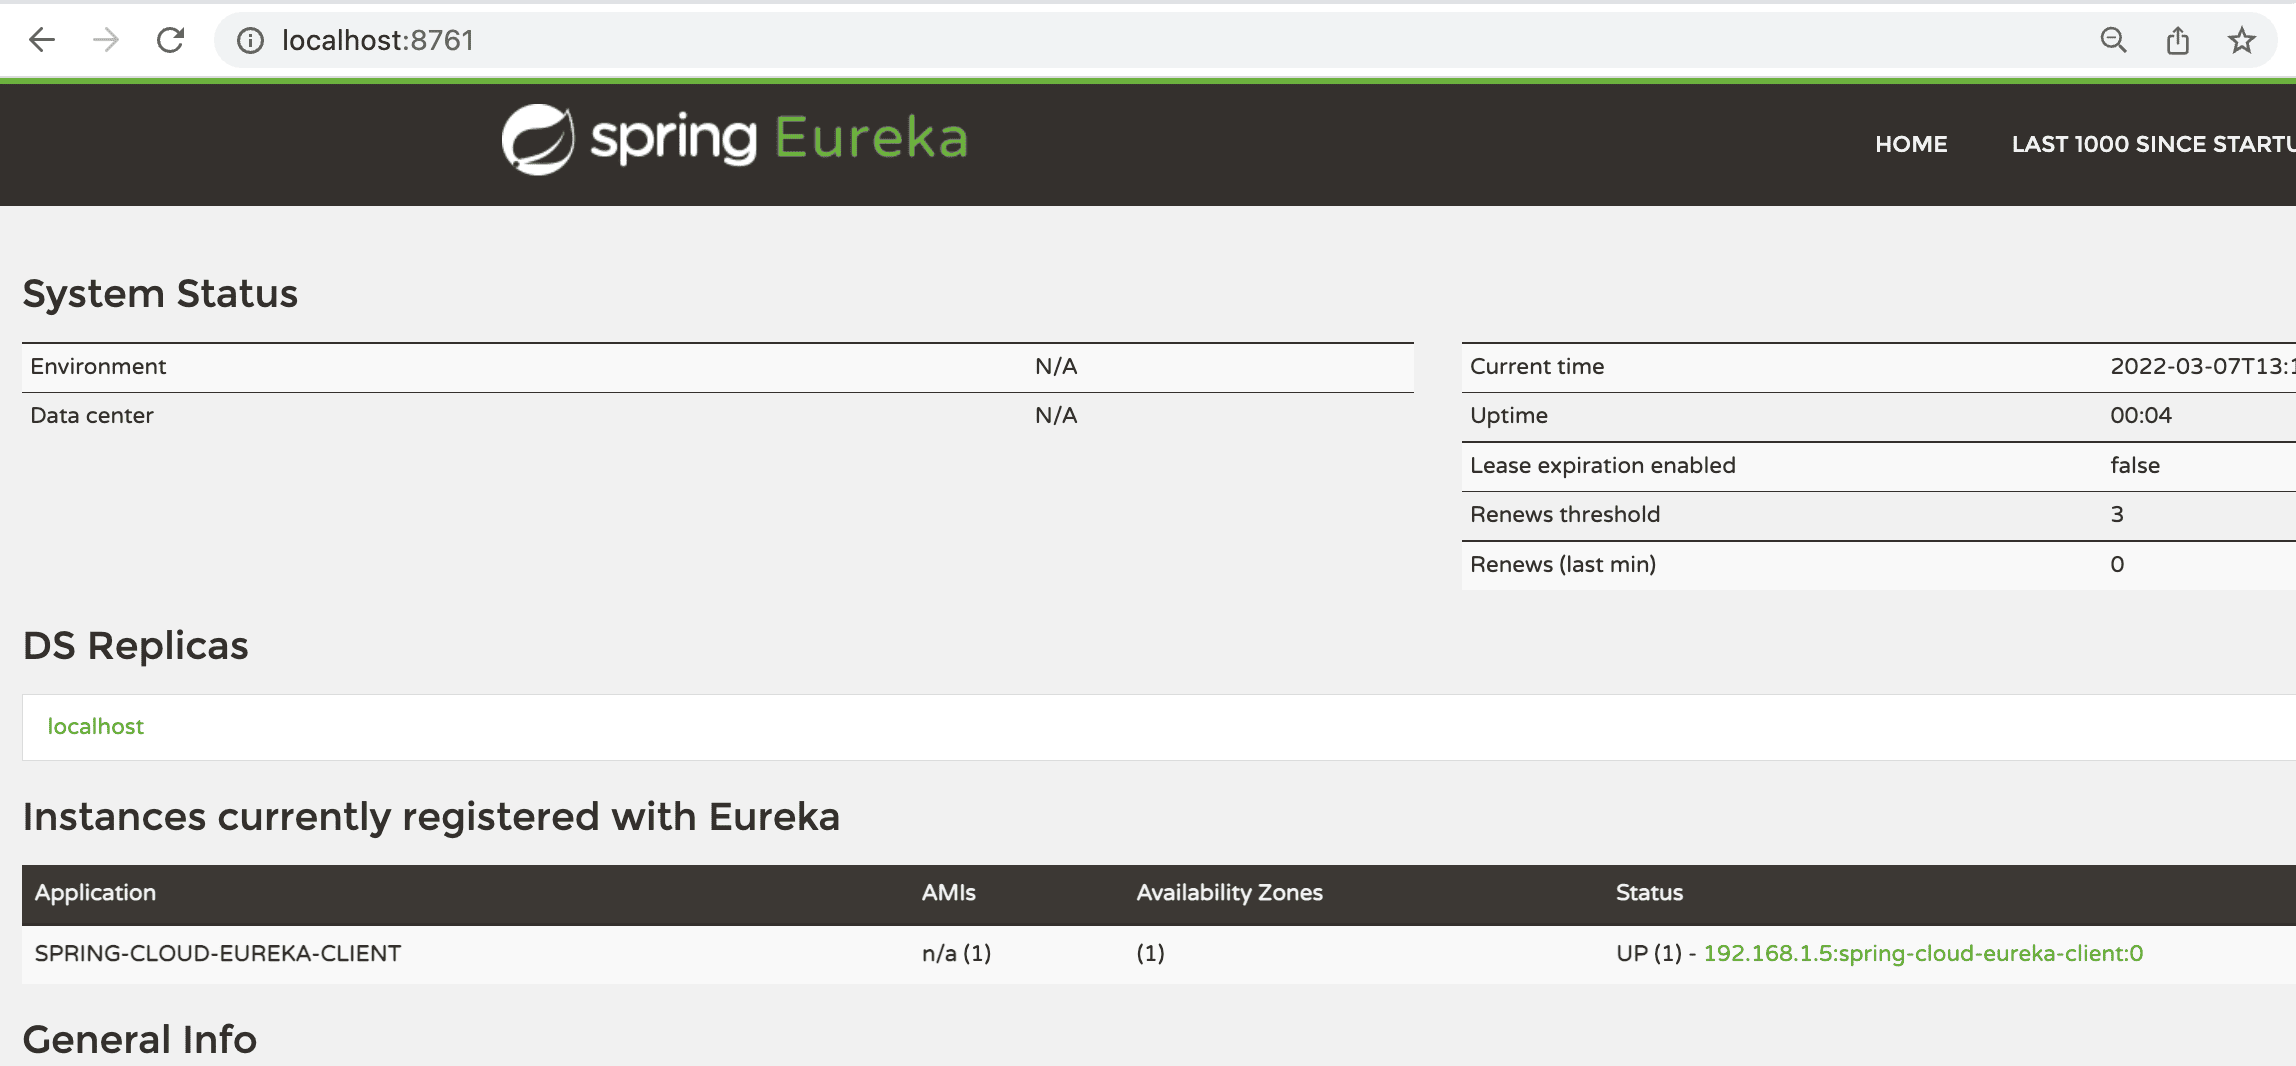
Now, it’s time to run the Eureka Server and the Discovery Client. When we run the application, the Discovery Client will register with the Eureka Server. We can see the same on the Eureka Server dashboard:
现在,是时候运行Eureka服务器和发现客户端了。当我们运行该应用程序时,Discovery客户端将与Eureka服务器注册。我们可以在Eureka服务器的仪表板上看到同样的情况。

3. Profile-Based Configuration
3.基于配置文件的配置
There can be situations where we may want to disable service registration. One reason might be the environment.
在有些情况下,我们可能想禁用服务注册。一个原因可能是环境问题。
For example, we may want to disable Discovery Clients in local development environments because running a Eureka server every time we want to test locally can be unnecessary. Let’s see how we can achieve this.
例如,我们可能想在本地开发环境中禁用发现客户端,因为每次我们想在本地测试时运行Eureka服务器是不必要的。让我们看看如何实现这一点。
We’ll change properties in the application.properties file to enable and disable Discovery Clients per profile.
我们将改变application.properties文件中的属性,以启用和禁用每个配置文件的发现客户端。
3.1. Using Separate Properties Files
3.1.使用独立的属性文件
One easy and popular way is to use separate properties files per environment.
一个简单而流行的方法是使用每个环境分开的属性文件。
So, let’s create another property file named application-dev.properties:
所以,让我们再创建一个名为application-dev.properties的属性文件。
spring.cloud.discovery.enabled=falseWe can enable/disable Discovery Clients using the spring.cloud.discovery.enabled property. We’ve set it to false to disable Discovery Clients.
我们可以使用spring.cloud.discovery.enabled属性启用/禁用发现客户端。我们将其设置为false以禁用发现客户端。
When the dev profile is active, this file will be used instead of the original properties file.
当devprofile被激活时,这个文件将被使用,而不是原来的属性文件。
3.2. Using Multi-Document Files
3.2.使用多文档文件
If we don’t want to use separate files per environment, another option is to use Multi-document properties files.
如果我们不想在每个环境中使用单独的文件,另一个选择是使用多文件属性文件。
We’re going to add two properties to do this:
我们将添加两个属性来做到这一点。
#---
spring.config.activate.on-profile=dev
spring.cloud.discovery.enabled=false
For this technique, we use ‘#—‘ to divide our properties file into two parts. Further, we’ll use the spring.config.activate.on-profile property. These two lines, used in conjunction, instruct the application to read the properties defined in the current part only if a profile is active. In our case, we’re going to use the dev profile.
对于这个技术,我们使用‘#-‘ 将我们的属性文件分为两部分。此外,我们将使用spring.config.activated.on-profile属性。这两行连在一起使用,指示应用程序只有在配置文件处于激活状态时才会读取当前部分定义的属性。在我们的例子中,我们将使用dev配置文件。
In the same way, as previously, we’ve set the spring.cloud.discovery.enabled property to false.
与之前一样,我们将spring.cloud.discovery.enabled属性设置为false。
This will disable Discovery Clients in the dev profile but keep them enabled when the profile isn’t active.
这将禁用dev配置文件中的Discovery客户端,但在配置文件未激活时保持其启用。
4. Testing
4.测试
Now, it’s time to run the Eureka Server and the Discovery Client and test if everything works as expected. We haven’t added the profile yet. When we run the application, the Discovery Client will register with the Eureka Server. We can see the same on the Eureka Server dashboard:
现在,是时候运行Eureka服务器和Discovery客户端,并测试一切是否按预期工作。我们还没有添加配置文件。当我们运行应用程序时,Discovery客户端将向Eureka服务器注册。我们可以在Eureka服务器的仪表板上看到同样的情况。

4.1. Testing with Profile
4.1.用配置文件进行测试
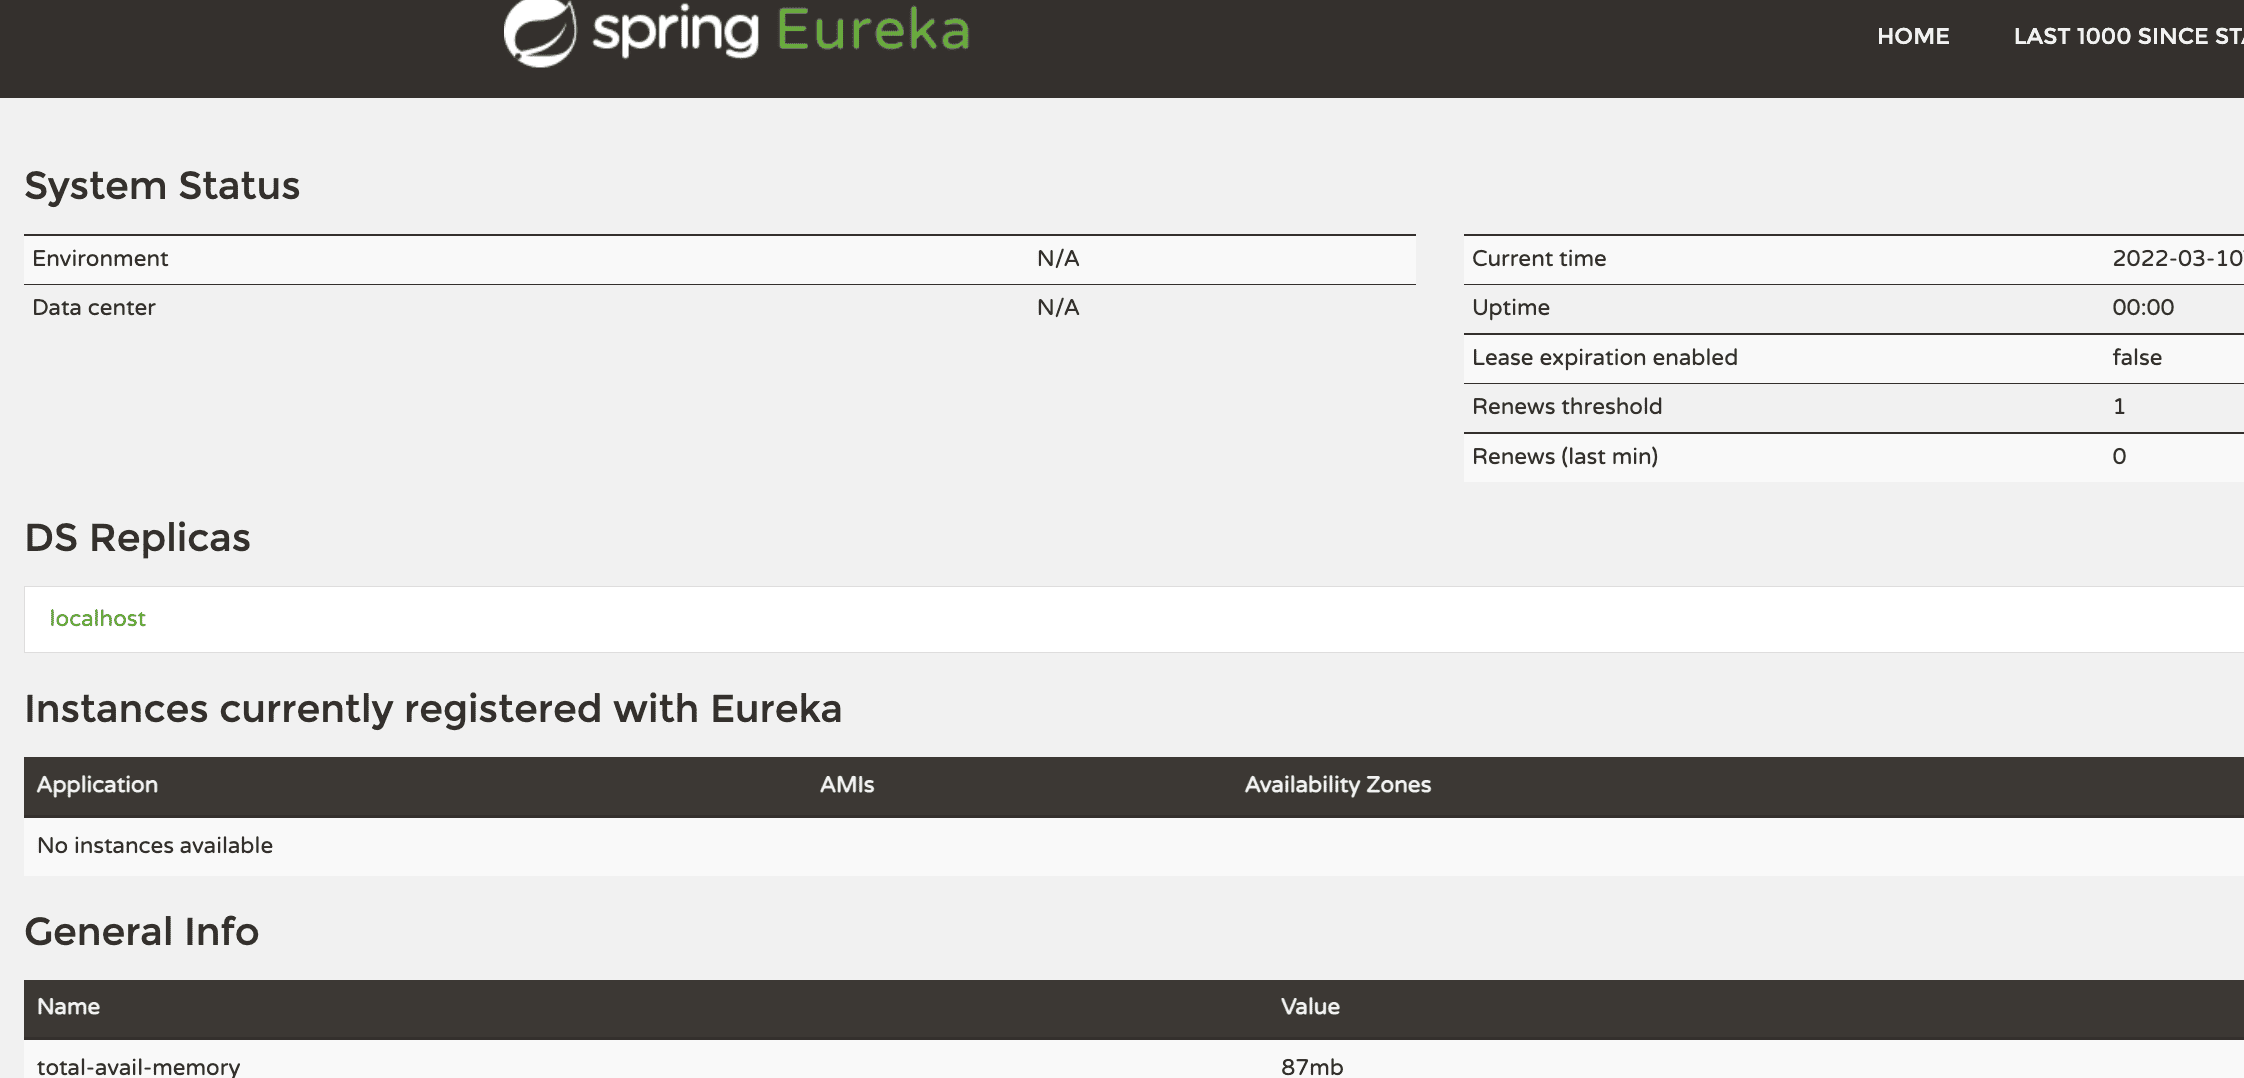
Next, we’ll add the profile while running the application. We can add the command-line argument -Dspring.profiles.active=dev to enable the dev profile. When we run the application, we can see the client does not register with the Eureka Server this time:
接下来,我们将在运行应用程序时添加配置文件。我们可以添加命令行参数-Dspring.profiles.active=dev来启用dev配置文件。当我们运行应用程序时,我们可以看到客户端这次没有在Eureka服务器上注册: a>
a>
5. Conclusion
5.总结
In this tutorial, we learned how to use properties to add configurations based on profiles. We used the same method to disable Discovery Clients based on active profiles.
在本教程中,我们学习了如何使用属性来根据配置文件添加配置。我们使用同样的方法,根据活动配置文件禁用发现客户端。
As always, the code for this tutorial is available over on GitHub.
一如既往,本教程的代码可在GitHub上获取。