1. Overview
1.概述
Auth0 provides authentication and authorization services for various types of applications like Native, Single Page Applications, and Web. Additionally, it allows for implementing various features like Single Sign-on, Social login, and Multi-Factor Authentication.
Auth0为各种类型的应用程序提供认证和授权服务,如本地、单页应用程序和 Web。此外,它还允许实施各种功能,如单点登录、社交登录和多因素认证。
In this tutorial, we’ll explore Spring Security with Auth0 through a step-by-step guide, along with key configurations of the Auth0 account.
在本教程中,我们将通过一步步的指导来探索Spring Security与Auth0的关系,以及Auth0账户的关键配置。
2. Setting Up Auth0
2.设置Auth0
2.1. Auth0 Sign-Up
2.1 Auth0注册
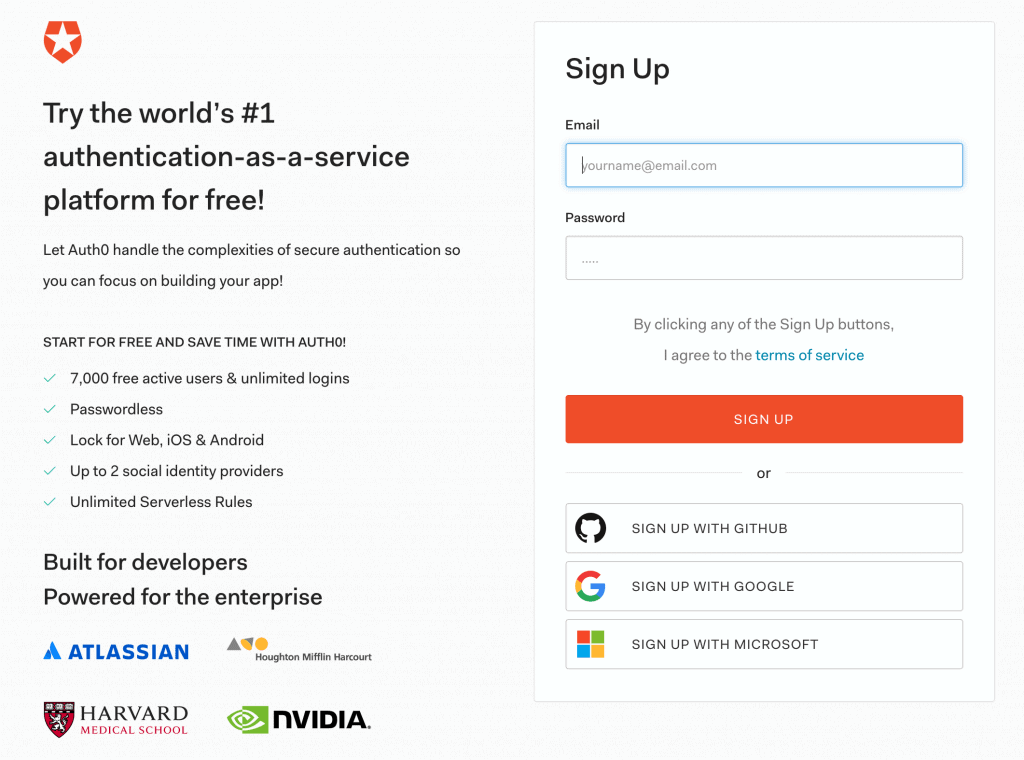
First, we’ll sign up for a free Auth0 plan that provides access for up to 7k active users with unlimited logins. However, we can skip this section if we already have one:
首先,我们将注册一个免费的Auth0计划,该计划为多达7千名活跃用户提供无限制的登录访问。然而,如果我们已经有了一个,我们可以跳过这一部分。
2.2. Dashboard
2.2 仪表板
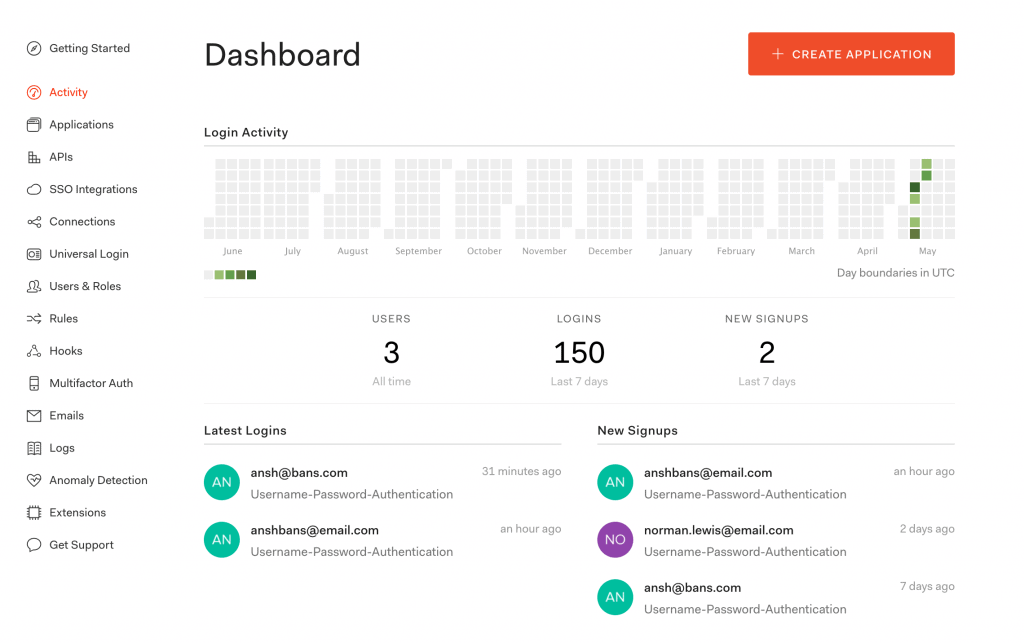
Once logged in to the Auth0 account, we’ll see a dashboard that highlights the details like login activities, latest logins, and new signups:
一旦登录到Auth0账户,我们会看到一个仪表板,其中突出了登录活动、最新登录和新注册等细节。
2.3. Create a New Application
2.3.创建一个新的应用程序
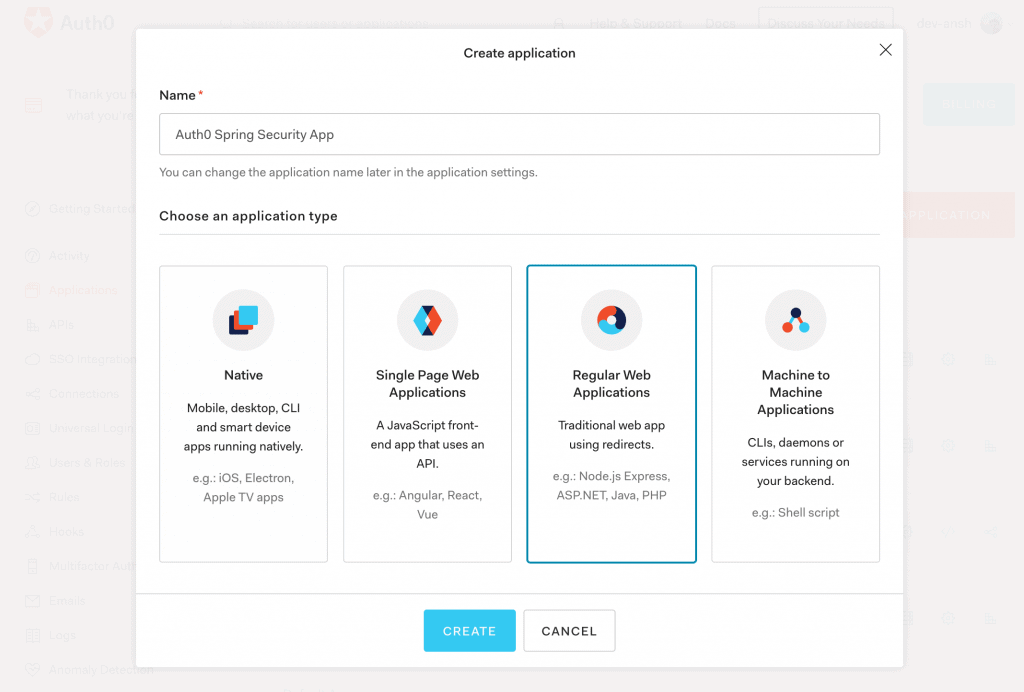
Then, from the Applications menu, we’ll create a new OpenID Connect (OIDC) application for Spring Boot.
然后,从应用程序菜单中,我们将为Spring Boot创建一个新的OpenID Connect(OIDC)应用程序。
Further, we’ll choose Regular Web Applications as application type out of available options like Native, Single-Page Apps, and Machine to Machine Apps:
此外,我们将从Native、Single-Page Apps和Machine to Machine Apps等可用选项中选择Regular Web Applications作为application type。
2.4. Application Settings
2.4.应用程序设置
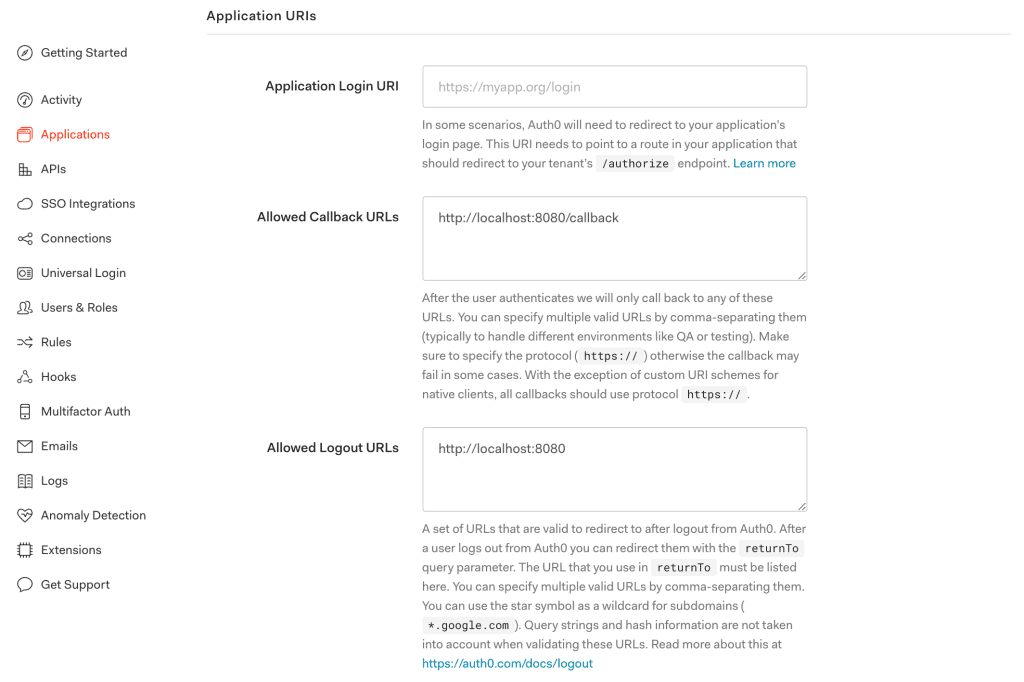
Next, we’ll configure a few Application URIs like Callback URLs and Logout URLs pointing to our application:
接下来,我们将配置一些应用URI,如回调URL和注销URL,指向我们的应用。
2.5. Client Credentials
2.5.客户端凭证
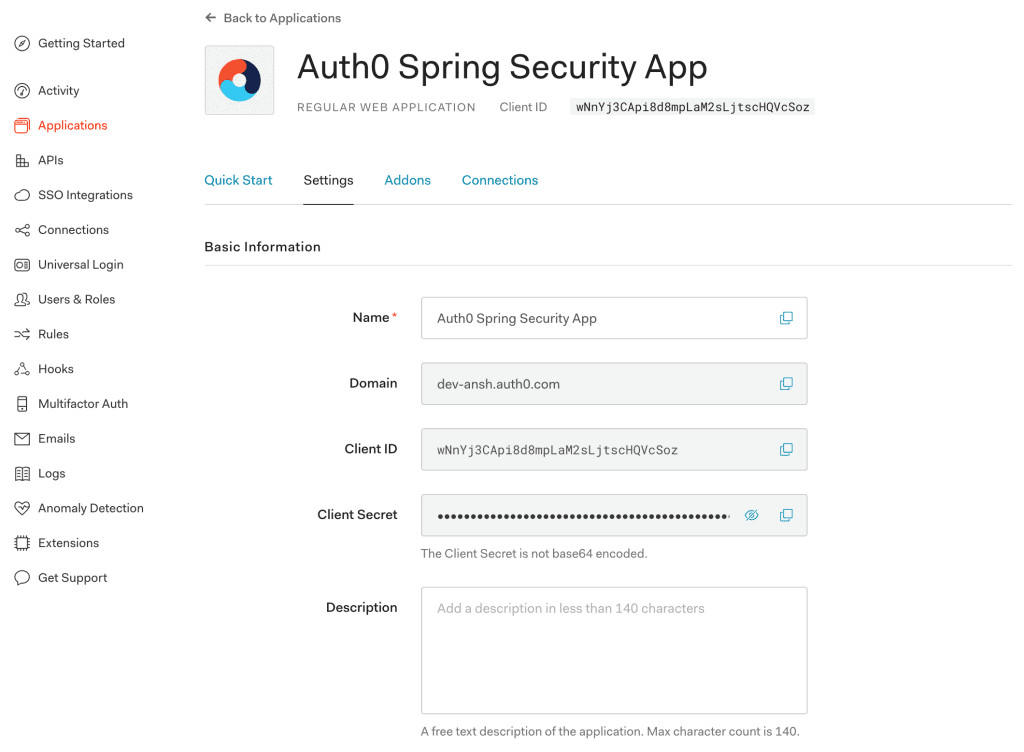
At last, we’ll get values of the Domain, Client ID, and Client Secret associated with our app:
最后,我们将得到与我们的应用程序相关的域名、客户端ID和客户端机密的值。
Please keep these credentials handy because they are required for the Auth0 setup in our Spring Boot App.
请保留这些证书,因为在我们的Spring Boot应用程序中设置Auth0时需要这些证书。
3. Spring Boot App Setup
3.Spring Boot应用程序的设置
Now that our Auth0 account is ready with key configurations, we’re prepared to integrate Auth0 security in a Spring Boot App.
现在,我们的Auth0账户已经准备好了关键配置,我们准备在Spring Boot应用程序中整合Auth0安全。
3.1. Maven
3.1. Maven
First, let’s add the latest mvc-auth-commons Maven dependency to our pom.xml:
首先,让我们把最新的mvc-auth-commonsMaven依赖性添加到我们的pom.xml。
<dependency>
    <groupId>com.auth0</groupId>
    <artifactId>mvc-auth-commons</artifactId>
    <version>1.2.0</version>
</dependency>
3.2. Gradle
3.2 Gradle
Similarly, when using Gradle, we can add the mvc-auth-commons dependency in the build.gradle file:
同样,在使用Gradle时,我们可以在build.gradle文件中添加mvc-auth-commons依赖。
compile 'com.auth0:mvc-auth-commons:1.2.0'3.3. application.properties
3.3.application.properties
Our Spring Boot App requires information like Client Id and Client Secret to enable authentication of an Auth0 account. So, we’ll add them to the application.properties file:
我们的Spring Boot应用程序需要Client Id和Client Secret等信息,以启用Auth0账户的认证。因此,我们要把它们添加到application.properties文件中。
com.auth0.domain: dev-example.auth0.com
com.auth0.clientId: {clientId}
com.auth0.clientSecret: {clientSecret}
3.4. AuthConfig
3.4.AuthConfig
Next, we’ll create the AuthConfig class to read Auth0 properties from the application.properties file:
接下来,我们将创建AuthConfig类,以便从application.properties文件中读取Auth0属性。
@Configuration
@EnableWebSecurity
public class AuthConfig extends WebSecurityConfigurerAdapter {
    @Value(value = "${com.auth0.domain}")
    private String domain;

    @Value(value = "${com.auth0.clientId}")
    private String clientId;

    @Value(value = "${com.auth0.clientSecret}")
    private String clientSecret;

    @Override
    protected void configure(HttpSecurity http) throws Exception {
        http.csrf().disable();
        http
          .authorizeRequests()
          .antMatchers("/callback", "/login", "/").permitAll()
          .anyRequest().authenticated()
          .and()
          .formLogin()
          .loginPage("/login")
          .and()
          .logout().logoutSuccessHandler(logoutSuccessHandler()).permitAll();
    }
}
Additionally, the AuthConfig class is configured to enable web security by extending the WebSecurityConfigurerAdapter class.
此外,AuthConfig类被配置为通过扩展WebSecurityConfigurerAdapter类来启用网络安全。
3.5. AuthenticationController
3.5.AuthenticationController
Last, we’ll add a bean reference for the AuthenticationController class to the already discussed AuthConfig class:
最后,我们将为已经讨论过的AuthConfig类添加一个AuthenticationController类的bean引用。
@Bean
public AuthenticationController authenticationController() throws UnsupportedEncodingException {
    JwkProvider jwkProvider = new JwkProviderBuilder(domain).build();
    return AuthenticationController.newBuilder(domain, clientId, clientSecret)
      .withJwkProvider(jwkProvider)
      .build();
}
Here, we’ve used the JwkProviderBuilder class while building an instance of the AuthenticationController class. We’ll use this to fetch the public key to verify the token’s signature (by default, the token is signed using the RS256 asymmetric signing algorithm).
这里,我们在构建AuthenticationController类的实例时使用了JwkProviderBuilder类。我们将用它来获取公钥以验证令牌的签名(默认情况下,令牌是使用RS256非对称签名算法签名的)。
Further, the authenticationController bean provides an authorization URL for login and handles the callback request.
此外,authenticationController bean为登录提供授权URL,并处理回调请求。
4. AuthController
4.AuthController
Next, we’ll create the AuthController class for login and callback features:
接下来,我们将为登录和回调功能创建AuthController类。
@Controller
public class AuthController {
    @Autowired
    private AuthConfig config;

    @Autowired
    private AuthenticationController authenticationController;
}
Here, we’ve injected the dependencies of the AuthConfig and AuthenticationController classes discussed in the previous section.
在这里,我们注入了上一节中讨论的AuthConfig和AuthenticationController类的依赖关系。
4.1. Login
4.1. 登录
Let’s create the login method that allows our Spring Boot App to authenticate a user:
让我们创建login方法,让我们的Spring Boot应用能够认证用户。
@GetMapping(value = "/login")
protected void login(HttpServletRequest request, HttpServletResponse response) {
    String redirectUri = "http://localhost:8080/callback";
    String authorizeUrl = authenticationController.buildAuthorizeUrl(request, response, redirectUri)
      .withScope("openid email")
      .build();
    response.sendRedirect(authorizeUrl);
}
The buildAuthorizeUrl method generates the Auth0 authorize URL and redirects to a default Auth0 sign-in screen.
buildAuthorizeUrl方法生成Auth0授权URL并重定向到默认的Auth0登录屏幕。
4.2. Callback
4.2 回调
Once the user signs in with Auth0 credentials, the callback request will be sent to our Spring Boot App. For that, let’s create the callback method:
一旦用户用Auth0凭证登录,回调请求将被发送到我们的Spring Boot App。为此,让我们创建callback方法。
@GetMapping(value="/callback")
public void callback(HttpServletRequest request, HttpServletResponse response) {
    Tokens tokens = authenticationController.handle(request, response);

    DecodedJWT jwt = JWT.decode(tokens.getIdToken());
    TestingAuthenticationToken authToken2 = new TestingAuthenticationToken(jwt.getSubject(),
      jwt.getToken());
    authToken2.setAuthenticated(true);

    SecurityContextHolder.getContext().setAuthentication(authToken2);
    response.sendRedirect(config.getContextPath(request) + "/");
}
We handled the callback request to obtain the accessToken and idToken that represent successful authentication. Then, we created the TestingAuthenticationToken object to set the authentication in SecurityContextHolder.
我们处理了回调请求以获得代表成功认证的accessToken和idToken。然后,我们创建了TestingAuthenticationToken对象,以设置SecurityContextHolder中的认证。
However, we can create our implementation of the AbstractAuthenticationToken class for better usability.
然而,我们可以创建我们的AbstractAuthenticationToken类的实现以获得更好的可用性。
5. HomeController
5.HomeController
Last, we’ll create the HomeController with a default mapping for our landing page of the application:
最后,我们将创建HomeController,为我们的应用程序的登陆页面提供一个默认的映射。
@Controller
public class HomeController {
    @GetMapping(value = "/")
    @ResponseBody
    public String home(final Authentication authentication) {
        TestingAuthenticationToken token = (TestingAuthenticationToken) authentication;
        DecodedJWT jwt = JWT.decode(token.getCredentials().toString());
        String email = jwt.getClaims().get("email").asString();
        return "Welcome, " + email + "!";
    }
}
Here, we extracted the DecodedJWT object from the idToken. Further, user information like email is fetched from the claims.
在这里,我们从idToken中提取了a href=”https://www.javadoc.io/doc/com.auth0/java-jwt/latest/com/auth0/jwt/interfaces/DecodedJWT.html”>DecodedJWT对象。此外,像电子邮件这样的用户信息也是从索赔中获取的。
That’s it! Our Spring Boot App is ready with Auth0 security support. Let’s run our app using the Maven command:
这就是了!我们的Spring Boot应用已经准备好了,支持Auth0安全。让我们用Maven命令来运行我们的应用程序。
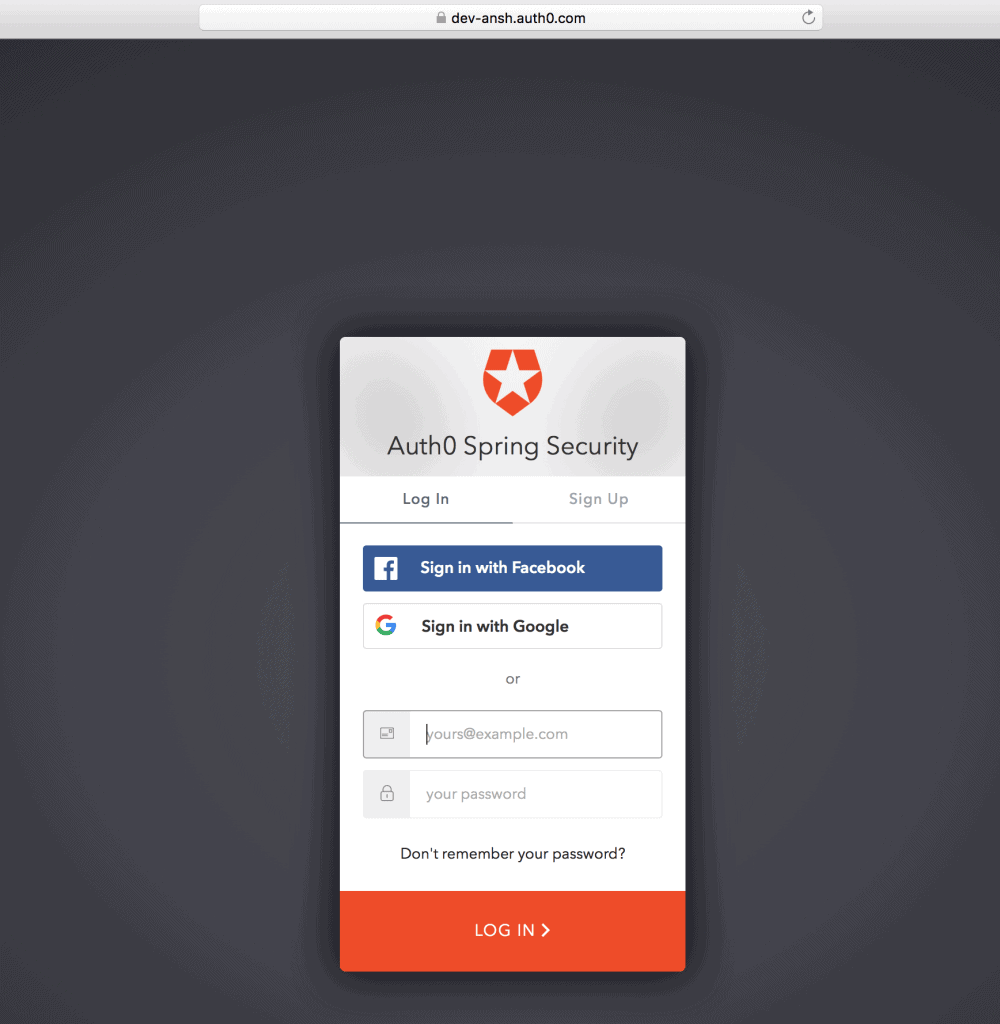
mvn spring-boot:runWhen accessing the application at localhost:8080/login, we’ll see a default sign-in page provided by Auth0:
当在localhost:8080/login访问应用程序时,我们将看到一个由Auth0提供的默认登录页面。
Once logged in using the registered user’s credentials, a welcome message with the user’s email will be shown:
一旦使用注册用户的凭证登录,将显示一个包含用户电子邮件的欢迎信息。
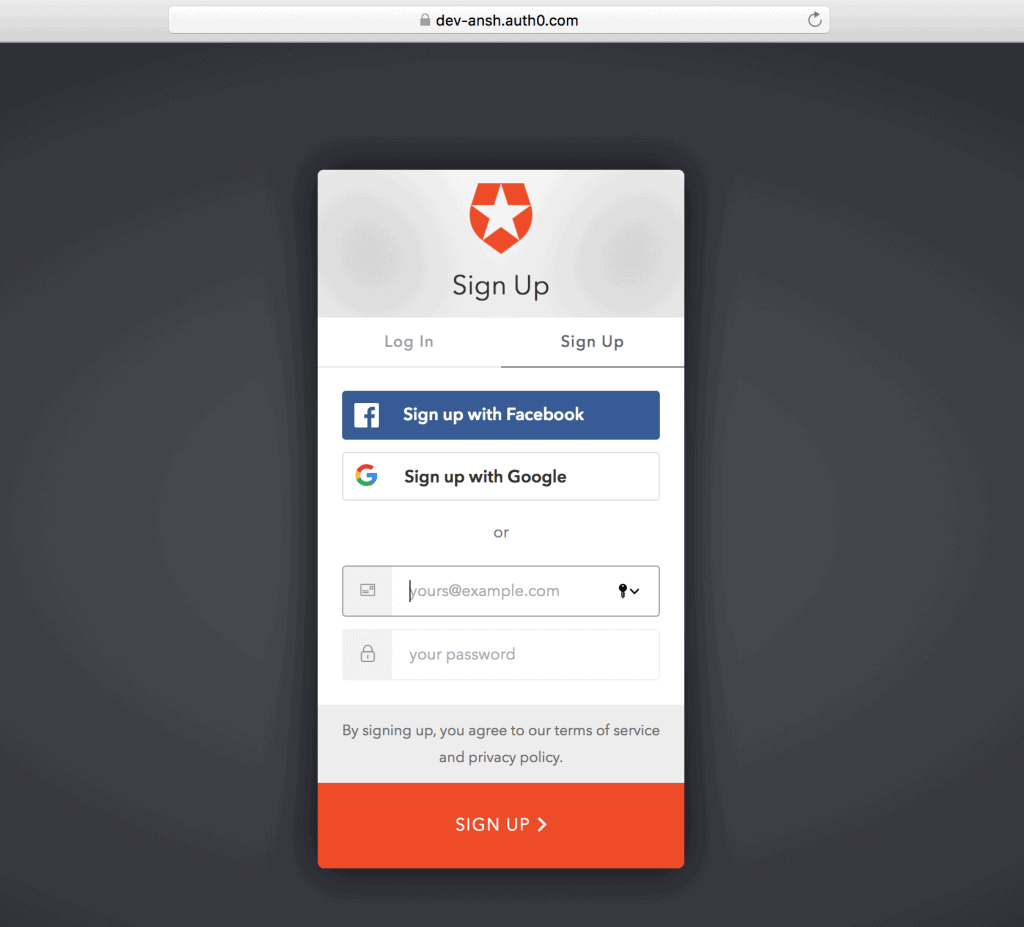
Also, we’ll find a “Sign Up” button (next to the “Log In”) on the default sign-in screen for self-registration.
另外,我们会在默认的签到屏幕上发现一个 “注册 “按钮(在 “登录 “旁边),用于自助注册。
6. Sign-Up
6. 报名
6.1. Self-Registration
6.1.自行登记
For the first time, we can create an Auth0 account by using the “Sign Up” button, and then providing information like email and password:
第一次,我们可以通过使用 “注册 “按钮创建一个Auth0账户,然后提供电子邮件和密码等信息。
6.2. Create a User
6.2.创建一个用户
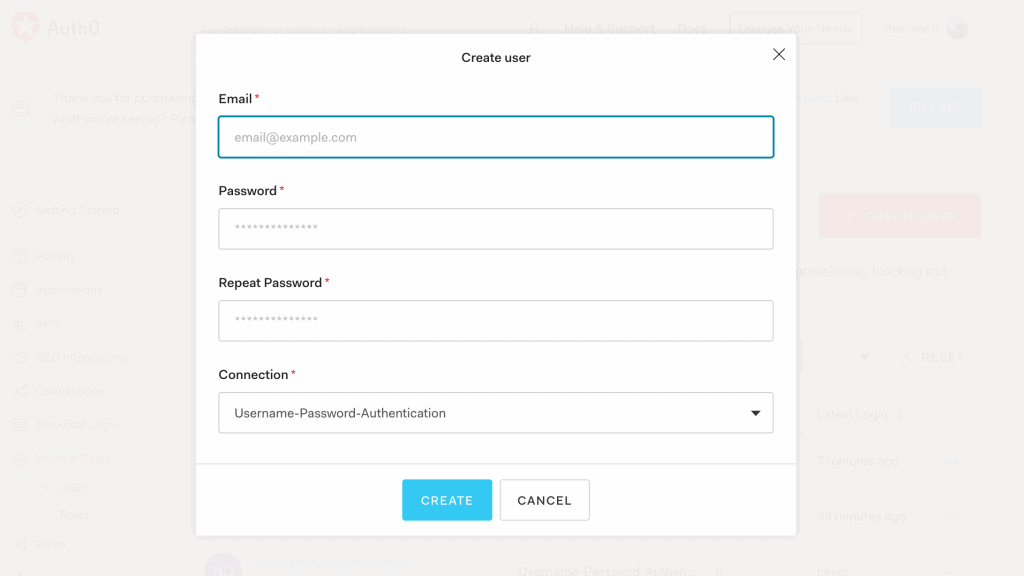
Or, we can create a new user from the Users menu in the Auth0 account:
或者,我们可以从Auth0账户的Users菜单中创建一个新用户。
6.3. Connections Settings
6.3.连接设置
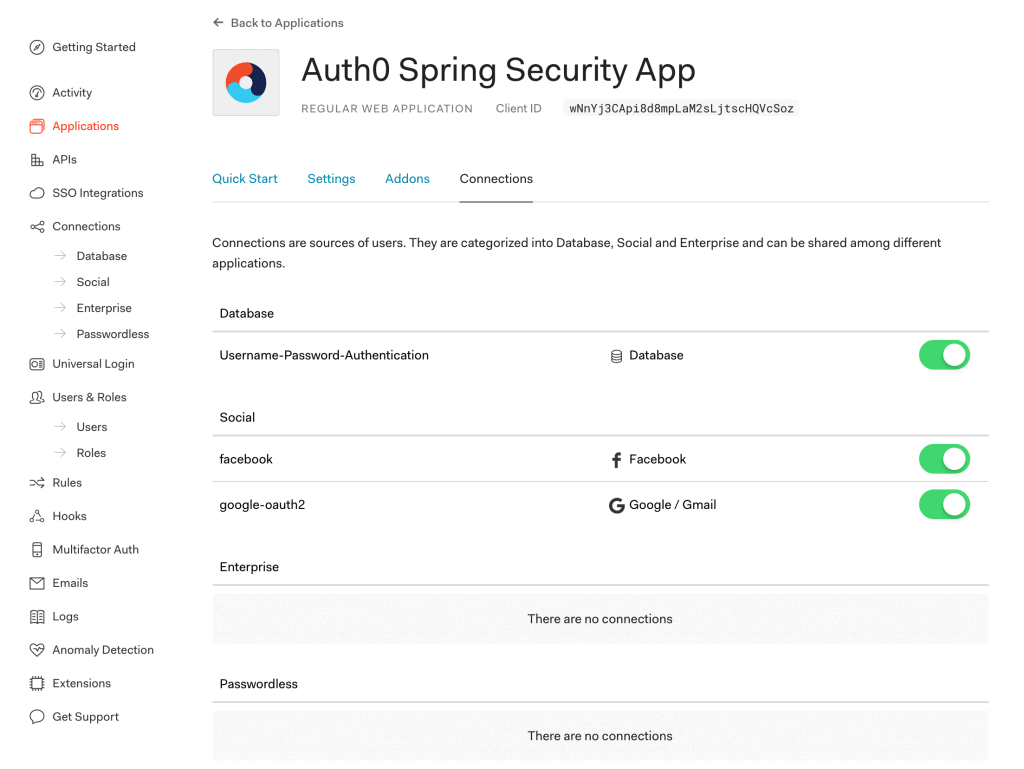
Additionally, we can choose various types of connections like Database and Social Login for Sign-Up/Sign-In to our Spring Boot App:
此外,我们还可以选择各种类型的连接,如数据库和社会登录,用于注册/签到我们的Spring Boot应用程序。
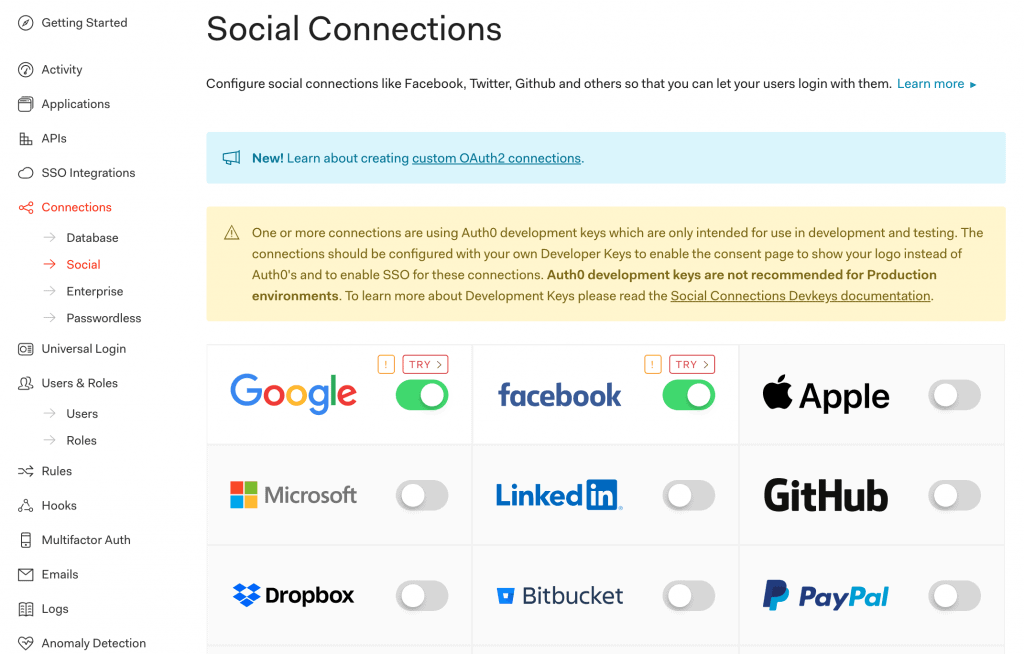
Further, a range of Social Connections are available to choose from:
此外,还有一系列的社会联系可供选择。
7. LogoutController
7.LogoutController
Now that we’ve seen login and callback features, we can add a logout feature to our Spring Boot App.
现在我们已经看到了登录和回调功能,我们可以为我们的Spring Boot应用程序添加注销功能。
Let’s create the LogoutController class implementing the LogoutSuccessHandler class:
让我们创建LogoutController类,实现LogoutSuccessHandler类。
@Controller
public class LogoutController implements LogoutSuccessHandler {
    @Autowired
    private AuthConfig config;

    @Override
    public void onLogoutSuccess(HttpServletRequest req, HttpServletResponse res,
      Authentication authentication) {
        if (req.getSession() != null) {
            req.getSession().invalidate();
        }
        String returnTo = "http://localhost:8080/";
        String logoutUrl = "https://dev-example.auth0.com/v2/logout?client_id=" +
          config.getClientId() + "&returnTo=" +returnTo;
        res.sendRedirect(logoutUrl);
    }
}
Here, the onLogoutSuccess method is overridden to call the /v2/logout Auth0 Logout URL.
这里,onLogoutSuccess方法被重载以调用/v2/logout Auth0 Logout URL。
8. Auth0 Management API
8.Auth0管理API
So far, we’ve seen Auth0 security integration in the Spring Boot App. Now, let’s interact with the Auth0 Management API (system API) in the same app.
到目前为止,我们已经看到Spring Boot应用程序中的Auth0安全集成。现在,让我们在同一个应用程序中与Auth0管理API(系统API)互动。
8.1. Create a New Application
8.1.创建一个新的应用程序
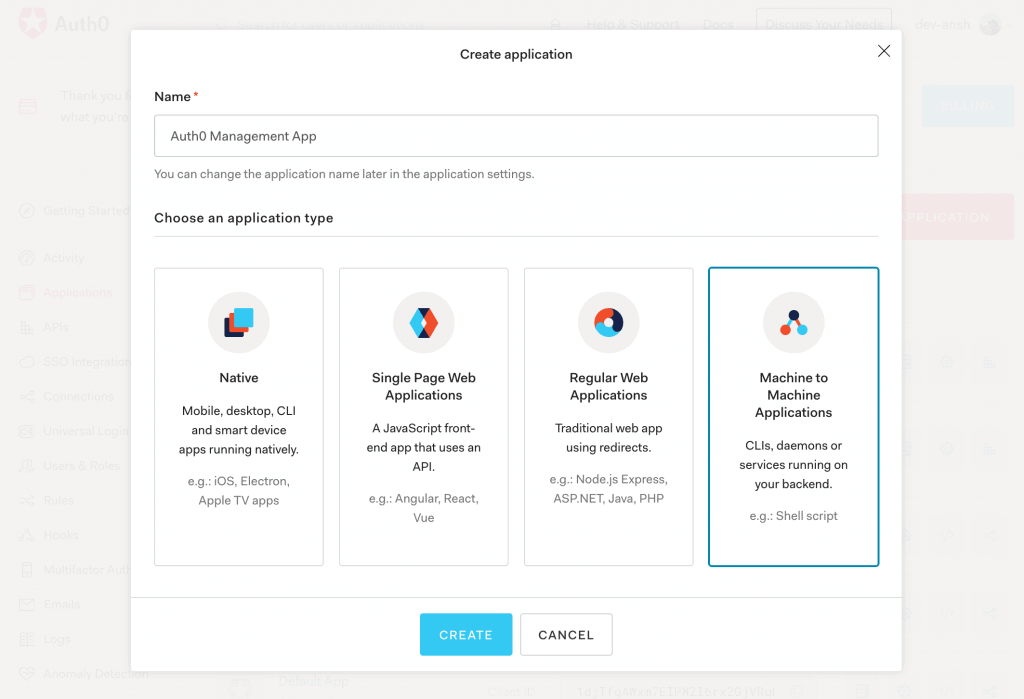
First, to access the Auth0 Management API, we’ll create a Machine to Machine Application in the Auth0 account:
首先,为了访问Auth0管理API,我们将在Auth0账户中创建一个机器对机器应用程序。
8.2. Authorization
8.2.授权
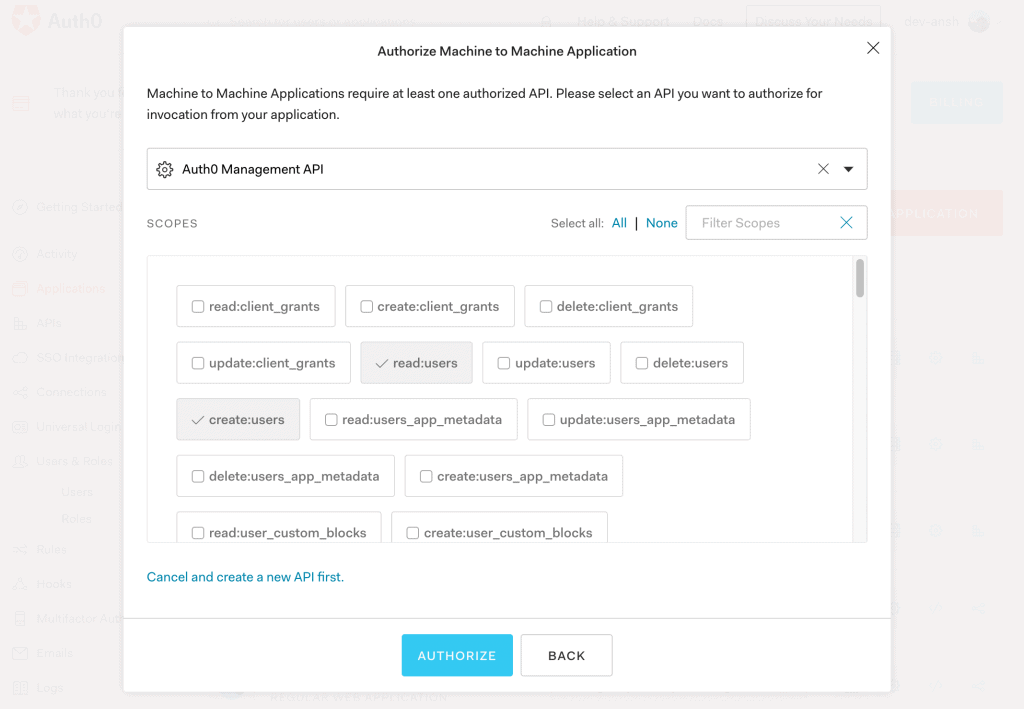
Then, we’ll add authorization to the Auth0 Management API with permissions to read/create users:
然后,我们将向Auth0管理API添加授权,并赋予读取/创建用户的权限。
8.3. Client Credentials
8.3.客户凭证
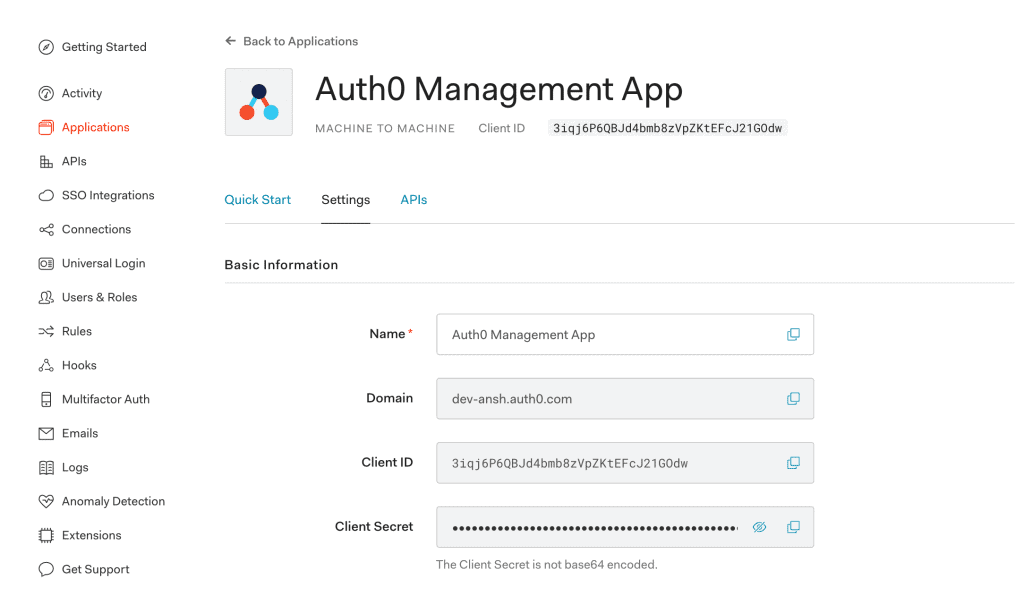
At last, we’ll receive Client Id and Client Secret to access the Auth0 Management App from our Spring Boot App:
最后,我们将收到Client Id和Client Secret,以便从我们的Spring Boot应用程序访问Auth0管理应用程序。
8.4. Access Token
8.4.访问令牌
Let’s generate an access token for the Auth0 Management App using client credentials received in the previous section:
让我们使用上一节中收到的客户凭证为Auth0管理应用程序生成一个访问令牌。
public String getManagementApiToken() {
    HttpHeaders headers = new HttpHeaders();
    headers.setContentType(MediaType.APPLICATION_JSON);

    JSONObject requestBody = new JSONObject();
    requestBody.put("client_id", "auth0ManagementAppClientId");
    requestBody.put("client_secret", "auth0ManagementAppClientSecret");
    requestBody.put("audience", "https://dev-example.auth0.com/api/v2/");
    requestBody.put("grant_type", "client_credentials");

    HttpEntity<String> request = new HttpEntity<String>(requestBody.toString(), headers);

    RestTemplate restTemplate = new RestTemplate();
    HashMap<String, String> result = restTemplate
      .postForObject("https://dev-example.auth0.com/oauth/token", request, HashMap.class);

    return result.get("access_token");
}
Here, we’ve made a REST request to the /oauth/token Auth0 Token URL to get the access and refresh tokens.
在这里,我们向/oauth/token Auth0 Token URL发出了一个REST请求,以获得访问和刷新令牌。
Also, we can store these client credentials in the application.properties file and read it using the AuthConfig class.
另外,我们可以将这些客户证书存储在application.properties文件中,并使用AuthConfig类读取。
8.5. UserController
8.5.UserController
After that, let’s create the UserController class with the users method:
之后,让我们用users方法创建UserController类。
@Controller
public class UserController {
    @GetMapping(value="/users")
    @ResponseBody
    public ResponseEntity<String> users(HttpServletRequest request, HttpServletResponse response) {
        HttpHeaders headers = new HttpHeaders();
        headers.setContentType(MediaType.APPLICATION_JSON);
        headers.set("Authorization", "Bearer " + getManagementApiToken());

        HttpEntity<String> entity = new HttpEntity<String>(headers);

        RestTemplate restTemplate = new RestTemplate();
        ResponseEntity<String> result = restTemplate
          .exchange("https://dev-example.auth0.com/api/v2/users", HttpMethod.GET, entity, String.class);
        return result;
    }
}
The users method fetches a list of all users by making a GET request to the /api/v2/users Auth0 API with the access token generated in the previous section.
users方法通过向/api/v2/users Auth0 API发出GET请求来获取所有用户的列表,并使用上一节中生成的访问令牌。
So, let’s access localhost:8080/users to receive a JSON response containing all users:
因此,让我们访问localhost:8080/users来接收一个包含所有用户的JSON响应。
[{
    "created_at": "2020-05-05T14:38:18.955Z",
    "email": "ansh@bans.com",
    "email_verified": true,
    "identities": [
        {
            "user_id": "5eb17a5a1cc1ac0c1487c37f78758",
            "provider": "auth0",
            "connection": "Username-Password-Authentication",
            "isSocial": false
        }
    ],
    "name": "ansh@bans.com",
    "nickname": "ansh",
    "logins_count": 64
    // ...
}]
8.6. Create User
8.6.创建用户
Similarly, we can create a user by making a POST request to the /api/v2/users Auth0 API:
同样地,我们可以通过向/api/v2/users Auth0 API发出POST请求来创建一个用户。
@GetMapping(value = "/createUser")
@ResponseBody
public ResponseEntity<String> createUser(HttpServletResponse response) {
    JSONObject request = new JSONObject();
    request.put("email", "norman.lewis@email.com");
    request.put("given_name", "Norman");
    request.put("family_name", "Lewis");
    request.put("connection", "Username-Password-Authentication");
    request.put("password", "Pa33w0rd");

    // ...
    ResponseEntity<String> result = restTemplate
      .postForEntity("https://dev-example.auth0.com/api/v2/users", request.toString(), String.class);
    return result;
}
Then, let’s access localhost:8080/createUser and verify the new user’s details:
然后,让我们访问localhost:8080/createUser并验证新用户的详细信息。
{
    "created_at": "2020-05-10T12:30:15.343Z",
    "email": "norman.lewis@email.com",
    "email_verified": false,
    "family_name": "Lewis",
    "given_name": "Norman",
    "identities": [
        {
            "connection": "Username-Password-Authentication",
            "user_id": "5eb7f3d76b69bc0c120a8901576",
            "provider": "auth0",
            "isSocial": false
        }
    ],
    "name": "norman.lewis@email.com",
    "nickname": "norman.lewis",
    // ...
}
Similarly, we can perform various operations like listing all connections, creating a connection, listing all clients, and creating a client using Auth0 APIs, depending on our permissions.
同样,我们可以根据我们的权限,使用Auth0 APIs执行各种操作,如列出所有连接、创建连接、列出所有客户和创建客户。
9. Conclusion
9.结语
In this tutorial, we explored Spring Security with Auth0.
在本教程中,我们探讨了Spring Security与Auth0。
First, we set up the Auth0 account with essential configurations. Then, we created a Spring Boot App and configured the application.properties for Spring Security integration with Auth0.
首先,我们用基本配置设置了Auth0账户。然后,我们创建了一个Spring Boot应用程序,并配置了application.properties,以便与Auth0进行Spring Security集成。
Next, we looked into creating an API token for the Auth0 Management API. Last, we looked into features like fetching all users and creating a user.
接下来,我们研究了为Auth0管理API创建一个API令牌。最后,我们研究了获取所有用户和创建用户等功能。
As usual, all the code implementations are available over on GitHub.
像往常一样,所有的代码实现都可以在GitHub上找到,。
