1. Overview
1.概述
In this tutorial, we’ll learn how to configure a default global security scheme and apply it as the default security requirement of the API using the springdoc-openapi library in a Spring MVC web application. Further, we’ll discuss how we can override these default security requirements.
在本教程中,我们将学习如何在Spring MVC Web应用程序中使用springdoc-openapi库配置默认的全局安全方案并将其作为API的默认安全要求。此外,我们将讨论如何覆盖这些默认安全要求。
The OpenAPI specification lets us define a set of security schemes for the API. We can configure the security requirements of the API globally or apply/remove them per endpoint.
OpenAPI规范让我们可以为API定义一套安全方案。我们可以在全局范围内配置API的安全要求,或者在每个端点应用/删除这些要求。
2. Setup
2.设置
As we are building a Maven project using Spring Boot, let’s explore the setup of the project. At the end of this section, we’ll have a simple web app.
由于我们正在使用Spring Boot构建一个Maven项目,让我们来探讨项目的设置。在本节结束时,我们将有一个简单的网络应用。
2.1. Dependencies
2.1. 依赖性
The example has two dependencies. The first dependency is the spring-boot-starter-web. This is the main dependency to build the web app:
这个例子有两个依赖项。第一个依赖是spring-boot-starter-web。这是构建Web应用的主要依赖项。
<dependency>
    <groupId>org.springframework.boot</groupId>
    <artifactId>spring-boot-starter-web</artifactId>
    <version>2.7.1</version>
</dependency>
The other dependency is the springdoc-openapi-ui, which is the library that will render the documentation of the API in HTML, JSON, or YAML:
另一个依赖是springdoc-openapi-ui,它是一个库,将以HTML、JSON或YAML的形式呈现API文档。
<dependency>
    <groupId>org.springdoc</groupId>
    <artifactId>springdoc-openapi-ui</artifactId>
    <version>1.6.9</version>
</dependency>
2.2. Application Entry Point
2.2.应用程序入口点
Once the dependencies are ready, let’s define the entry point for the application.
一旦依赖关系准备好了,让我们来定义应用程序的入口点。
We’ll use the @SpringBootApplication annotation to bootstrap the app and the SpringApplication helper class to launch it:
我们将使用@SpringBootApplication annotation来引导应用程序,并使用SpringApplication helper类来启动它。
@SpringBootApplication
public class DefaultGlobalSecuritySchemeApplication {
    public static void main(String[] args) {
        SpringApplication.run(DefaultGlobalSecuritySchemeApplication.class, args);
    }
}
3. springdoc-openapi Base Configuration
3.springdoc-openapi 基本配置
Once we have the Spring MVC configured, let’s look at the API semantic information.
一旦我们配置好了Spring MVC,我们就来看看API的语义信息。
We’ll define the default global security scheme and the API metadata by adding springdoc-openapi annotations to the DefaultGlobalSecuritySchemeApplication class. To define the global security scheme, we’ll use the @SecurityScheme annotation:
我们将通过向springdoc-openapi注解添加DefaultGlobalSecuritySchemeApplicationclass来定义默认的全球安全方案和API元数据。为了定义全局安全方案,我们将使用@SecurityScheme注解。
@SecurityScheme(type = SecuritySchemeType.APIKEY, name = "api_key", in = SecuritySchemeIn.HEADER)We’ve chosen an APIKEY security scheme type, but we could configure other security schemes, for instance, JWT. After defining the security scheme, we’ll add the metadata and establish the default security requirement for the API. We do this using the @OpenApiDefinition annotation:
我们选择了一个APIKEY安全方案类型,但我们可以配置其他安全方案,例如JWT。在定义了安全方案之后,我们将添加元数据并为API建立默认的安全要求。我们使用@OpenApiDefinition注解来完成这项工作。
@OpenAPIDefinition(info = @Info(title = "Apply Default Global SecurityScheme in springdoc-openapi", version = "1.0.0"), security = { @SecurityRequirement(name = "api_key") })Here, the info attribute defines the API metadata. Furthermore, the security attribute determines the default global security requirements.
这里,info属性定义了API元数据。此外,security属性确定了默认的全球安全要求。
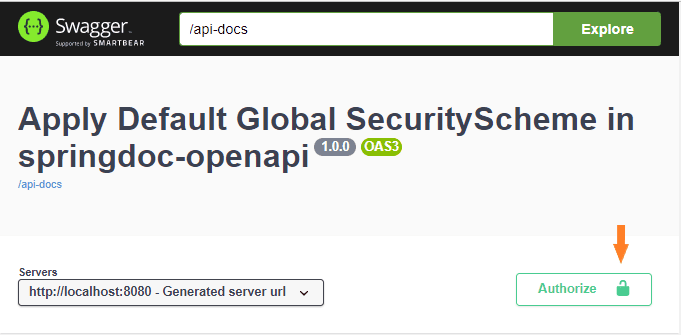
Let’s see what the HTML documentation will look like with the annotations. We’ll see the metadata and a security button that will apply to the whole API:
让我们看看带有注释的HTML文档会是什么样子。我们将看到元数据和一个安全按钮,它将适用于整个API。
4. Controllers
4.控制员
Now that we have configured the Spring framework and the springdoc-openapi library, let’s add one REST controller to the context base path. To achieve this, we’ll use the @RestController and @RequestMapping annotations:
现在我们已经配置了Spring框架和springdoc-openapi库,让我们在上下文基本路径中添加一个REST控制器。为了实现这一目标,我们将使用@RestController和@RequestMapping注释。
@RestController
@RequestMapping("/")
public class DefaultGlobalSecuritySchemeOpenApiController {
    ...
}
After that, we’ll define two endpoints or paths.
之后,我们将定义两个端点或路径。
The first endpoint will be the /login endpoint. It’ll receive the user credentials and authenticate the user. If the authentication succeeds, the endpoint will return a token.
第一个端点将是/login端点。它将接收用户凭证,并对用户进行认证。如果认证成功,该端点将返回一个令牌。
The other endpoint of the API is the /ping endpoint and requires the token generated by the /login method. Before performing the request, the method validates the token and checks if the user is authorized.
API的另一个端点是/ping端点,需要由/login方法生成的token。在执行请求之前,该方法会验证令牌,并检查用户是否被授权。
In summary, the /login endpoint authenticates the user and provides a token. The /ping endpoint receives the token returned by the /login endpoint and checks that it’s valid and that the user can perform the operation.
总之,/login端点对用户进行认证并提供一个令牌。/ping端点接收由/login端点返回的令牌,并检查它是否有效,用户是否可以执行操作。
4.1. login() Method
4.1. login()方法
This method won’t have any security requirements. Therefore, we need to override the default security requirement configuration.
这个方法不会有任何安全要求。因此,我们需要覆盖默认的安全要求配置。
First of all, we need to tell Spring that this is an endpoint of our API, so we’ll add the annotation @RequestMapping to configure the endpoint:
首先,我们需要告诉Spring这是我们的API的一个端点,所以我们将添加注解@RequestMapping来配置这个端点。
@RequestMapping(method = RequestMethod.POST, value = "/login", produces = { "application/json" }, consumes = { "application/json" })After that, we need to add semantic information to the endpoint. So we’ll use the @Operation and @SecurityRequirements annotations. The @Operation will define the endpoint and the @SecurityRequirements will define the specific set of security requirements that applies to the endpoint:
之后,我们需要向端点添加语义信息。所以我们将使用@Operation和@SecurityRequirements注释。@Operation将定义端点,@SecurityRequirements将定义适用于该端点的特定安全要求集。
@Operation(operationId = "login", responses = {
    @ApiResponse(responseCode = "200", description = "api_key to be used in the secured-ping endpoint", content = { @Content(mediaType = "application/json", schema = @Schema(implementation = TokenDto.class)) }),
    @ApiResponse(responseCode = "401", description = "Unauthorized request", content = { @Content(mediaType = "application/json", schema = @Schema(implementation = ApplicationExceptionDto.class)) }) })
@SecurityRequirements()
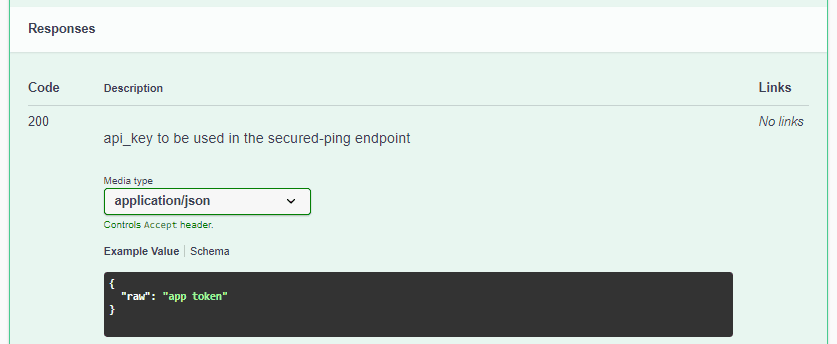
For instance, here’s the HTML documentation for the response with status code 200:
例如,这里是状态代码为200的响应的HTML文档。
Finally, let’s see the login() method’s signature:
最后,让我们看看login()方法的签名。
public ResponseEntity login(@Parameter(name = "LoginDto", description = "Login") @Valid @RequestBody(required = true) LoginDto loginDto) {
    ...
}
As we can see, the body of the API request receives a LoginDto instance. We also must decorate the DTOs with semantic information to display the information in the documentation:
我们可以看到,API请求的主体收到了一个LoginDto实例。我们还必须用语义信息来装饰DTO,以便在文档中显示这些信息。
public class LoginDto {
    private String user;
    private String pass;

    ...

    @Schema(name = "user", required = true)
    public String getUser() {
        return user;
    }

    @Schema(name = "pass", required = true)
    public String getPass() {
        return pass;
    }
}
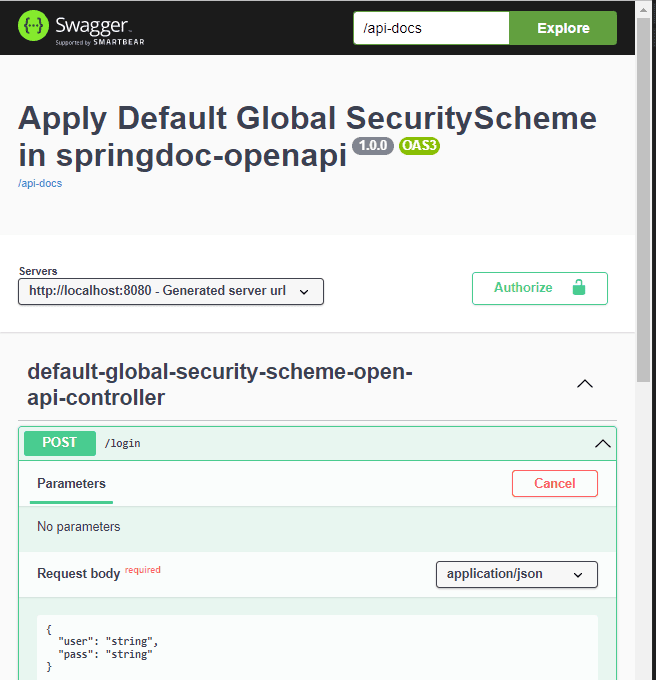
Here we can see what the /login endpoint HTML documentation will look like:
在这里,我们可以看到/login端点的HTML文档会是什么样子。
4.2. ping() Method
4.2.ping()方法
At this point, we’ll define the ping() method. The ping() method will use the default global security scheme:
在这一点上,我们将定义ping()方法。ping()方法将使用默认的全球安全方案。
@Operation(operationId = "ping", responses = {
    @ApiResponse(responseCode = "200", description = "Ping that needs an api_key attribute in the header", content = {
        @Content(mediaType = "application/json", schema = @Schema(implementation = PingResponseDto.class), examples = { @ExampleObject(value = "{ pong: '2022-06-17T18:30:33.465+02:00' }") }) }),
    @ApiResponse(responseCode = "401", description = "Unauthorized request", content = { @Content(mediaType = "application/json", schema = @Schema(implementation = ApplicationExceptionDto.class)) }),
    @ApiResponse(responseCode = "403", description = "Forbidden request", content = { @Content(mediaType = "application/json", schema = @Schema(implementation = ApplicationExceptionDto.class)) }) })
@RequestMapping(method = RequestMethod.GET, value = "/ping", produces = { "application/json" })
public ResponseEntity ping(@RequestHeader(name = "api_key", required = false) String api_key) {
    ...
}
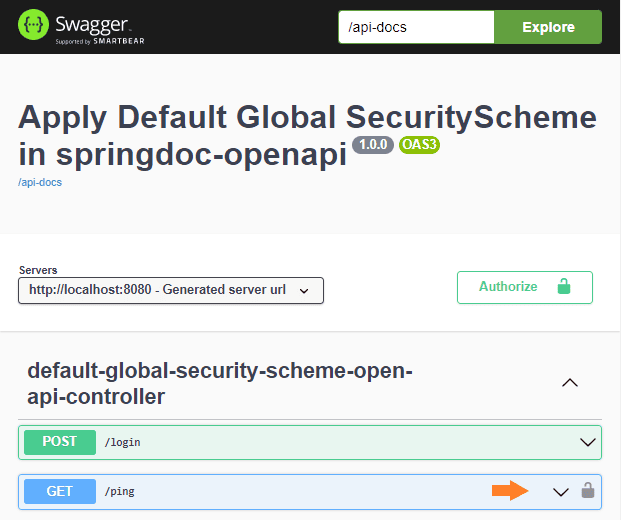
The main difference between the login() and ping() methods is in the security requirement that will be applied. The login() won’t have any security requirement at all, but the ping() method will have the security defined at the API level. So, the HTML documentation will represent the situation showing a lock only for the /ping endpoint:
login()和ping()方法的主要区别在于将应用的安全要求。login()完全没有任何安全要求,但是ping()方法将在API级别定义安全。因此,HTML文档将表示只为/ping端点显示锁的情况。
5. REST API Documentation URLs
5.REST API文档URLs
At this point, we have the Spring MVC web app ready, and we can start the server:
在这一点上,我们已经准备好了Spring MVC网络应用,我们可以启动服务器。
mvn spring-boot:run -Dstart-class="com.baeldung.defaultglobalsecurityscheme.DefaultGlobalSecuritySchemeApplication"Once the server is ready, we can see the HTML documentation, as shown in the previous examples, at the http://localhost:8080/swagger-ui-custom.html URL.
一旦服务器准备好了,我们就可以看到HTML文档,如前面的例子所示,在http://localhost:8080/swagger-ui-custom.html URL。
The JSON version of the API definition is found at http://localhost:8080/api-docs and the YAML version at http://localhost:8080/api-docs.yaml.
API定义的JSON版本在http://localhost:8080/api-docs,YAML版本在http://localhost:8080/api-docs.yaml。
These outputs can be used to build clients or servers of the API in different languages using the swagger-codegen-maven-plugin.
这些输出可用于使用swagger-codegen-maven-plugin构建不同语言的API的客户端或服务器。
6. Conclusion
6.结语
In this article, we’ve learned how to use the springdoc-openapi library to define a default global security scheme. Also, we saw how to apply it as the default security requirement to the API. Furthermore, we’ve learned how to change the default security requirement for a particular endpoint.
在这篇文章中,我们已经学会了如何使用springdoc-openapi库来定义一个默认的全局安全方案。另外,我们还看到了如何将其作为默认的安全要求应用到API中。此外,我们还学习了如何为一个特定的端点改变默认的安全要求。
Another thing we’ve discovered is that we can automate code generation using the JSON and YAML outputs from the springdoc-openapi.
我们发现的另一件事是,我们可以使用springdoc-openapi的JSON和YAML输出来自动生成代码。
As usual, the complete source code for this article is available over on GitHub.
像往常一样,本文的完整源代码可在GitHub上获得。


