1. Overview
1.概述
In this tutorial, we’ll learn how to add an image to a cell in an Excel file with Java.
在本教程中,我们将学习如何用Java向Excel文件中的单元格添加图像。
We’ll create an Excel file dynamically and add an image to the cell, using apache-poi.
我们将动态地创建一个Excel文件,并在单元格中添加一个图像,使用apache-pai.。
2. Project Setup and Dependencies
2.项目设置和依赖性
Java applications can use apache-poi to read, write, and modify the contents of an Excel spreadsheet dynamically. It supports both .xls and .xlsx Excel formats.
Java应用程序可以使用apache-poi来动态地读、写和修改Excel电子表格的内容。它同时支持.xls和.xlsx Excel格式。
2.1. Maven Dependency for Apache Poi API
2.1.Apache Poi API的Maven依赖项
First, let’s add the poi dependency to our project:
首先,让我们把poi依赖性添加到我们的项目。
<dependency>
    <groupId>org.apache.poi</groupId>
    <artifactId>poi</artifactId>
    <version>3.15</version>
</dependency>
2.2. Excel Workbook Creation
2.2.创建Excel工作簿
Workbook workbook = new XSSFWorkbook();
Sheet sheet = workbook.createSheet("Avengers");
Row row1 = sheet.createRow(0);
row1.createCell(0).setCellValue("IRON-MAN");
Row row2 = sheet.createRow(1);
row2.createCell(0).setCellValue("SPIDER-MAN");
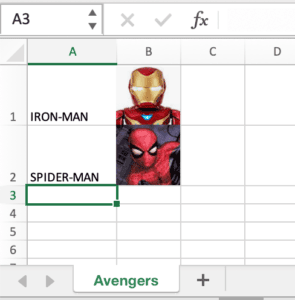
Here, we’ve created an Avengers sheet and filled the A1 and A2 cells with two names. Next, we’ll add the Avengers’ images to cells B1 and B2.
在这里,我们已经创建了一个Avengers表,并在A1和A2单元格中填入了两个名字。接下来,我们将在B1和B2单元格中添加复仇者联盟的图片。
3. Insert Image in the Workbook
3.在工作簿中插入图片
3.1. Read Image From Local File
3.1.从本地文件读取图像
To add the images, we’ll first need to read them from our project directory. For our project, we have two images in the resources directory:
要添加图片,我们首先需要从我们的项目目录中读取它们。对于我们的项目,我们在resources目录下有两个图像。
- /src/main/resources/ironman.png
- /src/main/resources/spiderman.png
InputStream inputStream1 = TestClass.class.getClassLoader()
    .getResourceAsStream("ironman.png");
InputStream inputStream2 = TestClass.class.getClassLoader()
    .getResourceAsStream("spiderman.png");
3.2. Convert Image InputStream Into a Byte Array
3.2.将图像InputStream转换成一个字节数组
Next, let’s convert the images into byte arrays. Here, we’ll use IOUtils from apache-poi:
接下来,让我们把图像转换为字节数组。这里,我们将使用IOUtils,来自apache-poi。
byte[] inputImageBytes1 = IOUtils.toByteArray(inputStream1);
byte[] inputImageBytes2 = IOUtils.toByteArray(inputStream2);
3.3. Add Picture in the Workbook
3.3.在工作簿中添加图片
Now, we’ll use the byte array to add a picture to our workbook. The supported picture types are PNG, JPG, and DIB. We’re using PNG here:
现在,我们将使用字节数组向我们的工作簿添加一张图片。 支持的图片类型是PNG、JPG和DIB。我们在这里使用PNG。
int inputImagePictureID1 = workbook.addPicture(inputImageBytes1, Workbook.PICTURE_TYPE_PNG);
int inputImagePictureID2 = workbook.addPicture(inputImageBytes2, Workbook.PICTURE_TYPE_PNG);
As a result of this step, we’ll obtain an index of each picture that we’ll use for creating Drawing objects.
通过这一步,我们将获得每张图片的索引,我们将用来创建Drawing对象。
3.4. Create a Drawing Container
3.4.创建一个绘图容器
The drawing patriarch is the top-level container for all shapes. This will return a Drawing interface – in our case, the XSSFDrawing object. We’ll use this object to create pictures that we will put into our defined cell.
绘图元老是所有形状的最高级别容器。这将返回一个Drawing接口 – 在我们的例子中,是XSSFDrawing对象。我们将使用这个对象来创建图片,并将其放入我们定义的单元中。
Let’s create the drawing patriarch:
让我们创造出画中的元老。
XSSFDrawing drawing = (XSSFDrawing) sheet.createDrawingPatriarch();4. Add Image in a Cell
4.在单元格中添加图片
Now, we’re ready to add the images into our cells.
现在,我们准备将图像添加到我们的单元格中。
4.1. Create Anchor Object
4.1.创建锚点对象
First, we’ll create a client anchor object, which is attached to an Excel worksheet and is used to set the position of the image in an Excel sheet. It anchors against a top-left and bottom-right cell.
首先,我们将创建一个客户锚定对象,它连接到Excel工作表,用于设置图像在Excel工作表中的位置。它锚定在左上角和右下角的单元格中。
We’ll create two anchor objects, one for each image:
我们将创建两个锚点对象,每个图像一个。
XSSFClientAnchor ironManAnchor = new XSSFClientAnchor();
XSSFClientAnchor spiderManAnchor = new XSSFClientAnchor();
Next, we need to specify the relative positions of the images to our anchor objects.
接下来,我们需要指定图像与我们的锚点对象的相对位置。
Let’s place our first image in cell B1:
让我们把第一张图片放在B1单元格中。
ironManAnchor.setCol1(1); // Sets the column (0 based) of the first cell.
ironManAnchor.setCol2(2); // Sets the column (0 based) of the Second cell.
ironManAnchor.setRow1(0); // Sets the row (0 based) of the first cell.
ironManAnchor.setRow2(1); // Sets the row (0 based) of the Second cell.
In the same way, we’ll place the second image in cell B2:
以同样的方式,我们将把第二张图片放在B2单元格中。
spiderManAnchor.setCol1(1);
spiderManAnchor.setCol2(2);
spiderManAnchor.setRow1(1);
spiderManAnchor.setRow2(2);
4.2. Add Anchor Object and Picture Index to Drawing Container
4.2.在绘图容器中添加锚点对象和图片索引
drawing.createPicture(ironManAnchor, inputImagePictureID1);
drawing.createPicture(spiderManAnchor, inputImagePictureID2);
5. Save Workbook
5.保存工作簿
Before we save, let’s make sure the cells are wide enough for the pictures we’ve added by using autoSizeColumn:
在我们保存之前,让我们通过使用autoSizeColumn确保单元格的宽度足以容纳我们所添加的图片。
for (int i = 0; i < 3; i++) {
    sheet.autoSizeColumn(i);
}
Finally, let’s save the workbook:
最后,让我们保存该工作簿。
try (FileOutputStream saveExcel = new FileOutputStream("target/baeldung-apachepoi.xlsx")) {
    workbook.write(saveExcel);
}
The resulting Excel sheet should look like this:
由此产生的Excel表格应该是这样的。
6. Conclusion
6.结语
In this article, we learned how to add an image to the cell of an Excel worksheet in Java using the apache-poi library.
在这篇文章中,我们学习了如何使用apache-poi库在Java中向Excel工作表的单元格添加图片。
We needed to load the image, convert it into bytes, attach it to the sheet, and then use the drawing tools to locate the image in the correct cells. Finally, we were able to resize the columns and save our workbook.
我们需要加载图像,将其转换为字节,将其附加到工作表中,然后使用绘图工具将图像定位到正确的单元格中。最后,我们能够调整列的大小并保存我们的工作簿。
As always, the example code for this article is available over on GitHub.
像往常一样,本文的示例代码可在GitHub上获得。
